


We create passwords on our accounts and devices to ensure that no one else can use it. We create passwords on our mobile devices, on websites, and even on computers. If you have iOS devices, passwords are usually called passcodes. You can erase your device with recovery mode to remove your passcode within it.
As such, if you forgot your passcode, you can remove it through the recovery mode. Apple even has its own support page on how to do that.
Here, we will discuss how to delete system storage of your iPhone using the recovery mode. Included in this article, are tools you can use to remove passcodes permanently. In this way, you can take advantage of a second-hand iPhone.
Contents Guide Part #1: How to Erase Your Device with Recovery Mode to Remove Your PasscodePart #2: Best Alternative to Easily Remove iPhone Passcode with Recovery ModePart #3: Conclusion
Part #1: How to Erase Your Device with Recovery Mode to Remove Your Passcode
If you have placed the wrong passcode within the lock screen of your iPhone multiple times, the device will show an alert that it’s already disabled. But what if you have lost or forgotten the passcode? What you can do is use the help of a macOS or Windows PC to open iPhone within recovery mode.
The said mode will enable you to delete the entire contents of the iPhone. In this way, you can set the iPhone as a new device with a new passcode. Or, you can even restore from iCloud or computer backup. If the iPhone isn’t backed up, you can simply set up a new iPhone device. After that, you can download images, videos, and other data that are saved within your iCloud account.
Here’s how to do that:
Step #1: Prepare Your Equipment
First, you have to ensure that you have a Windows or a macOS computer. For Windows, you have to install the latest version of iTunes. You also need the lightning cable (or any USB cable) that came with your device. Or, you can use anything compatible with it. You can even borrow a computer from a retail store authorized by Apple or a service provider legitimized by Apple to provide customer or technical support.
Step #2: Shut iPhone Down
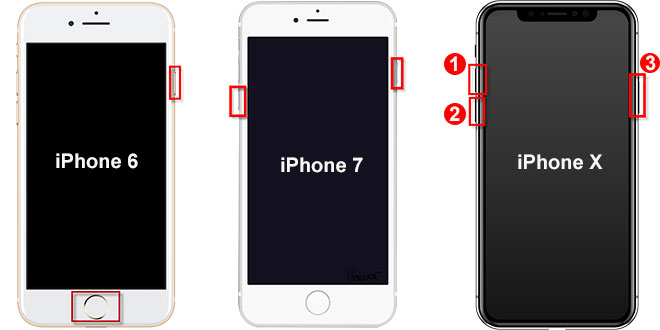
Now, you have to ensure that the iPhone is not connected to the computer first. You have to turn your iPhone off using various steps that will depend on your device model.
- For iPhone 8 Plus, iPhone 8, iPhone SE 2nd Generation, iPhone SE 3rd Generation, iPhone X versions, and later, do the following:
- Press the two buttons together. Do this until the shutdown slider will show up. These two buttons are the Volume Down AND side buttons.
- For iPhone 6, iPhone 6s, iPhone 7 Plus, and iPhone 7:
- Press the side button and hold this press until the slider for shutting down the iPhone shows up.
- For iPhone S, 1st generation iPhone SE, and other earlier iPhone models:
- Press its top button. After that, you must hold this press till the shut-down slider will show up.
Once the slider for turning off the iPhone appears, drag it in the respective direction in order to turn it off completely.
Step #3: Open Your iPhone Using Recovery Mode
Now, in this following step, you have to put your iPhone into the said recovery mode. This will enable you to erase your device with recovery mode to remove your passcode, if necessary. To do that, you have to press the right buttons depending on the device you’re using:
- For iPhone 8 Plus, iPhone 8, iPhone SE 2nd Generation, iPhone SE 3rd Generation, iPhone X versions, and later: Get ready to hold the side button.
- For iPhone 7 Plus and iPhone 7: Get ready to hold the button for Volume Down.
- For 1st generation iPhone SE and the iPhone model 6s, and earlier device versions: Get ready to hold the button for Home.
Now, once you’re ready with pressing the right buttons, here’s what you should do next. You should press and then hold that press on the button. Once you are doing that, you should connect the iPhone to the computer using the USB cable.
While you are doing this, you must ensure that you’re still pressing the said button. Now, you must hold the press that button. Do this until the iPhone goes to recovery mode. You will see the iPhone display a screen for recovery mode. After that, let go of the press of the respective button.
But if the wrong screen appears, which is typically your passcode, you must do it all over again. Repeat the right steps to put your iPhone into the said recovery mode.
Step #4: iPhone Restore Process
On your computer, you must locate the iPhone within iTunes (if you’re using Windows) and within Finder (if you’re using macOS). Typically, it is on the left-hand side of the interface of Finder or iTunes. Once you have located it, select the label that says Restore. Now, the restoration process will begin. It will start by downloading the right software for the device.
However, if the process of downloading this software will be over 15 minutes and the device begins to shut off of recovery mode, you should just wait for the download process to complete. After that, shut the iPhone off. You can simply restart the steps and then wait for the entire restoration process to complete. Once that is done, you can simply unlink the iPhone from the computer. Then, you can set it up as a new device or you can set it up from a backup file.
Note: This approach only works if you have previously synchronized your iPhone with iTunes. If this is your first time syncing, your iPhone will ask you to trust this computer, which will require you to unlock your device with a passcode. If you don't meet this condition, head to Part 2 for an alternative method for removing the iPhone passcode.
Part #2: Best Alternative to Easily Remove iPhone Passcode with Recovery Mode
Here, we will discuss how to erase your device and its passcode if you’re locked out of it. If you have forgotten the password or if you can’t contact the previous owner of the device, this will be very useful.
There are multiple unlocking tools out there. But here, we will be talking about the most powerful and reliable option. For that, you will need iOS Unlocker. This software is used to remove passcodes to unlock iPhones. You can also use it to remove the Screen Time lock code, Apple ID, and iCloud account.
The great thing about iOS Unlocker is it works for a lot of iOS device models. In addition, it has a high success rate to help you recover your iPhone and gain full control over its use.
Before we talk about how to erase the passcode, you should take note of the following:
- When the passcode removal process is done, all data within your iPhone will be removed.
- The passcode removal procedure will update the iPhone to the latest version of its operating system.
- During the entire process, the iPhone must be linked to the computer. Do not remove or use it.
So, simply follow the steps below so you don’t have to erase your device with recovery mode to remove your passcode :
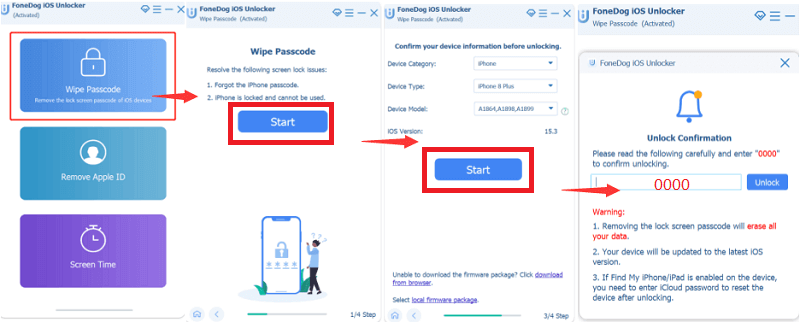
- First, you have to download, install, and launch iOS Unlocker in your computer. It is available in both macOS and Windows PCs.
- In the main interface, there are three modes to choose from. In this case, you have to select the mode called Wipe Passcode.
- Now, you have to press the button called Start.
- Connect the iPhone to the computer using the USB cable. Ensure that you will “Trust ” that computer with your iPhone.
- Information about your connected iPhone will be shown. You have to make sure these are correct. Once that is done, click Start.
- You have to wait since the download process will begin. The firmware package that you need will be grabbed online. Once complete, press the button for Unlock. Type in “0000 ” without the quotes in order to confirm the unlock process. Wait for a few minutes until the passcode is wiped out.
- Now, you can unlink the iPhone from the computer easily.
As you can see, iOS Unlocker is a very powerful tool. You can even use it to remove Apple IDs and their associated iCloud account. In this way, you can use a second-hand iOS device just like you would a new one!
People Also ReadHow To Put iPhone In Recovery Mode Without ComputerWhat To Do When Your iPad Is Stuck in Recovery Mode? 3 Solutions to Try
Part #3: Conclusion
This article is about how to erase your device with recovery mode to remove your passcode from the iPhone. You can do that if you know how to put your device in recovery mode. Fortunately, we gave you the actual steps to do it with different models of the iPhone.
After that, we taught you how to remove the passcode, in case the recovery mode process doesn’t work. In this section, we talked about iOS Unlocker. This tool can help you remove passcodes, Apple IDs, screen-time passwords, and iCloud accounts from second-hand devices.
The tool is very powerful and has a high rate of success. As such, it is used by a lot of iOS consumers around the world. Once you get the free trial, you will realize the reliability and practicality of this tool. You can grab it today at ios-unlocker. Get the tool today and have full control of your iOS device without limits!
Written By Rosie
Last updated: 2022-03-01