- The Mac device will not start up.
- An external device you’re connecting to your Mac will not work.
- Your applications within the Mac devices quit unexpectedly.
- You have files that are corrupted.
- It is required for you to mount or unmount a disk.
- You need to eject a disk.
...
In such circumstances, you'd better learn how to use Disk Utility on Mac to successfully solve your problems.
Part I: 6 Things You Can Do With Mac’s Disk UtilityPart II: Things You Should Know About Mac’s Disk UtilityPart III: How To Protect Your Disk From FailingPart IV. Conclusion
Part I: 6 Things You Can Do With Mac’s Disk Utility
There are multiple things you can do with Mac’s Disk Utility. These are shown below:
01: Utilizing Disk Utility To Discover If You Have A Faulty Disk
Think you have a specific problem with your internal drive or with external devices for storage? What you can do is utilize the First Aid element of Disk Utility in order to check it. The feature First within Disk Utility will implement checks. When these checks are done, it is able to detect if there are issues with disks. It will repair it as well.

You have to remember that Disk Utility was overhauled in the Mac operating system El Capitan. That’s why, with El Capitan, the method of repairing disks has slightly changed. The method and the steps you need to follow vary from one operating system to the next. In this article, we are assuming that you are using an operating system higher than that of OS X El Capitan.
Here are the steps you can follow in order to launch First Aid within your Mac device and be able to check if problems persist within the disk:
Step 01 - Launch Disk Utility.
Step 02 - Go to the sidebar.
Step 03 - Choose the device which you think has the problem.
Step 04 - Press First Aid.
Step 05 - Disk Utility will now perform a check of the different partition maps within the disk. Each volume will be checked. If you operate First Aid within only a single volume, Disk Utility will simply verify the various contents of that single volume.
Now, if First Aid detects a specific problem with that disk, Disk Utility will do its best to fix it. However, if Disk Utility states that the volume or disk is nearly failing, it is necessary for you to make a backup and then replace it. Disk Utility is unable to repair this type of problem. On the other hand, if Disk Utility states OK, it means no problem persists within the disk.
02: Repairing Disks Using Disk Utility
The method you use to repair a specific disk is dependent on whether that disk is the startup disk of your Mac or whether the disk is a separate one plugged into the Mac device. The startup disk is the one that contains the operating system and is where the Mac device runs from.
If the disk is your Startup one, go to the next section.
Step 01 - Go to Applications.
Step 02 - Go To Utilities.
Step 03 - Launch Disk Utility.
Step 04 - Choose the specific volume you want to run on First Aid. This volume can be from an external storage drive. However, if it is a hard drive within your Mac, you should go toward the next part.
Step 05 - Press First Aid.
Step 06 - Press Run. This will begin the processes of verification and repair.
Step 07 - After Disk Utility has finished running all its checks, the status will be displayed on a drop-down sheet. You can press the triangle located at the bottom in order to check out more information.
Step 08 - A specific green tick will be displayed at the top part of the drop-down sheet if no errors have been found.
Step 09 - If errors have been discovered, Disk Utility will try to repair them. However, in older versions of the operating system, you manually select Repair Disk to do so.
But what if Disk Utility cannot repair the actual drive? Or, what if it states that the disk it checked is almost failing? Well, what you have to do is to back your data up immediately. This is because you might lose all the data in your drive if it fails.
03: Repairing Startup Disks Or Boot Disks Using Disk Utility
Follow the steps above in order to run the First Aid tool on your drive for a startup. But, with startup drives, Disk Utility is not able to repair problems with it. If you wish to fix the startup drive of your Mac, you cannot do so. This is because Disk Utility doesn’t have the ability to repair volumes that are mounted. When we say mounted, we’re referring to the drive where everything runs from. In older Disk Utility versions, the option to Repair the Disk will be colored grey.
What you have to do is to start your Mac device in Recovery Mode. After which, you repair the drive from that mode. When you do it this way, your Mac will run from the HD volume of Recovery. This volume was made during the installation process of your Mac’s operating system. But, you have to remember that if you currently have Fusion Drives, things will be more complicated.
Step 01 - Start your Mac up and hit the keys Command + R while doing so. This will open the Mac in Recovery Mode.
Step 02 - Once the Mac device boots up, the screen will pop up Utilities. Select Disk Utility.
Step 03 - Choose the specific disk you want to fix.
Step 04 - Press First Aid.
Step 05 - Disk Utility will now run various checks and if it detects a problem, it will try to repair it. Wait for the entire process to be complete.
04: Repairing Disk Permissions
When OS X El Capitan was introduced, the feature to repair disk permissions was removed. This move possibly states that repairing disk permissions is not a good thing. But, repairing permissions can still be done by utilizing Terminal.
However, we won’t delve into much detail here. It’s because we’re going with Apple’s choice of not doing so. We will assume that repairing disk permissions won’t do good to your device. On that note, it might even cause more harm to Mac devices.
But, if you are utilizing the Yosemite (or previous versions) operating system and a specific file’s permissions are not correctly set, it might lead to the software that utilizes this particular file not working properly. If that happens, you can do the steps below to fix permissions:
Step 01 - Go to Applications.
Step 02 - Go To Utilities.
Step 03 - Launch Disk Utility.
Step 04 - From the list of different volumes, select the Startup disk.
Step 05 - Press the tab named First Aid.
Step 06 - Press Verify Disk Permissions in order to check out permissions. Press Repair Disk Permissions in order to repair them.
People Also Read 17 Reasons Why Your Mac Running Slow! How Do You Speed Up Your Mac?
05: Creating Disk Images By Utilizing Disk Utility
Mac’s Disk Utility has the ability to make a disk image of a specific folder. You can use it to transfer the folder or files to a different Mac device. You can use it as an archive as well. Or, you can place it in locations where folders are not accepted.
Creating disk images is almost similar to compressing files into a RAR or ZIP archive. But there are added benefits to it. It can help you save more space. Plus, it can help you encrypt the disk image for added protection.
06: Formatting Drives With The Use Of Disk Utility
You might wish to format a drive for multiple reasons. Maybe, you wish to sweep off all the data on your drive in preparation for the installation of a new operating system. Or maybe you wish to create a partition. Whatever your reason is, below are the steps to format your drive using Disk Utility:
Step 01 - Go to Applications.
Step 02 - Go To Utilities.
Step 03 - Launch Disk Utility.
Step 04 - Choose the specific drive you wish to format.
Step 05 - Press the option Erase.
Step 06 - Disk Utility will select the right format for your drive automatically. You can also choose the format you want.
Step 07 - Provide a name for your drive.
Step 08 - Press the button named Security Options.
Step 09 - Press Erase
Step 10 - Move your files back to the newly formatted drive.
Take note that it is important to back your files up before you format a hard disk drive.
Part II: Things You Should Know About Mac’s Disk Utility
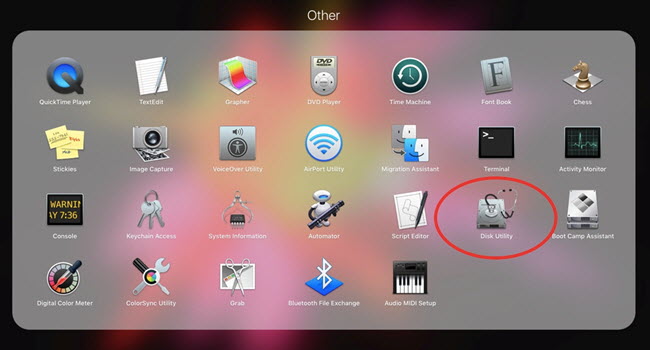
Disk Utility is a tool that can be found within the folder Utilities. The said tool, along with its First Aid element can be utilized to check a disk especially if it is damaged. It can also be used to repair disks, to make disk images, to partition disks, and a whole lot more.
This Disk Utility application comes together with Mac devices. As said before, Disk Utility can be seen in the folder Utilities. The said folder is located within the Applications folder. However, Disk Utility can also be searched for by utilizing Spotlight. The Spotlight can be opened by pressing CMD + Spacebar.
Below are the purposes of Disk Utility:
01 - It is utilized for erasing, formatting, and managing internal disks. The same is true for external devices used for storage.
02 - It is utilized for adding and managing volumes. Plus, it can also be used for organizing into partitions.
03 - The Disk Utility tool is very helpful when it comes to RAID sets. Multiple disks can be combined into one RAID set. This RAID set will serve as one disk that can result in enhanced performance, storage space, and reliability.
04 - Disk Utility can be utilized to make disk images of various files you wish to transfer to another computer, backup, or archive.
05 - Finally, Disk Utility can be utilized to diagnose disk problems and fix these problems. Plus, it can be utilized to diagnose and repair problems with corrupted or damaged volumes.
With the OS X El Capitan of Mac, Disk Utility underwent a lot of modifications. It had a redesign and multiple features were removed. A lot of features also became better and evolved to solve numerous problems. Plus, with the macOS High Sierra, some changes have also been made. This is because a new file format was introduced by Apple, APFS. We’ll delve more into this later.
Part III: How To Protect Your Disk From Failing
Keeping your Mac’s health in tip-top shape is easy. You can use TechyCub’s Mac Cleaner in order to remove unnecessary files from your system. It can also be used to remove corrupted files that are causing harm to your device.
Here are the steps on how to use it:
Step 1: Launch Mac Cleaner on Your Mac
Download TechyCub Mac Cleaner and launch it. You can check the system status on the homepage after you run the tool on your Mac.
 Mac Cleaner
Scan your Mac quickly and clean junk files easily.
Check the primary status of your Mac including the disk usage, CPU status, memory usage, etc.
Speed up your Mac with simple clicks.
Free Download
Mac Cleaner
Scan your Mac quickly and clean junk files easily.
Check the primary status of your Mac including the disk usage, CPU status, memory usage, etc.
Speed up your Mac with simple clicks.
Free Download
Step 2: Scan Junk File
Choose Junk Cleaner, then click the "Scan" button at the lower right corner, and wait for a while.

Step 3: Review and Select Items
Review the scan result, then select what you want to clean, and you can delete them by clicking the "Clean" button. After that, all you have to do is wait for the cleaning process.

Part IV. Conclusion
Your Mac’s Disk Utility can be used to repair a lot of things with your Mac device. It’s a good tool to master to help you navigate your way through your most loved Apple product. One thing to keep your Mac healthy so that you wouldn’t use Disk Utility for repairs is to maintain your device with TechyCub’s Mac Cleaner. It’s a great tool to free up more space on your device and rid it of unnecessary corrupted files.
Mac Cleaner
Scan your Mac quickly and clean junk files easily.
Check the primary status of your Mac including the disk usage, CPU status, memory usage, etc.
Speed up your Mac with simple clicks.
Free Download
