For the longest time that you are using your Mac – whether you use it for your business or other things – you can save most of your time by turning on the Autofill feature of your Mac. The Autofill feature that you have on your Mac can automatically key in your personal information when necessary when you use your web browser.
However, this can be somehow risky especially if you are not the only one using your computer. So with that, most users would just like to delete autofill on their Mac but do not know how they can do this.

No need to worry because, in this article, we are going to show you several ways how to delete autofill on Mac in the easiest and quickest way possible. No need to get some help from professionals because even you alone can get this job done.
Part 1: How to Delete Autofill on MacPart 2: An Alternative Way to Delete Autofill on MacPart 3: Conclusion
People Also Read How to Delete Cookies on Mac? How to Allow Pop Ups on Mac
Part 1: How to Delete Autofill on Mac
As we have mentioned earlier, the autofill feature that you have on your Mac is where you can automatically input the information needed when you try to access your web browsers such as Safari, Google Chrome, or Firefox. This feature can save you time from typing the information over and over again.
However, since this could risk whatever you are trying to access in your browser, then deleting your autofill can save your information as well as the content of what you are accessing over the internet.

So for you to delete autofill on your Mac, we have here some steps that you could follow for you to get rid of them.
Method #1: How to Delete Autofill in Google Chrome for Mac
If you are fond of using your Google Chrome browser and you have autofill saved in it, then here is how you can delete them.
Step 1: On your Mac, launch your Google Chrome browser.
Step 2: From the main page of the Google Chrome browser, go ahead and click on the three dots located at the upper right-hand corner of your window screen.
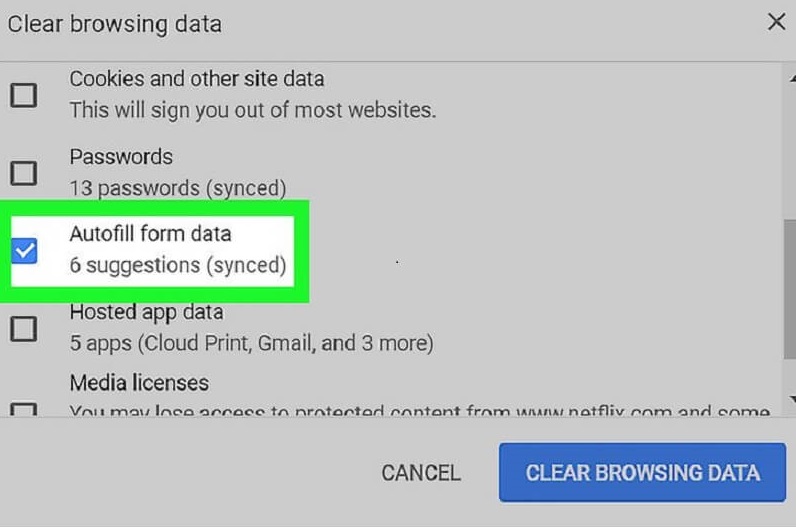
Step 3: A drop-down box will then show up. From the drop-down menu, simply choose the option History and then choose Show Full History
Step 4: From the History page of your Google Chrome browser, go ahead and simply choose Clear Browsing Data. Make sure that you have also marked down the option for Password and the Autofill form data.
Step 5: After that, go ahead and simply click on Clear browsing data.
Now, just in case you would just like to delete some specific type of autofill on your Google Chrome, then go ahead and follow the steps below.
Step 1: Open up the Google Chrome browser on your Mac.
Step 2: And then, simply click on the three-dot icon which is in the upper right-hand corner of the browser window.
Step 3: Then, a drop-down menu will show up. So from there, all you need to do is to select on Settings.
Step 4: From the Settings page, scroll down and look for the option Manage Password which can be found under the Passwords and forms tab.
Step 5: From there, you will then be able to check out all of the passwords that you have saved for all of the websites that you have accessed using your Google Chrome browser. So, all you have to do is to click on the three-dot icon and then select on the option Remove for you to be able to delete the autofill on your Google Chrome.
NOTE: If in case that you would like to disable autofill on your Google Chrome, just simply click on the three-dot icon once again and then choose Settings. From there, simply click on the Advanced option and then look for the option Password and forms. And then, simply click on the settings for Autofill and then turn off the autofill feature from there.
Method #2: How to Delete Autofill in Safari Browser on Mac
Safari is the most commonly used browser for Mac users since this is the most compatible browser for your Mac. And because of that, you might also have some autofill here such as your password and username that you would want to delete. And for you to be able to do this, all you have to do is to follow the simple steps below for you to delete autofill in the Safari web browser.
Step 1: Launch your Safari web browser on your Mac.
Step 2: Click “Safari” and then click “Reset Safari.” A dialog box appears. Click the “Remove Other AutoFill Form Text” check box to deselect it, and then click “Reset.” This removes any AutoFill information that you have previously entered.
Step 3: From there, go ahead and click on Safari and then select on Preferences.
Step 4: When you are in the Preferences window you can go ahead and select the Autofill that you would like to delete. Here are some options for you.
- Go to the Username and Password option and then choose Edit. From there, you can simply delete any username and password that is saved on your Safari browser.
- Then you can head to Credit Cards and then hit on the Edit button for you to delete any credit card information saved on your Safari browser.
- Then go to the other form option and then choose Edit for you to be able to remove any entries of Autofill.
NOTE: If just in case you no longer need the Autofill feature on your Safari browser then you can also have it disabled just like in the Google Chrome browser. Just simply choose Safari, then go to the Preferences page, and then choose Autofill. You can turn off the feature from there.
Method #3: How to Delete Autofill in Firefox Browser on Mac
And, If you would like to know how to delete autofill on your Firefox browser, there are the steps that you need to follow.
Step 1: Go ahead and start the Firefox browser on your Mac.
Step 2: Then on the main page of the Firefox browser, go ahead and simply select the three horizontal lines which can be found at the upper right-hand corner of your screen.
Step 3: Once you click on those three lines, a drop-down menu will then show up on your screen. From that menu, simply go ahead and choose History and then choose Show All History.
Step 4: On the History page of your Firefox browser, go ahead and select the range of time to clear and change it to Everything.
Step 5: Then a list of categories will show up on your screen. From there, you have to make sure that you put a checkmark beside the Forms & Search History option.
Step 6: After that, go ahead and click on the Clear Now button.
NOTE: If ever you want to turn off Autofill on your Firefox browser, all you need to do is to click on the three lines again and then choose Preferences. From there, simply click on the Privacy option. Then in the History option, go ahead and use “Custom Settings for history” in the “Firefox will…” tab. And then just below it removes the checkmark beside the option “Remember search and form history.”

So that is how easy to delete autofill on Mac using the different web browsers that you might have been using on your system.
Part 2: An Alternative Way to Delete Autofill on Mac
Aside from the simple methods above, there is a simpler way to delete the autofill on Mac in your web browser. This method will require you to use TechyCub Mac Cleaner.
This program is a third-party application that can help you clean up your Mac, save more storage space, as well as make your Mac run better than it was before. TechyCub Mac Cleaner is an all-in-one tool that you must have on your Mac.
When we say “all-in-one” tool, we mean that everything you need for your Mac will all be in this one application. So, of course, TechyCub Mac Cleaner has a feature called "Privacy" to delete autofill on your Mac.
The Privacy feature is used if you would like to clean up all of your browser’s cookies, history, downloads, and as well as your autofill. This program can work on any web browser such as Google Chrome, Firefox, and Safari browser.
So to start deleting your Autofill, download the TechyCub Mac Cleaner and have it installed on your Mac device. And then, simply follow the easy step-by-step guide below.
 Mac Cleaner
Scan your Mac quickly and clean junk files easily.
Check the primary status of your Mac including the disk usage, CPU status, memory usage, etc.
Speed up your Mac with simple clicks.
Free Download
Mac Cleaner
Scan your Mac quickly and clean junk files easily.
Check the primary status of your Mac including the disk usage, CPU status, memory usage, etc.
Speed up your Mac with simple clicks.
Free Download
Step 1: Start the Program. Simply click on the program to launch it on your Mac.
Step 2: Choose Privacy Feature. From the main screen of TechyCub Mac Cleaner, there is a set of features on the left side. From that list of features, simply select the Privacy feature.

Step 3: Scan Your Web Browser. Then, click the Scan button located at the bottom of your window screen. Wait until the program is done scanning the web browser on your Mac.
Step 4: Check Out the Scanned Result
Once the process is done, a list of web browsers that on your Mac will be shown on the screen. From there, click the browser that you want to view the files.

Step 5: Choose Autofill to Delete. Choose and put a mark beside the Autofill History and press "Clean". This way, you will delete the autofill feature of the browser that you have chosen.
NOTE: You can also choose other files on the right side of your screen if you want to delete more files aside from your Autofill history.
Step 6: Clean Up Autofill on Mac Is Finished. All you need to do now is to wait until the process is complete and successful.
Part 3: Conclusion
So there you go! How to delete Autofill on Mac is a very easy task that even you alone can have it done. Being able to delete the Autofill on your Mac can save up all of your important information such as your username, passwords, and even your credit card information if you are using it to pay online.
But if in case that you would like a better way for you to delete your autofill on your Mac, then you can go ahead and simply use the TechyCub Mac Cleaner and you will then be able to delete your Autofill on Mac in no time.
