The Photo application that you have on your Mac is the one that actually manages all of your images that can be found with the application. This also includes those photos that you have got from your iPhone device or from a memory card and was transferred over to your Photo application on your Mac.
And with all that, there are actually a lot of Mac users who are wondering about where are photos stored on Mac. That is why in this article, we are going to show you on how you can actually find image files that are in your Photo application on your Mac. However, if you are not using the Photo application on your Mac, then it is more likely to use the Finder app for you to locate your photos.
People Also Read Congratulations! You Have Successfully Located Backups Stored On Mac How to Recover Deleted Photos from Android Gallery [2023 Update]
Photos that you have on your Mac is actually considered to be one of the largest files that you have and eats up a lot of your storage space. And as you know, running out of space means that you will then eventually experience your Mac running slow, lagging, and other issues that you might encounter. So if necessary, you can go ahead and remove other photos that you think you no longer need. And we are also going to show that to you.
Part 1: How to Access Photos File Location on MacPart 2: Finding Out Where Are Photos Stored on MacPart 3: Identifying and Cleaning Up Similar Photos on MacPart 4: Conclusion
Part 1: How to Access Photos File Location on Mac
You will be able to find your photos image file on your Mac if you are going to go through this location path:
~/Pictures/Photos Library.photoslibrary/

As you can see, there is a tilde icon before the wherein this will show your home directory. You have to see to it that you indicate this sign for you to be able to go to your directory.
Part 2: Finding Out Where Are Photos Stored on Mac
Now, if you are going to go to where your photos are stored on your Mac manually, then you can go ahead and make use of Finder. All you have to do is to follow the steps that we provided below.
Step 1: Launch the Finder application on your Mac OS.
Step 2: Once that you are in Finder, go and head to your home directory. The location of which will be shown above and that you will be needing to have it verified. That means not to forget the tilde icon.
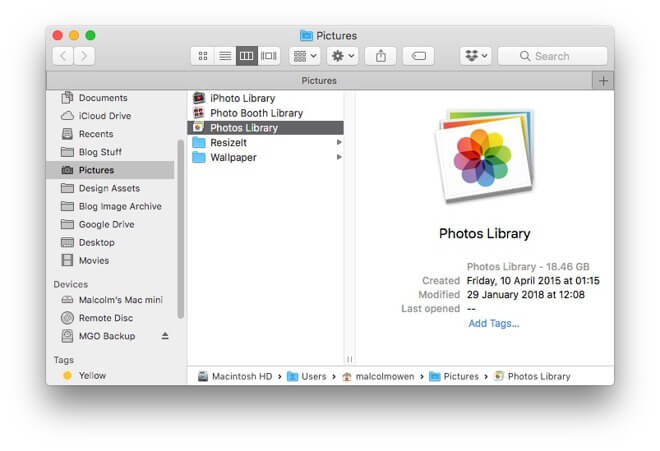
Step 3: After that, click on “Pictures”.
Step 4: Then, look for the file that has the name “Photos Library.photoslibrary”.
Step 5: Once that you have located the file, right-click on it and then choose “Show Package Content”. You can also just press the keys Command + Click and then look for “Show Package Content” from the pop-up menu.
Step 6: After that, look for a folder that has the name “Masters”. This is actually where you will be able to look for your image files that come in the Photos application package.
The Masters' folder that we have mentioned is the folder that actually contains directories of your photos. They are also sorted out in a subfolder by the date in year, month, and day. Those subfolders contain the images file that is made on that certain date.
And once that you have deleted a certain photo from the Masters' folder, then that image can no longer be seen or accessed in your Photos app. You can also go ahead and copy a certain file from the directory if you would want to have it edited.
The Masters' folder is actually made hidden because it not actually recommended to have it accessed. But, if you would still want to know where are photos stored on your Mac, then you can go ahead and go to the Masters' folder by following the steps given above.
You can also try to use the “Show Reference” option as an alternative function. This method will also open up your Finder application on your Mac and go to the directory folder.
Part 3: Identifying and Cleaning Up Similar Photos on Mac
As we all know, photos are the one that we actually keep on our devices for a long time. It is because many people would actually take photos of what their activities are and have them stored. However, there are instances that we might have taken or stored similar photos on your Mac and that is clearly eating up your storage space.
Photos on your Mac are actually the ones that consume a larger amount of storage space because they have the biggest file size. So in order to decrease the used space on your Mac, you should be able to remove all of the similar photos.
We know this may take a while if you are going to do it manually. That is why we have made the most powerful tool to get the job done and remove all of the similar photos on your Mac.
The tool that we are going to show you here is called TechyCub Mac Cleaner. This is a powerful tool to find all of the similar photos on your Mac the faster yet efficient way. Using this tool will only take you one click and you will be able to find and remove them.
The Similar Image Finder works just like the Duplicates Finder. The only difference between the two is that the Duplicates Finder can find any duplicate files including photos. While on the other hand, the Similar Image Finder can only find and remove those duplicate photos on your Mac.
Using TechyCub Mac Cleaner will help you in getting rid of those unwanted photos from your Mac and free up space. Aside from that, it will also boost up the performance of your Mac.
 Mac Cleaner
Scan your Mac quickly and clean junk files easily.
Check the primary status of your Mac including the disk usage, CPU status, memory usage, etc.
Speed up your Mac with simple clicks.
Free Download
Mac Cleaner
Scan your Mac quickly and clean junk files easily.
Check the primary status of your Mac including the disk usage, CPU status, memory usage, etc.
Speed up your Mac with simple clicks.
Free Download
To know how TechyCub Mac Cleaner works in finding your similar photos, we have a step by step method that you can easily follow.
Step 1: Download and Install the Mac Cleaner by TechyCub
Fist, go to our official website at www.techycub.com and then download Mac Cleaner. After completing the download, install it on your Mac.
Step 2: Open Up Mac Cleaner
Have it run on your Mac. As you can see on the main interface, your Mac’s system status is shown. This is the part wherein you will see what is taking up your Mac, and how much space you have left on your RAM, Disk, and your Memory. And with that, you will be able to manage your Mac.
Step 3: Choose the Similar Image Finder Module
There are different modules that you can choose from. Simply choose "Similar Image Finder" to start cleaning up your Mac.

Step 4: Scan Your Mac for Photos
After choosing the option, click the "+" button to select a folder to scan for similar photos. Then, to start scanning, just hit on the Scan button. And, wait for the scanning process to finish up the process.
Step 5: Select All the Similar Photos On Mac
You will then be able to see all the similar photos on your Mac. In the middle of your screen, you will find the photos that have a similar copy. Once you click its name, it will show you its similar copy. All you have to do from here is to mark down all of the similar photos that you would want to remove from your Mac.

Step 6: Clean Up Your Similar Photos
Click the Clean button located at the bottom right corner of your screen. Then the program will start to clean all the similr photos that you have chosen.
Step 7: Confirm the Cleaning Process
All you have to do now is to wait until the process is complete.
So there you have it. All of the similar photos that you have on your Mac is completely gone. See how fast and easy that is? Now, you will have more space on your Mac to store new photos or files.
Aside from that, you can also use TechyCub Mac Cleaner to clean up all of the files that you no longer need on your Mac. This way, you will be able to have more space. And at the same time, your Mac’s performance will be much better. No more manual process of removing your similar photos and other files that you no longer need. Because with just TechyCub Mac Cleaner, you will be able to do all of the cleaning processes with just a click of a button.
Part 4: Conclusion
As you were able to see, finding out where are photos stored on your Mac is very easy. All you will be needing to do is to follow the steps that we have provided above and you will be able to know where your photos are. That way, you will be able to know where you will be able to find them in case you might need to check some photos in the future.
And just a reminder, make sure that you do not delete any photos from where your photos are stored in your Mac. Because once that you do, that photo will no longer be available. Not unless you are really trying to remove them from your Mac’s system.
Also, you can make use of TechyCub Mac Cleaner to remove all of the unwanted photos, files, or uninstall applications that you no longer use. TechyCub Mac Cleaner is one great powerful tool to manage and optimize your Mac. It is an all-in-one Mac application that you must have.
Mac Cleaner
Scan your Mac quickly and clean junk files easily.
Check the primary status of your Mac including the disk usage, CPU status, memory usage, etc.
Speed up your Mac with simple clicks.
Free Download
