FoneDog Screen Recorder
FoneDog Screen Recorder
Special Offer
Special Offer


Step 1. First, download, install and launch the FoneDog iPhone Cleaner on your computer. After launching it, a register window will pop up. You can click "Free Trial" to try the product first.
Step 2. You can also become a subscription user by clicking the "Buy Now" button to enjoy all features. Alternatively, click the shopping cart icon which shows as "Purchase" from the top of the software.
Step 3. After the purchase, go back to the interface of the software and click "Register". Fill in your "Email Address" and "Registration Code". Then, press "Register". Alternatively, click the key icon on the top of the software to enter the register window.

Note: You should enter the Email Address that you used to purchase the product and the Registration Code from the email that you received after purchase. Noted that License Key is equal to Registration Code.
Now, the software has been activated successfully and all features are available.
Part 1. View iPhone Storage
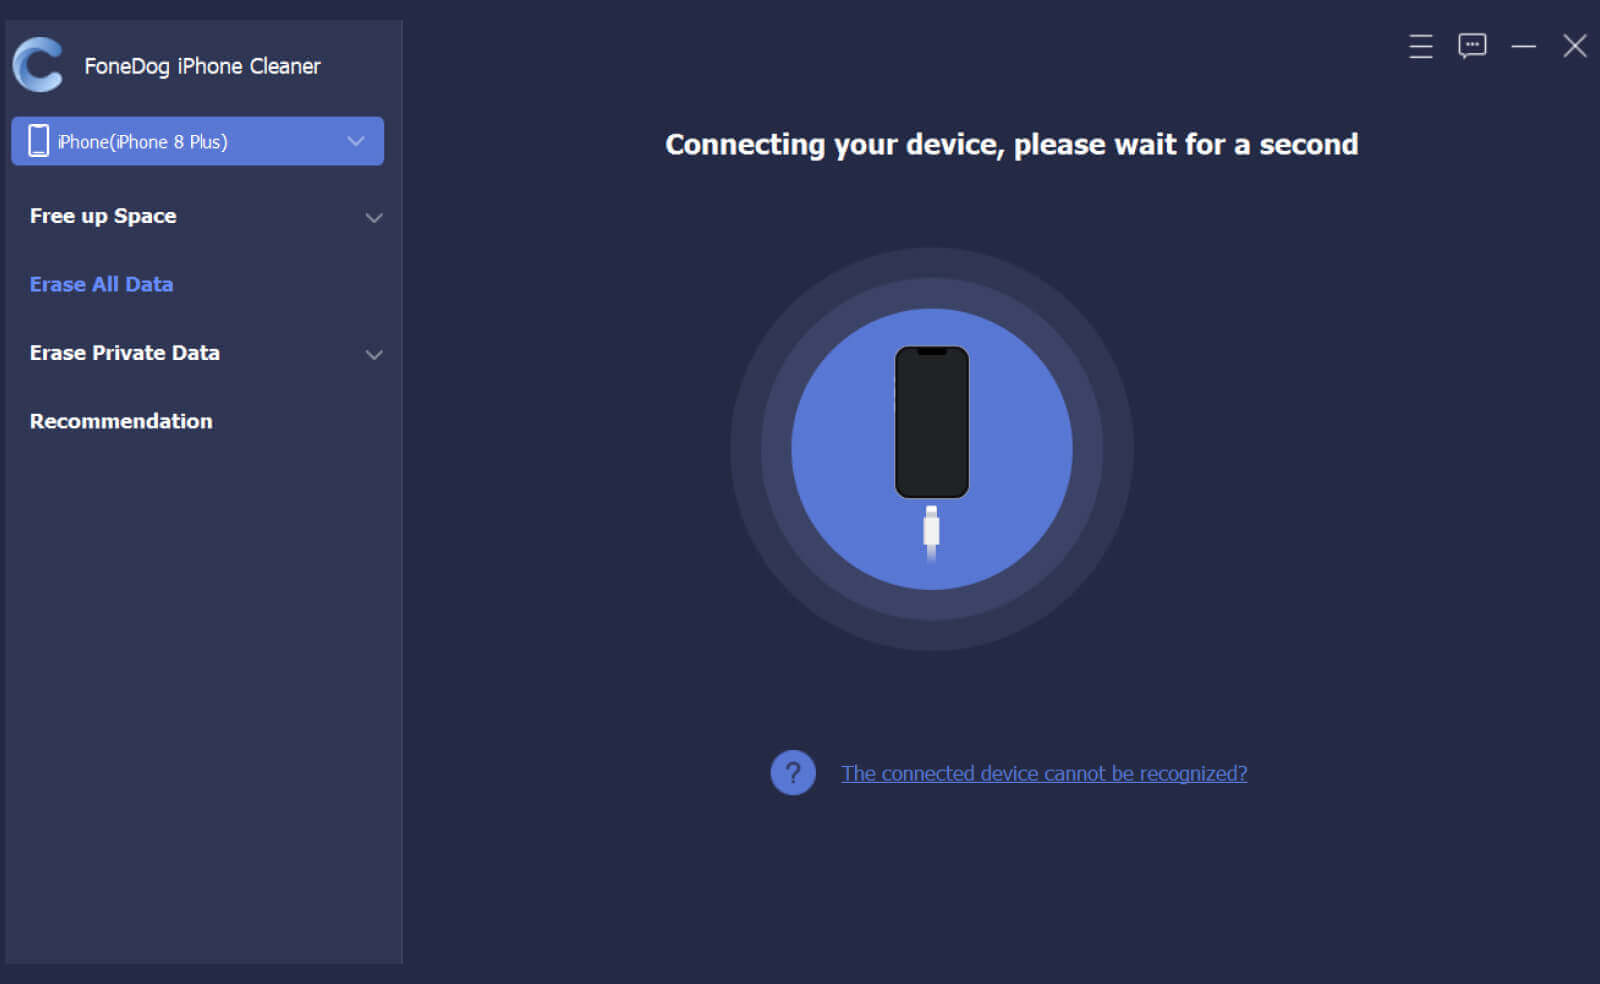
Step 1. Run FoneDog iPhone Cleaner on your computer.
Step 2. Connect your iOS device to the computer with a USB cable. Click Trust on the popup window and then enter your device password to trust the computer.
Note: FoneDog iPhone Cleaner acquire iTunes installed on your computer. You can download and install iTunes from the Apple official website.
Step 3. Then you are able to view the iPhone storage. Used space, available space, and capacity are listed below. You can click More Info to view more iPhone information which can be copied to the clipboard.
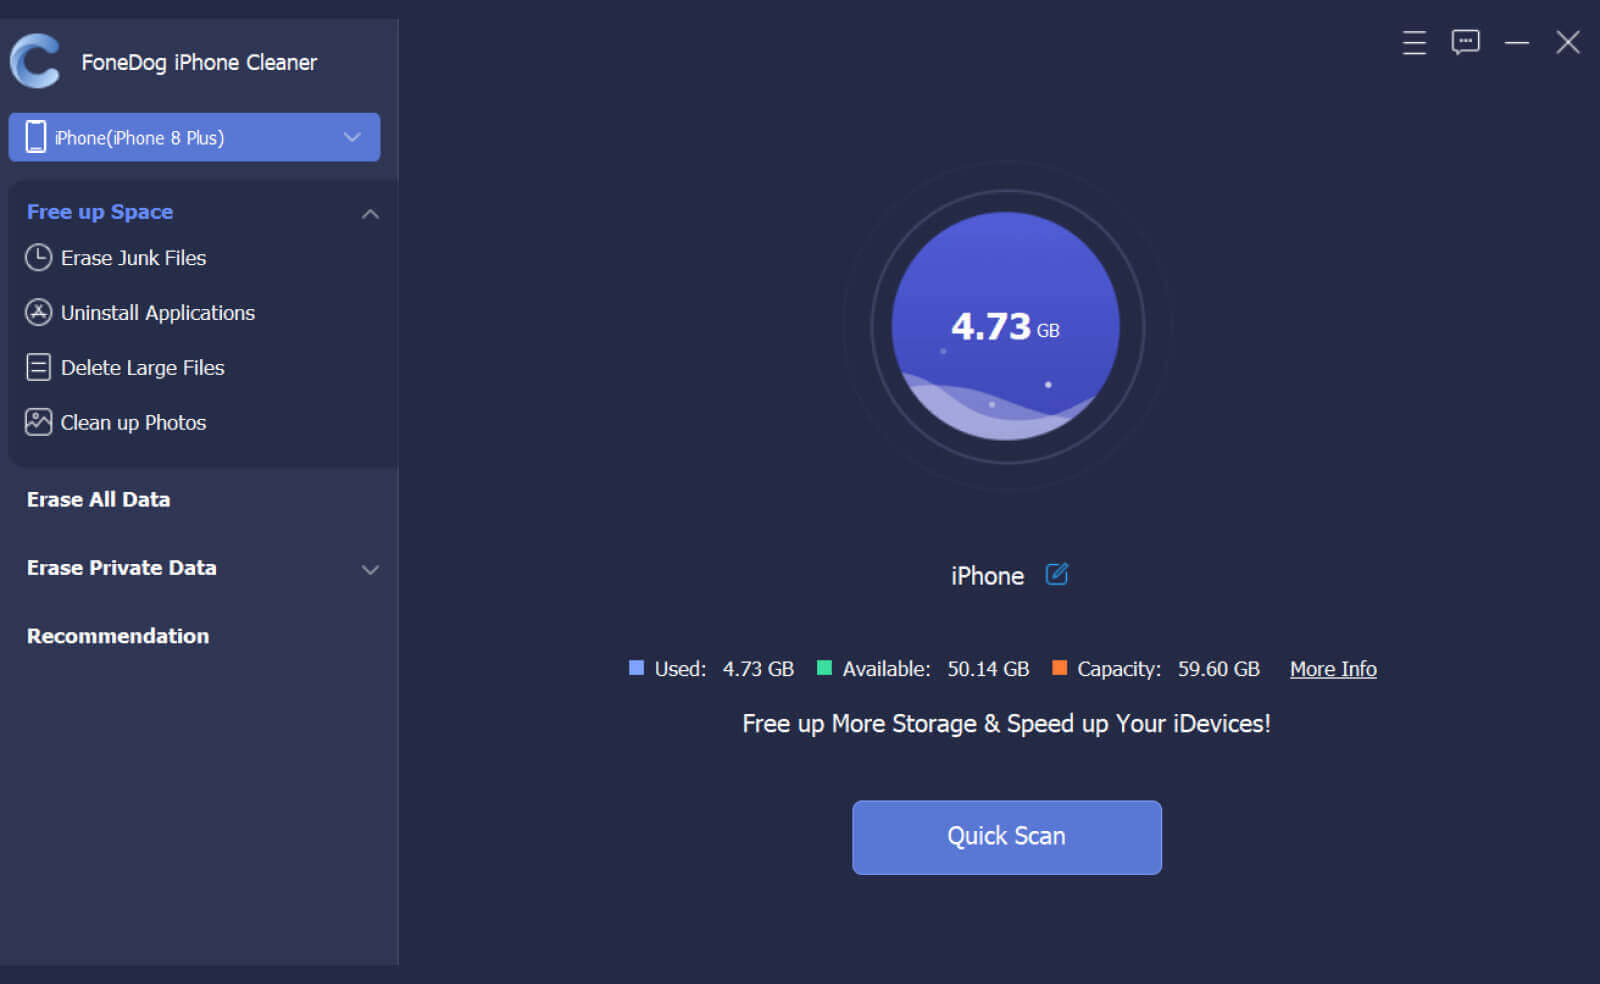
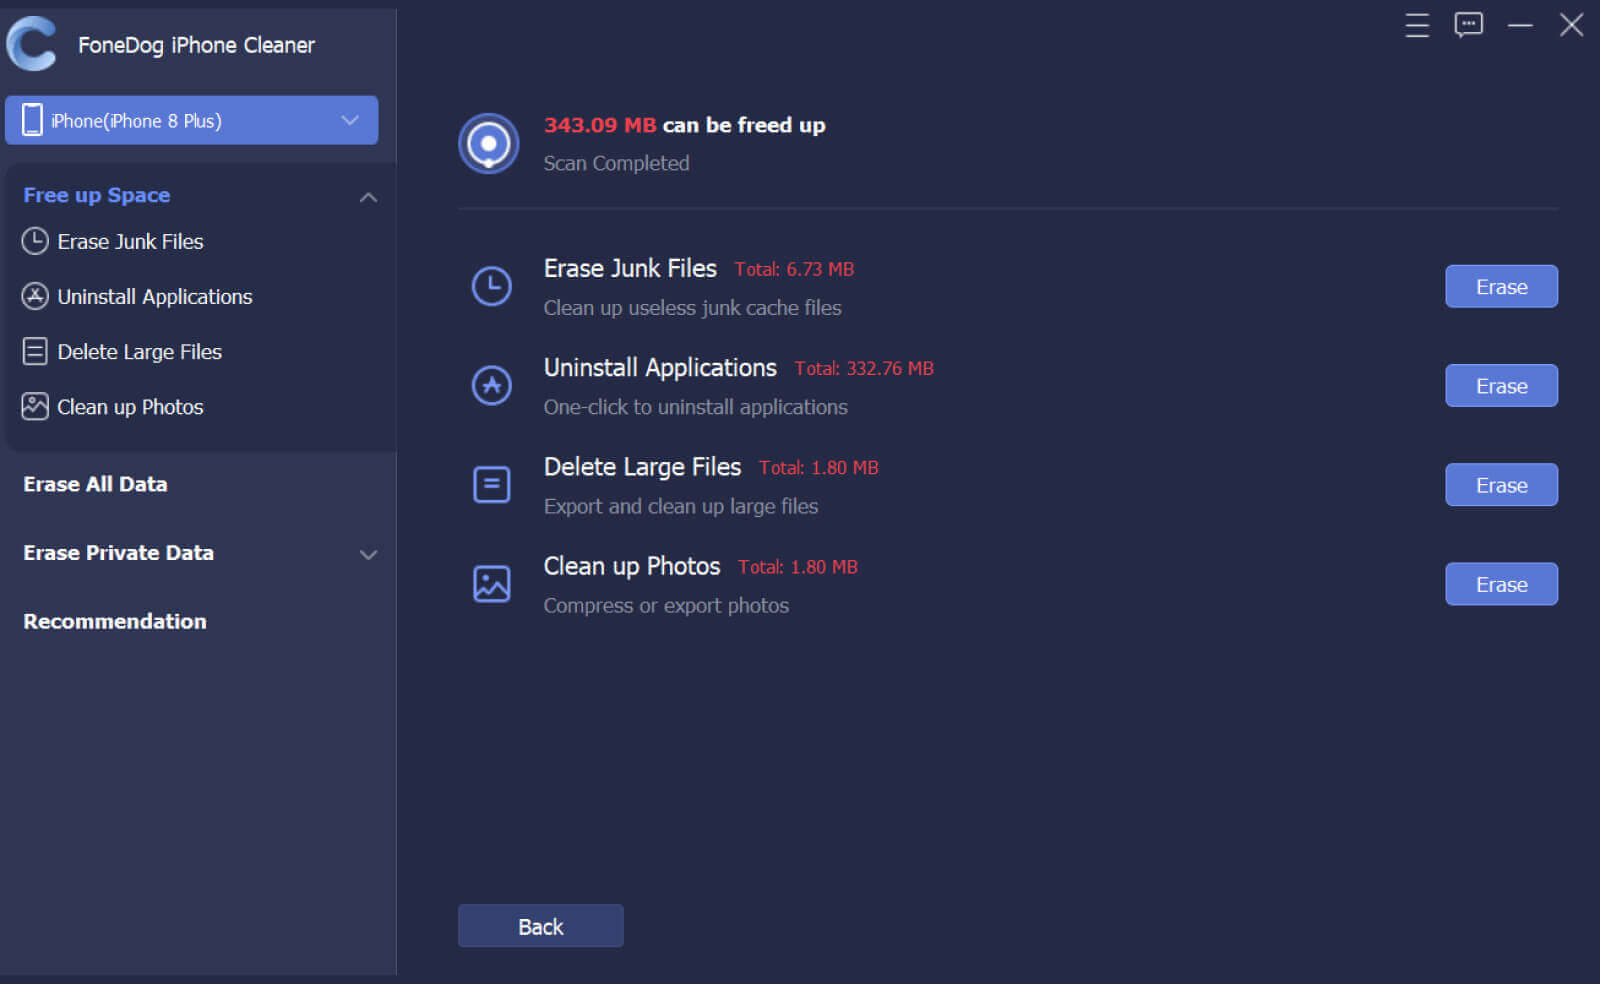
Step 4. Click Quick Scan and the program will start to scan for space to clean up. When the scanning process completes, the storage of junk files, applications, large files, and photos will be listed so that you can find out what is taking up your iPhone space.
Part 2. Clean Up iPhone
Step 1. Locate Erase Junk Files option and click Erase to view the junk files on your iPhone. Alternatively, click the drop-down arrow next to the Free Up Space option on the left panel of the interface and then choose Erase Junk Files option to scan the junk files on your iPhone.
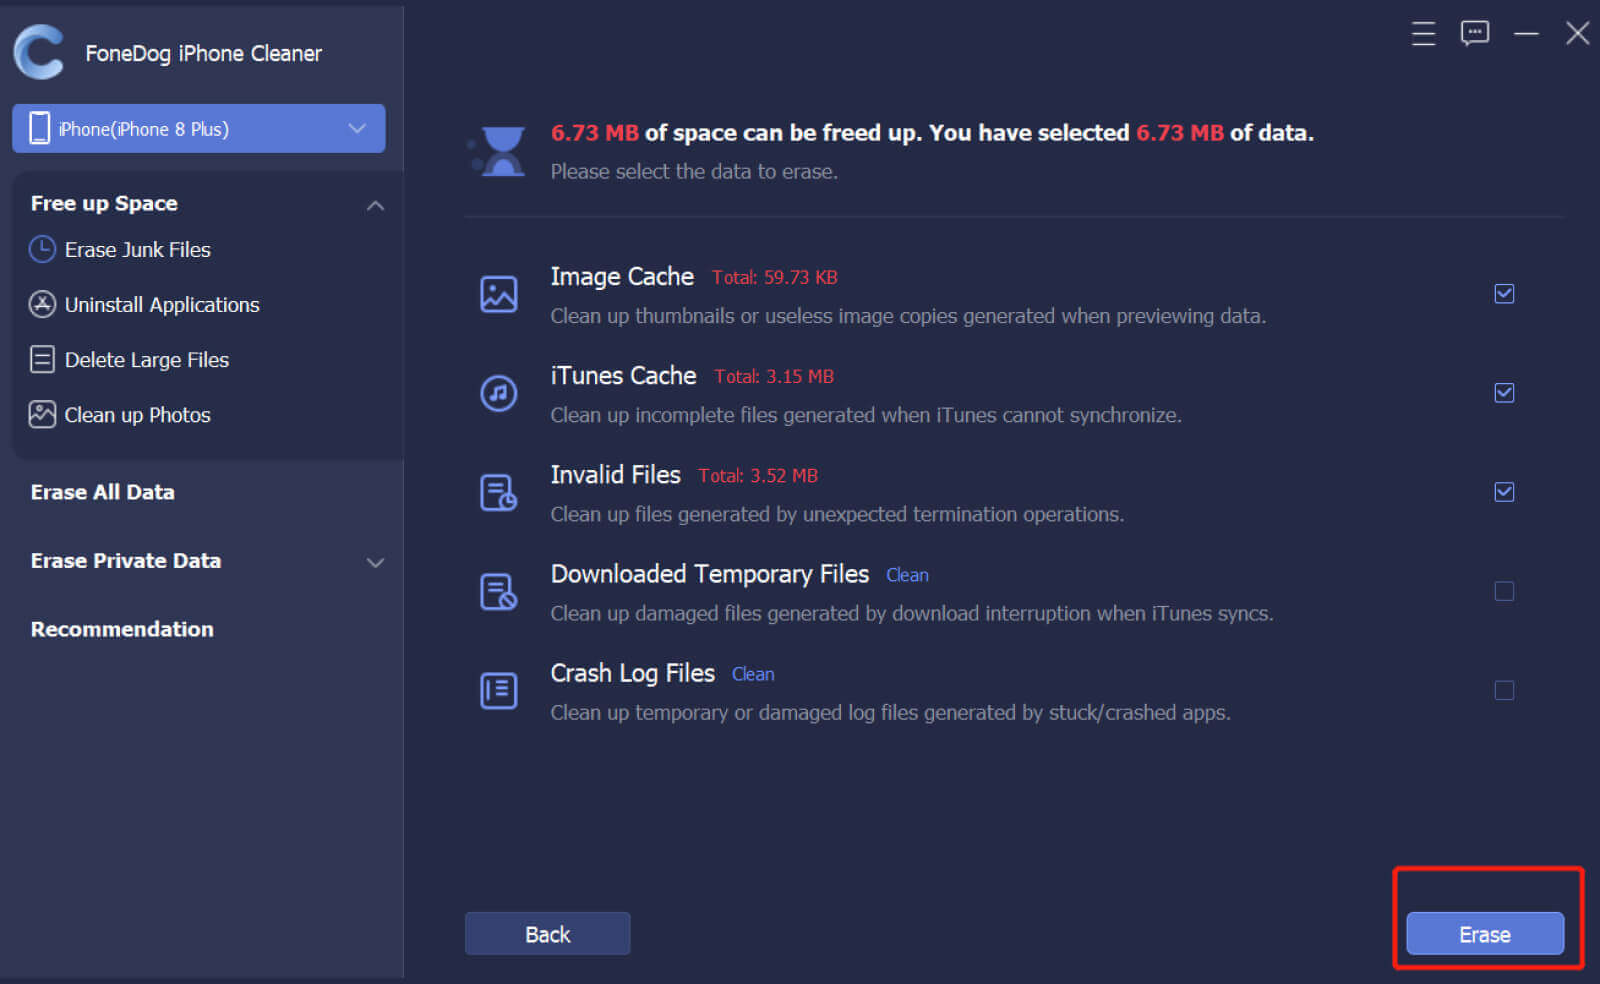
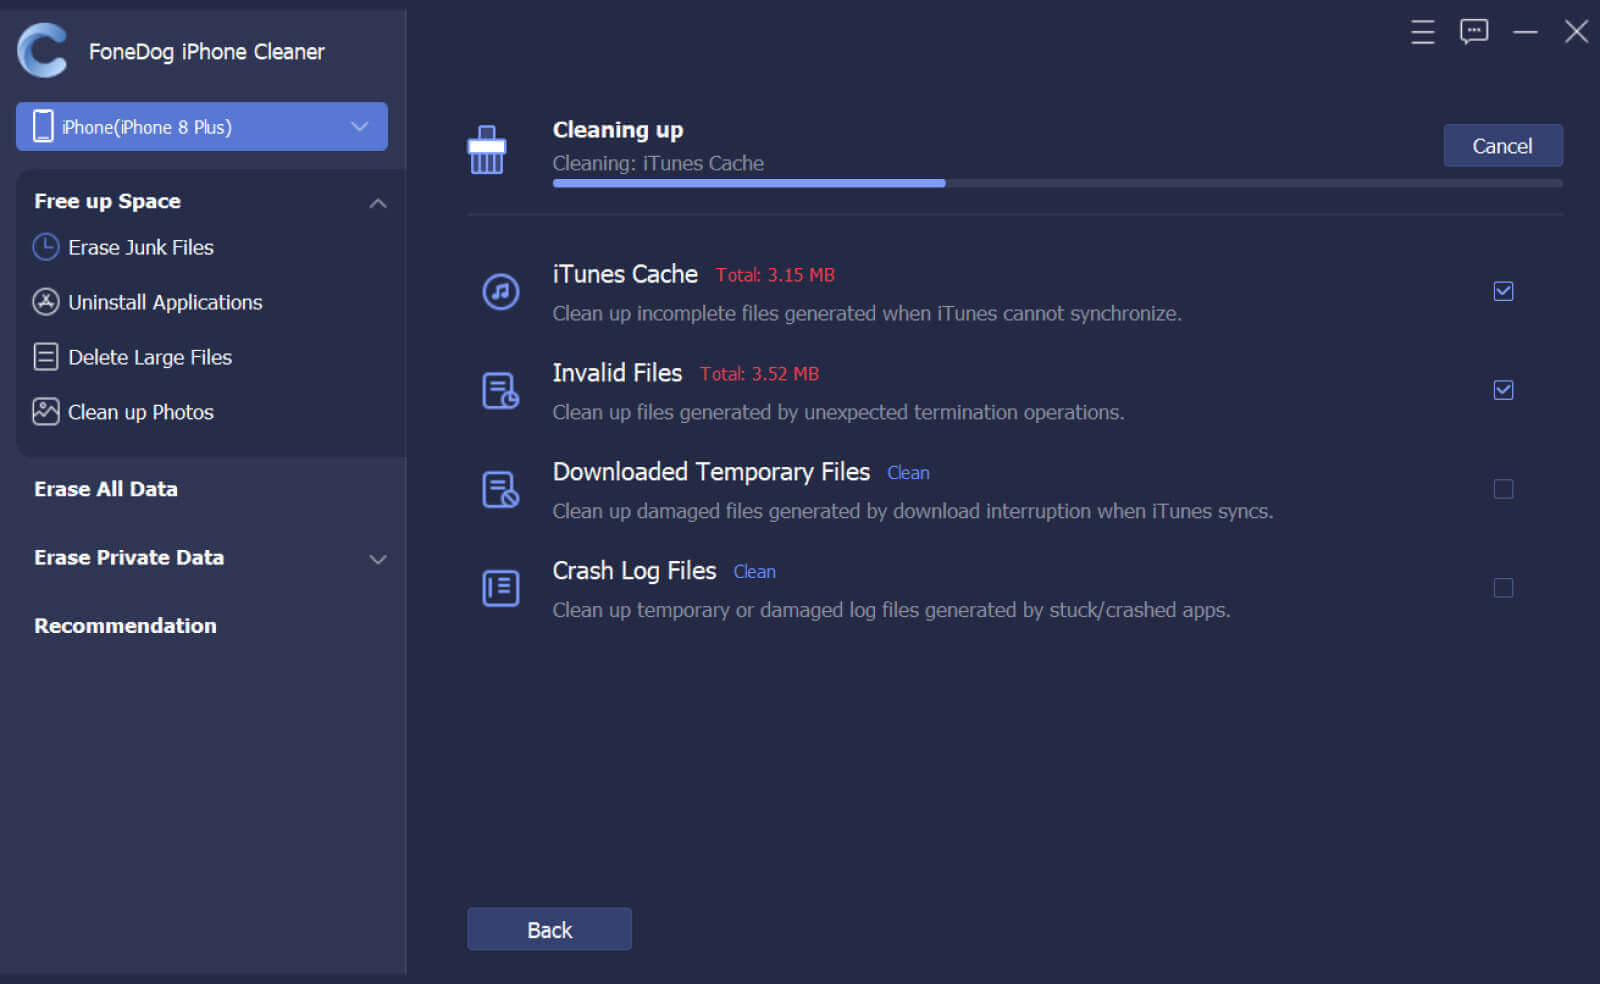
Step 2. Review the scanning results. Choose among the Image Cache, iTunes Cache, Invalid Files, Crash Log Files, or other junks. Then click Erase Button to remove those selected files from your iPhone.
Step 1. Locate Erase Applications option and click Erase button to view all applications on your iPhone. Alternatively, click the drop-down arrow next to the Free Up Space option on the left panel of the interface and then choose Erase Applications option to scan the applications on your iPhone.
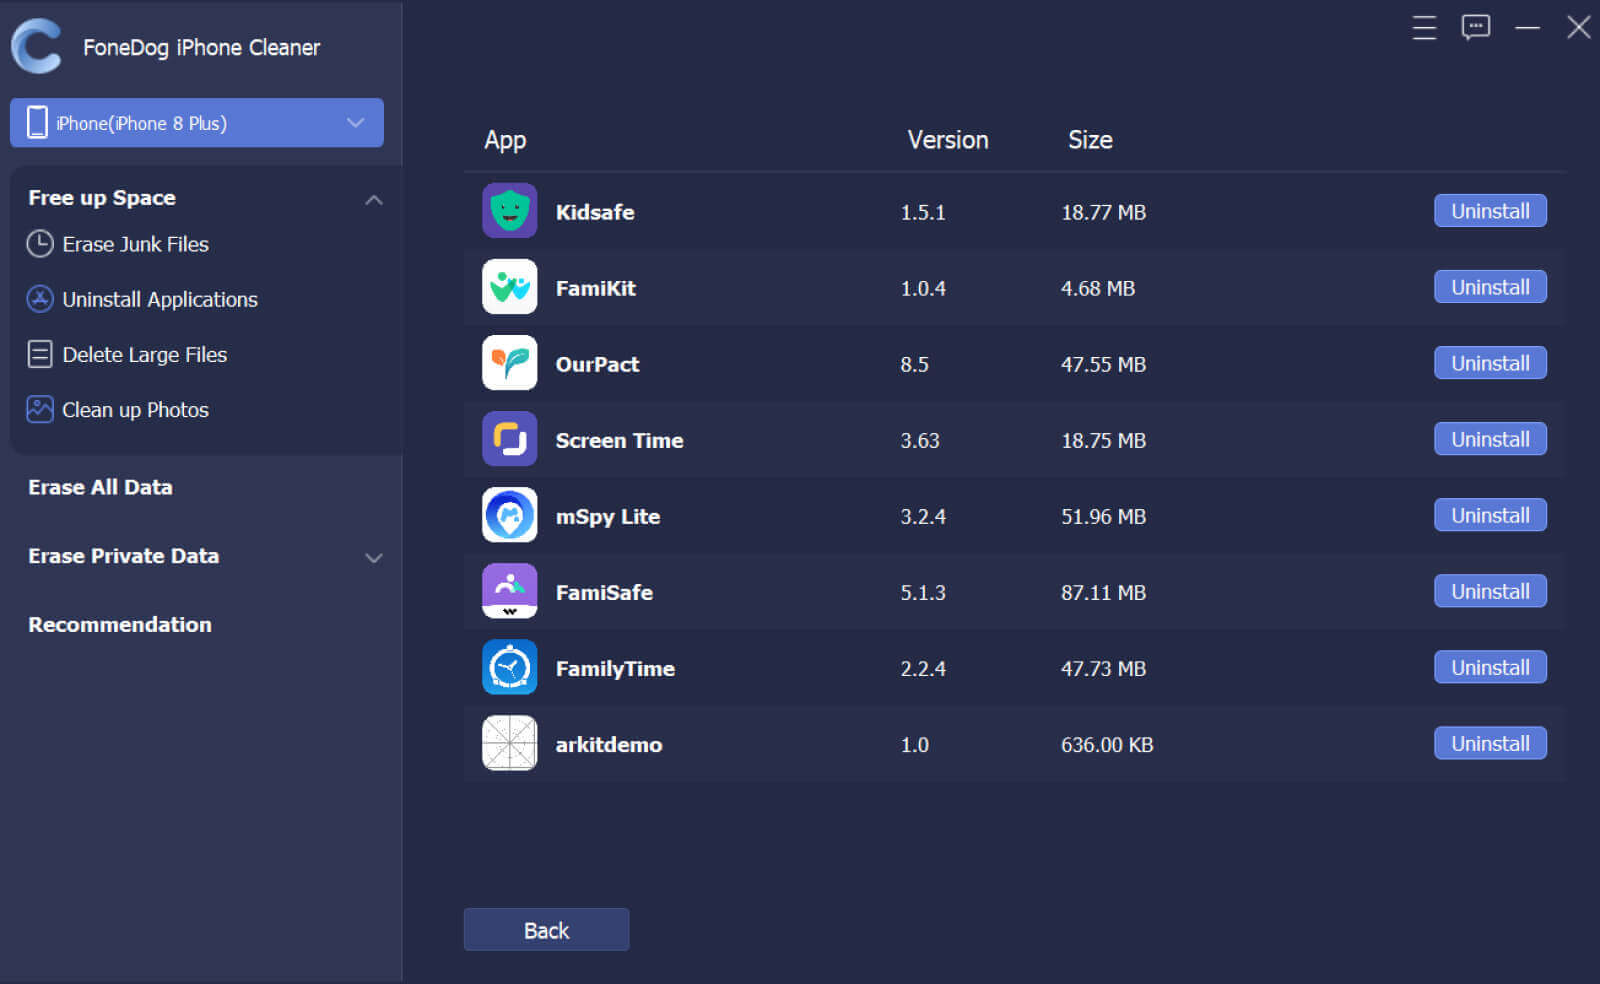
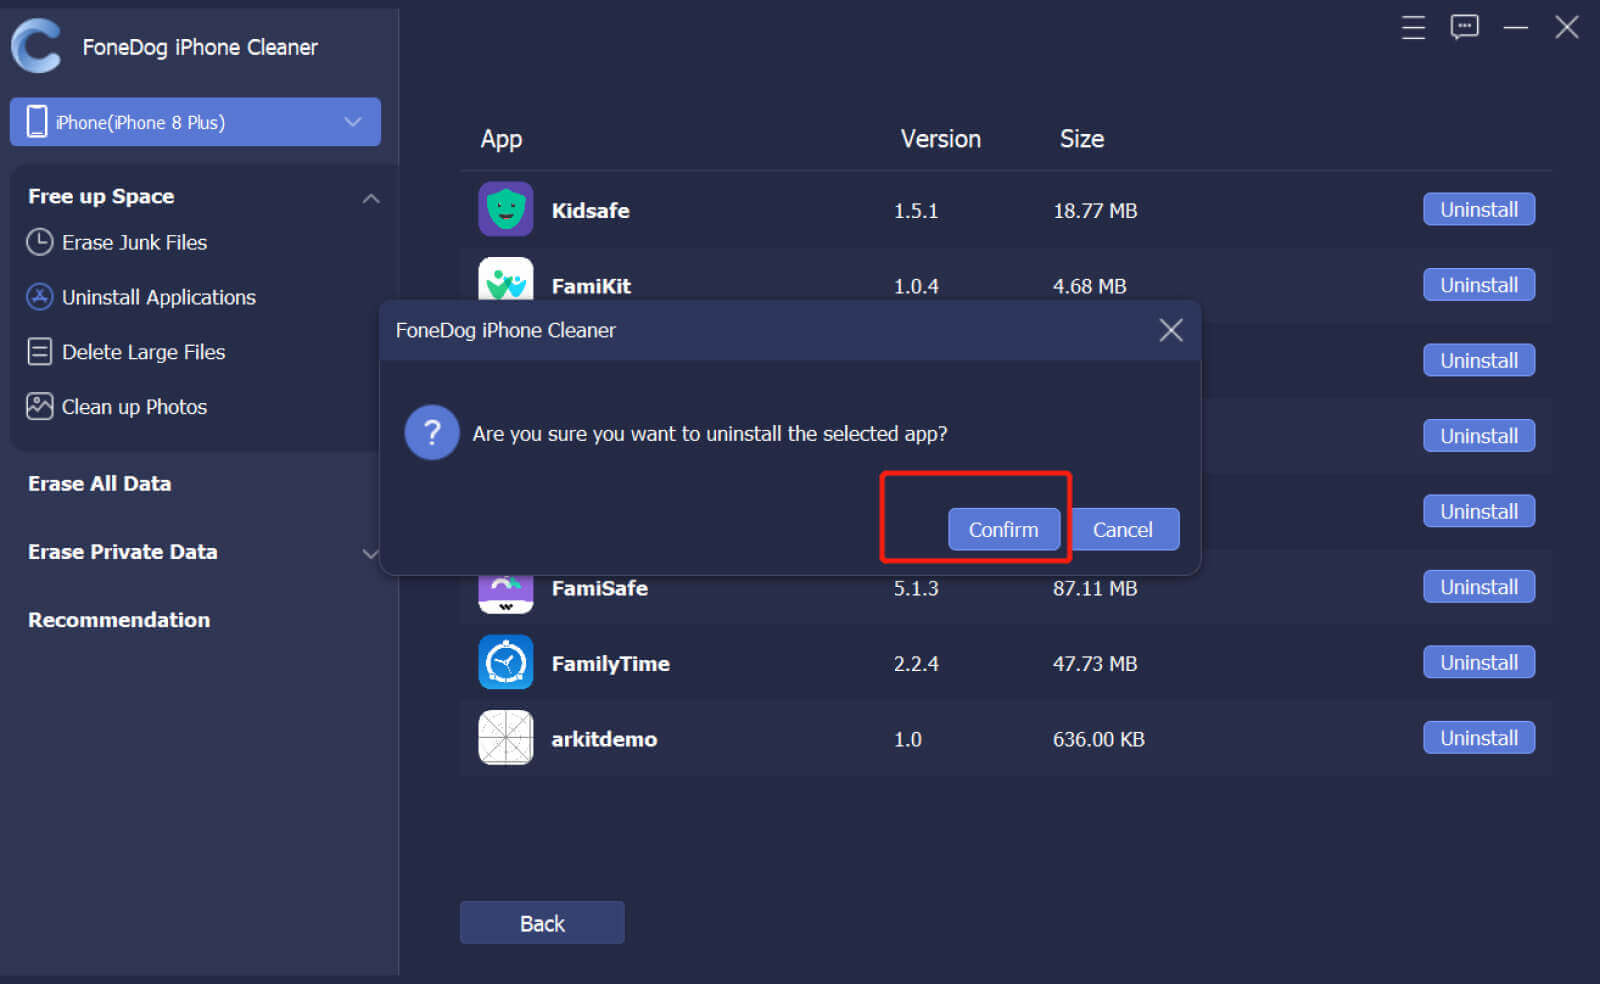
Step 2. Scroll to view the scanning results. Locate the unneeded apps and click Uninstall button. Then click Confirm on the pop-up prompt to uninstall the selected app.
Step 1. Find Erase Large Files option and click Erase to view all large files on your iPhone. Alternatively, click the drop-down arrow next to the Free Up Space option on the left panel of the interface and then choose Erase Large Files option to scan the large files on your iPhone.
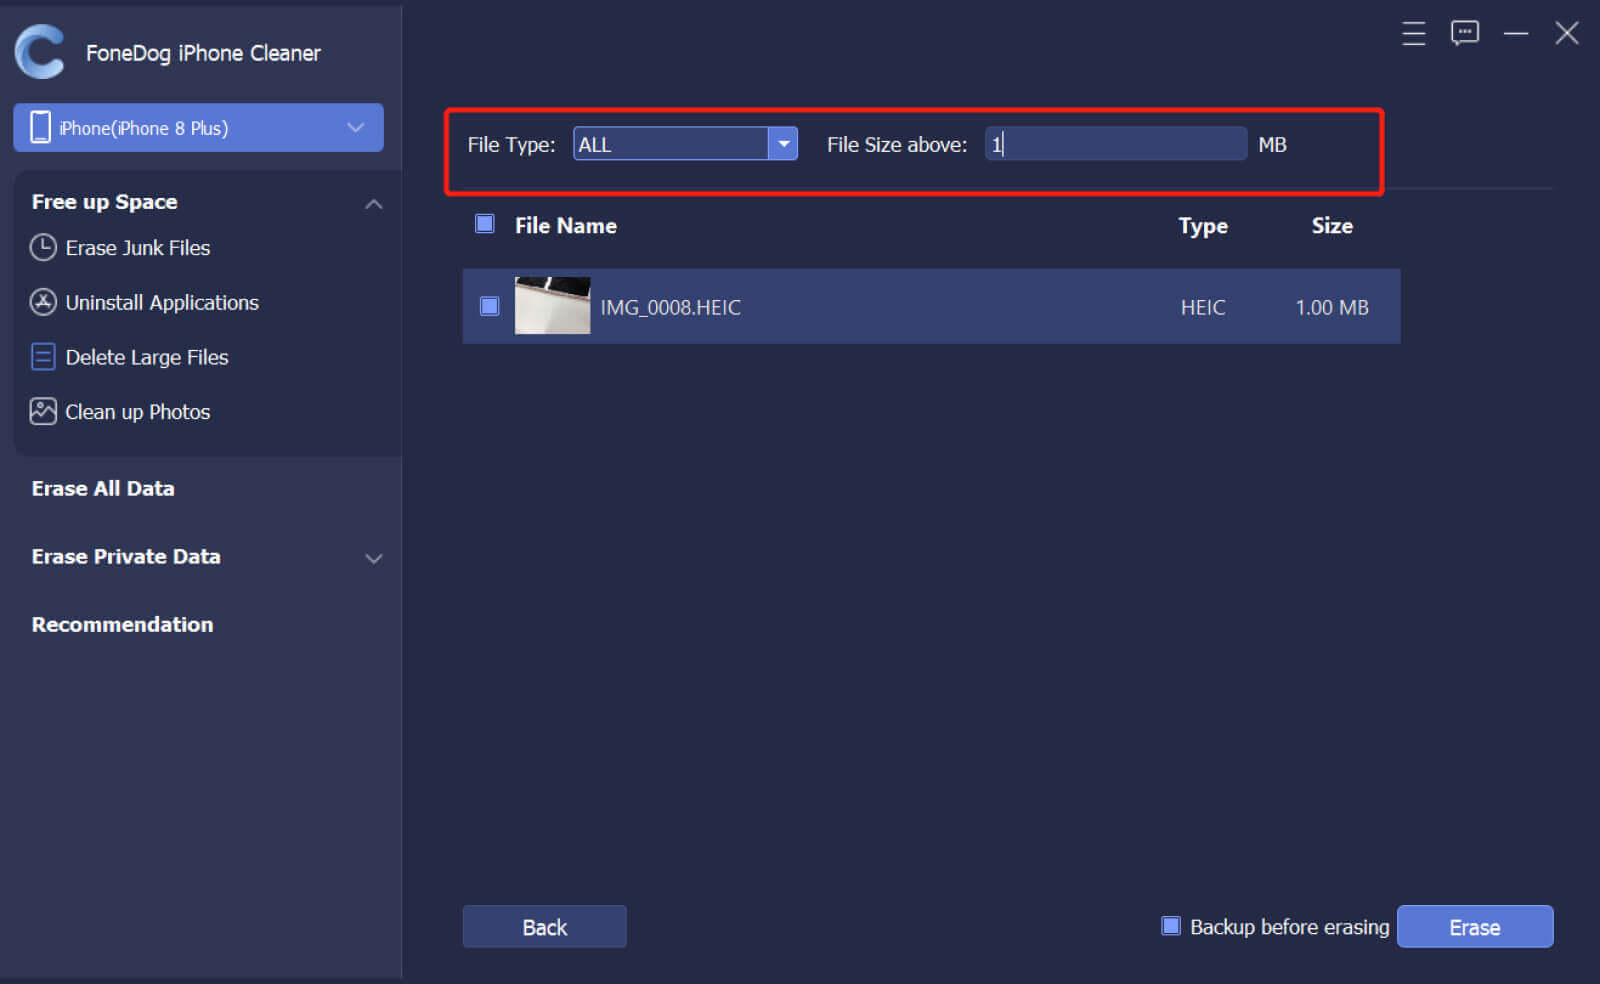
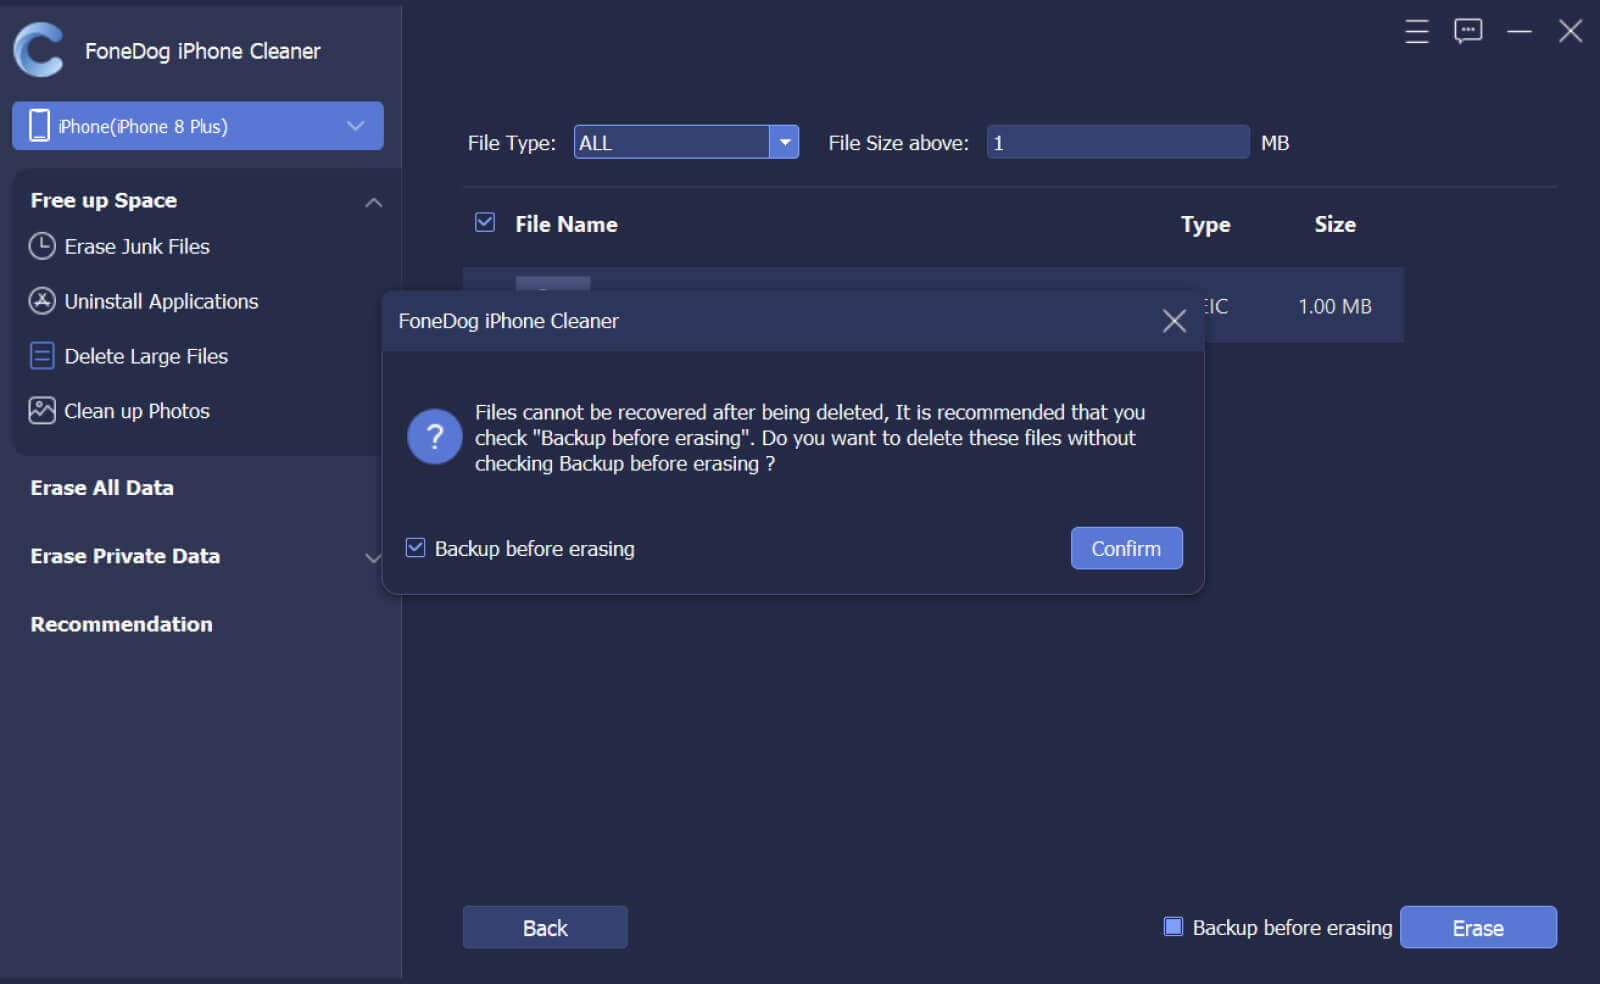
Step 2. Review the scanning results. You can view all file types like MP4, MP3, JPG, PNG, MOV, HEIC, or more. Locate and choose the unneeded large files, click Erase button to delete them. Then click Confirm to clear the selected files.
Note: If you need to back up the large files before deleting them, tick the Backup before erasing box and choose a file location to save the large files.
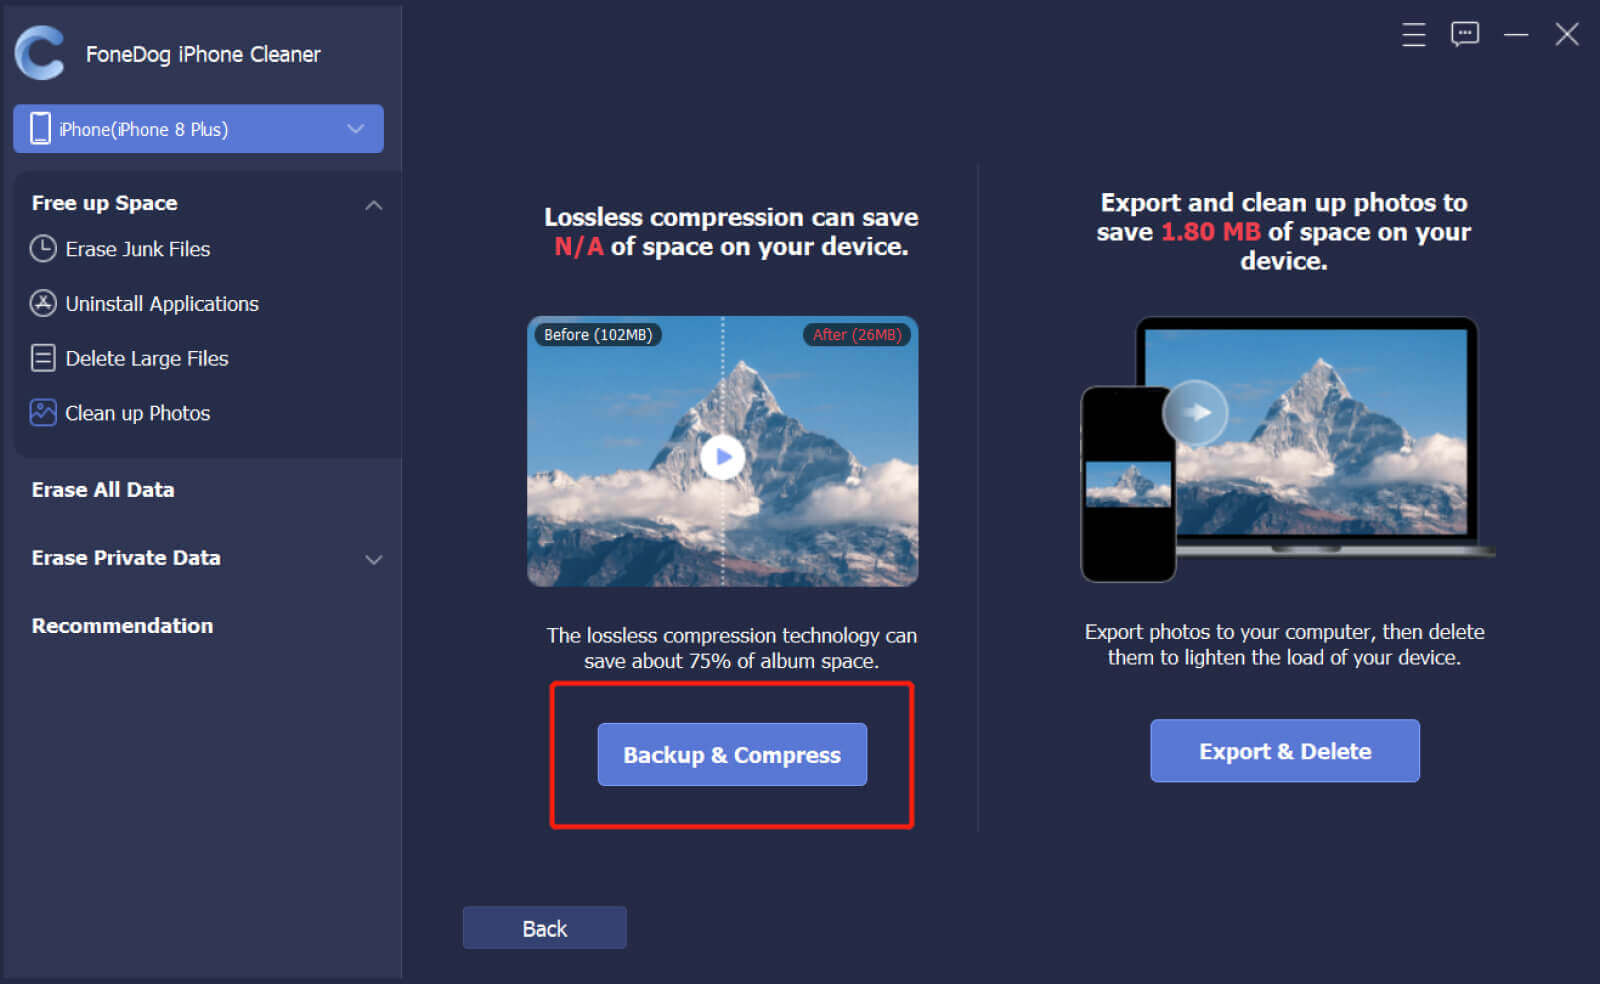
Step 1. Find the Clean Up Photos option and click Erase to view the junk photos on your iPhone. Alternatively, click the drop-down arrow next to the Free Up Space option and choose the Clean Up Photos option to scan junk photos on your iPhone.
Note: Two options are provided in this feature to manage your iPhone photos: Backup & Compress and Export & Delete.
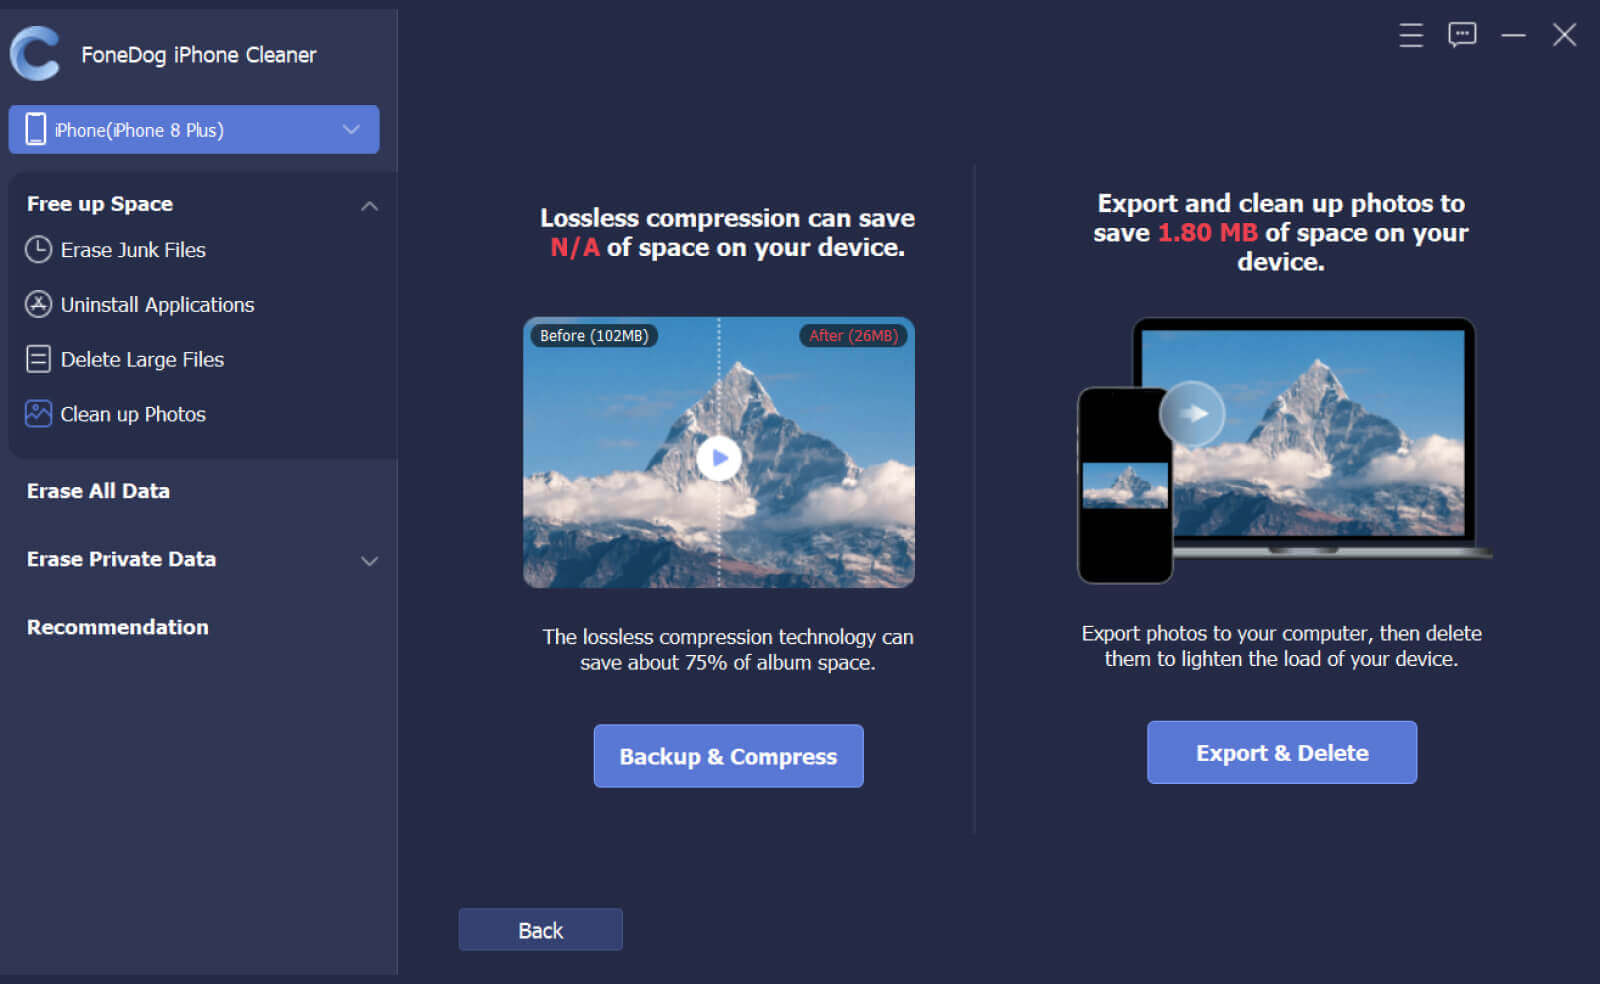
Step 2. Tap the Backup & Compress button to compress your photos if you want to clear storage space without deleting them. Select the photos and click Compress to compress the selected photos. You can also tick the Backup original photos box to backup photos without quality loss to your computer.
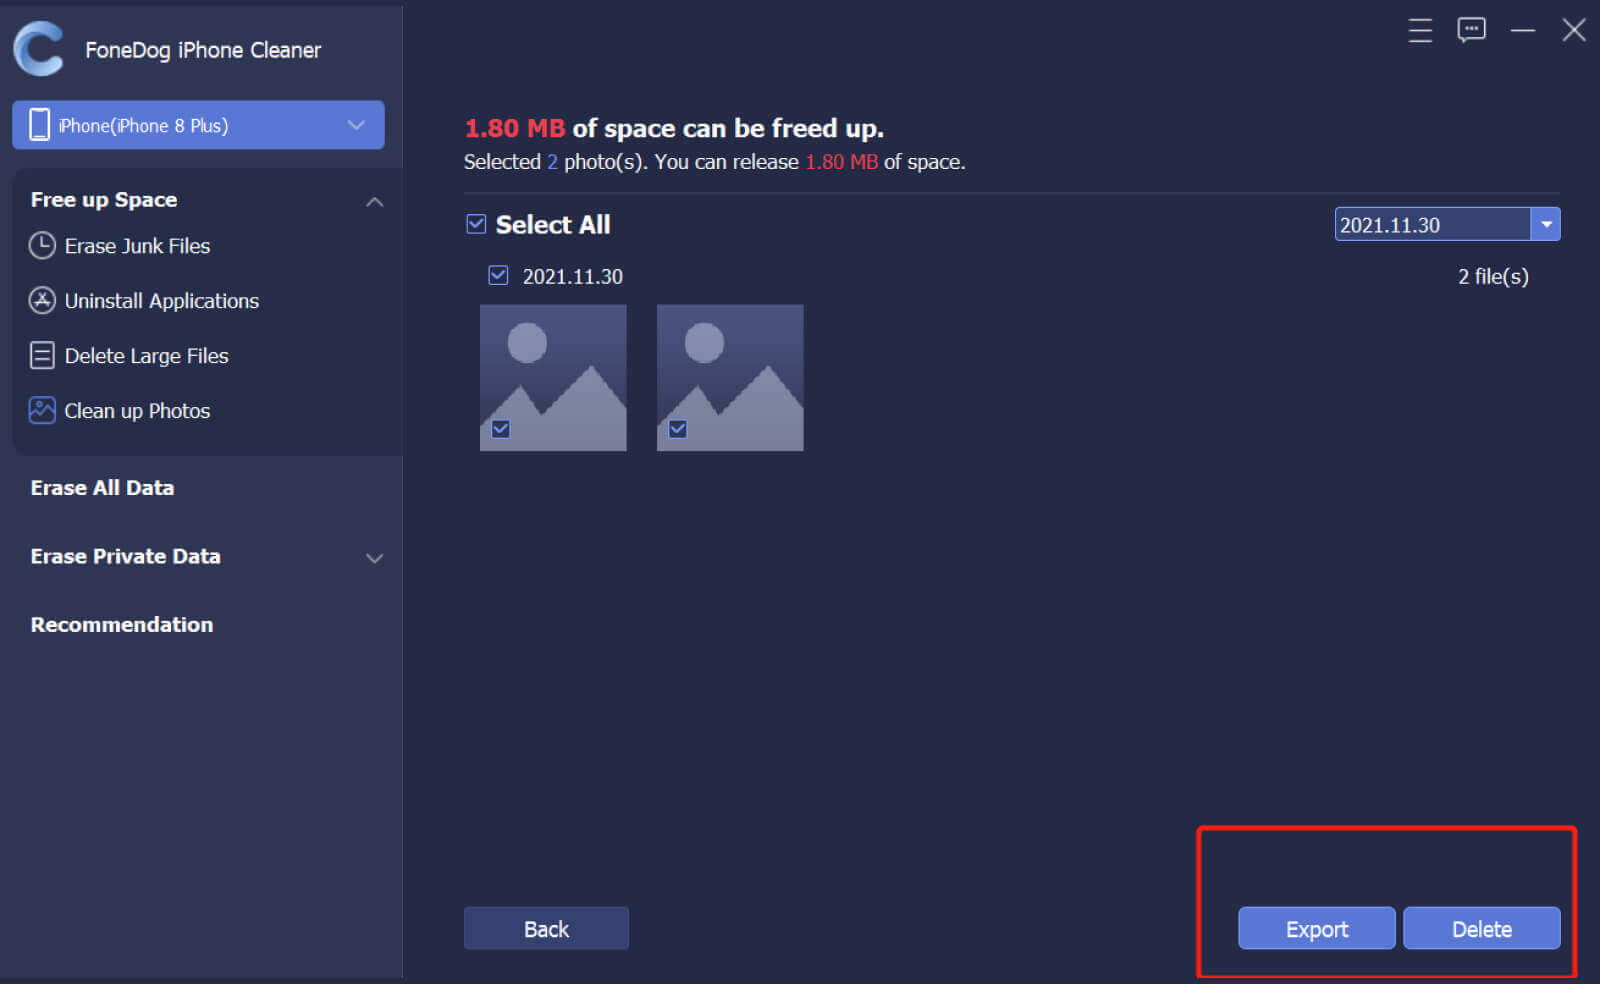
Step 3. Tap the Export & Delete button if you want to export or just delete photos on your iPhone. Select photos and click the Export button to export the selected photos to the computer if you want. Then click the Delete button and click Confirm on the pop-up prompt to delete the photos.
Note: You can use the timeline from the right side by clicking the drop-down arrow to find photos to delete.
Part 3. Wipe All Data on iPhone in One Click
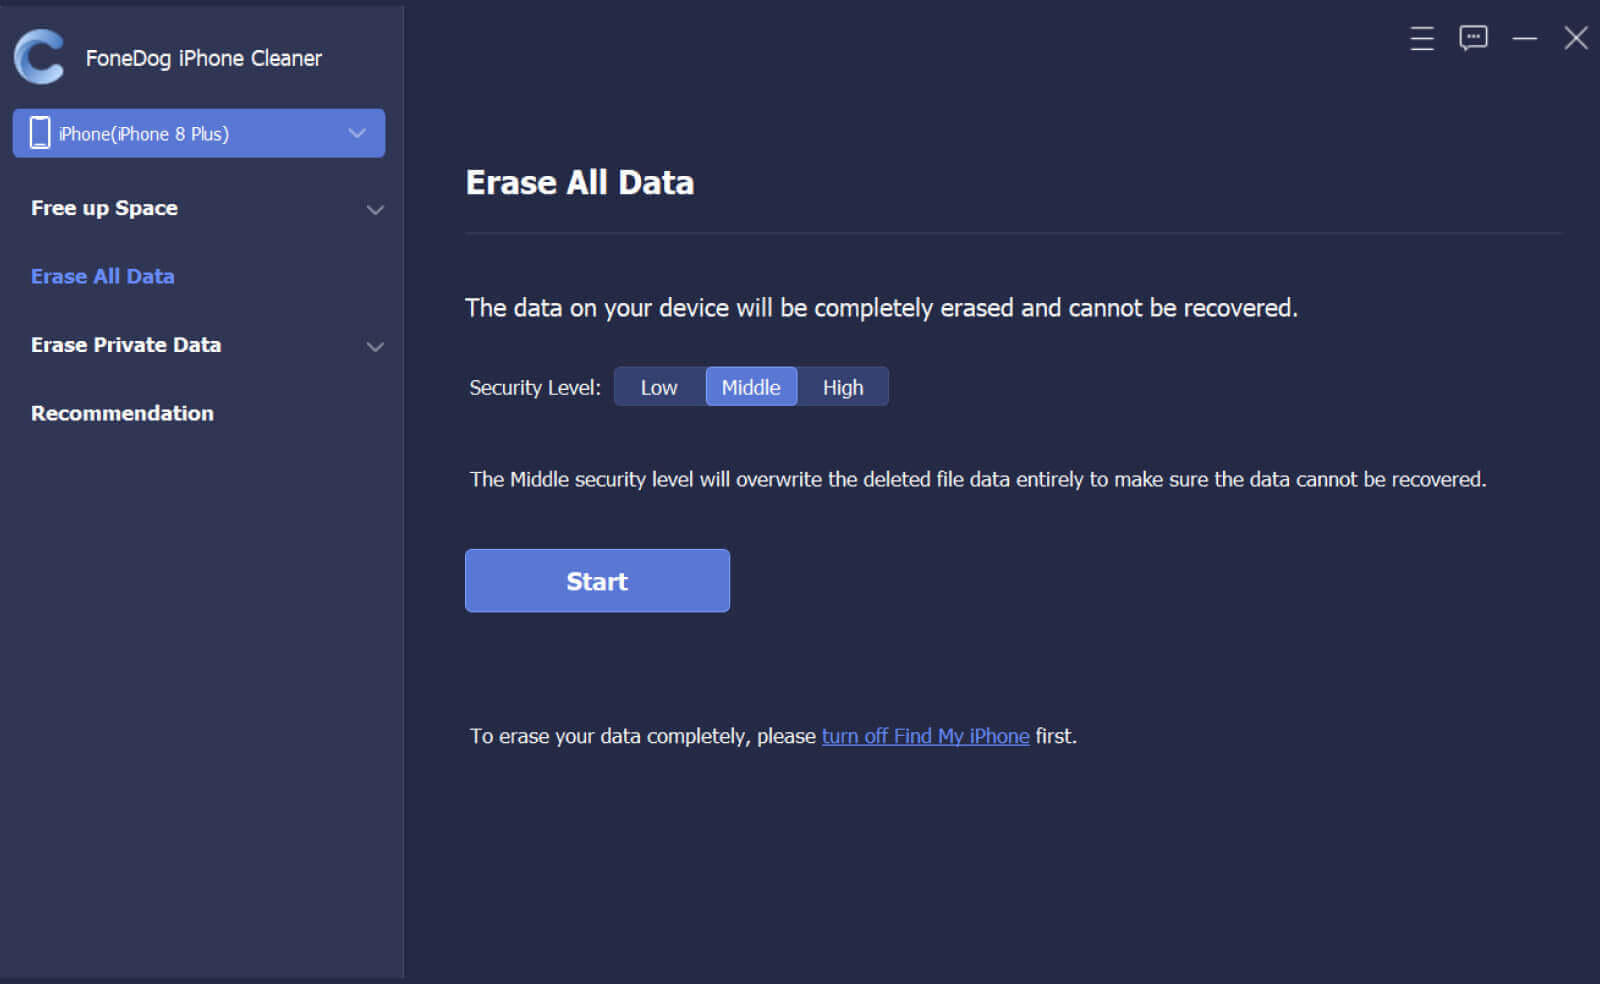
Step 1. Click Erase All Data on the left panel. There is three Security Level provided: Low level, Middle level, and High level. Select one level and then click the Start button to wipe data from iPhone.
Note: Please turn off Find My iPhone first before you wipe all the data of your iPhone.
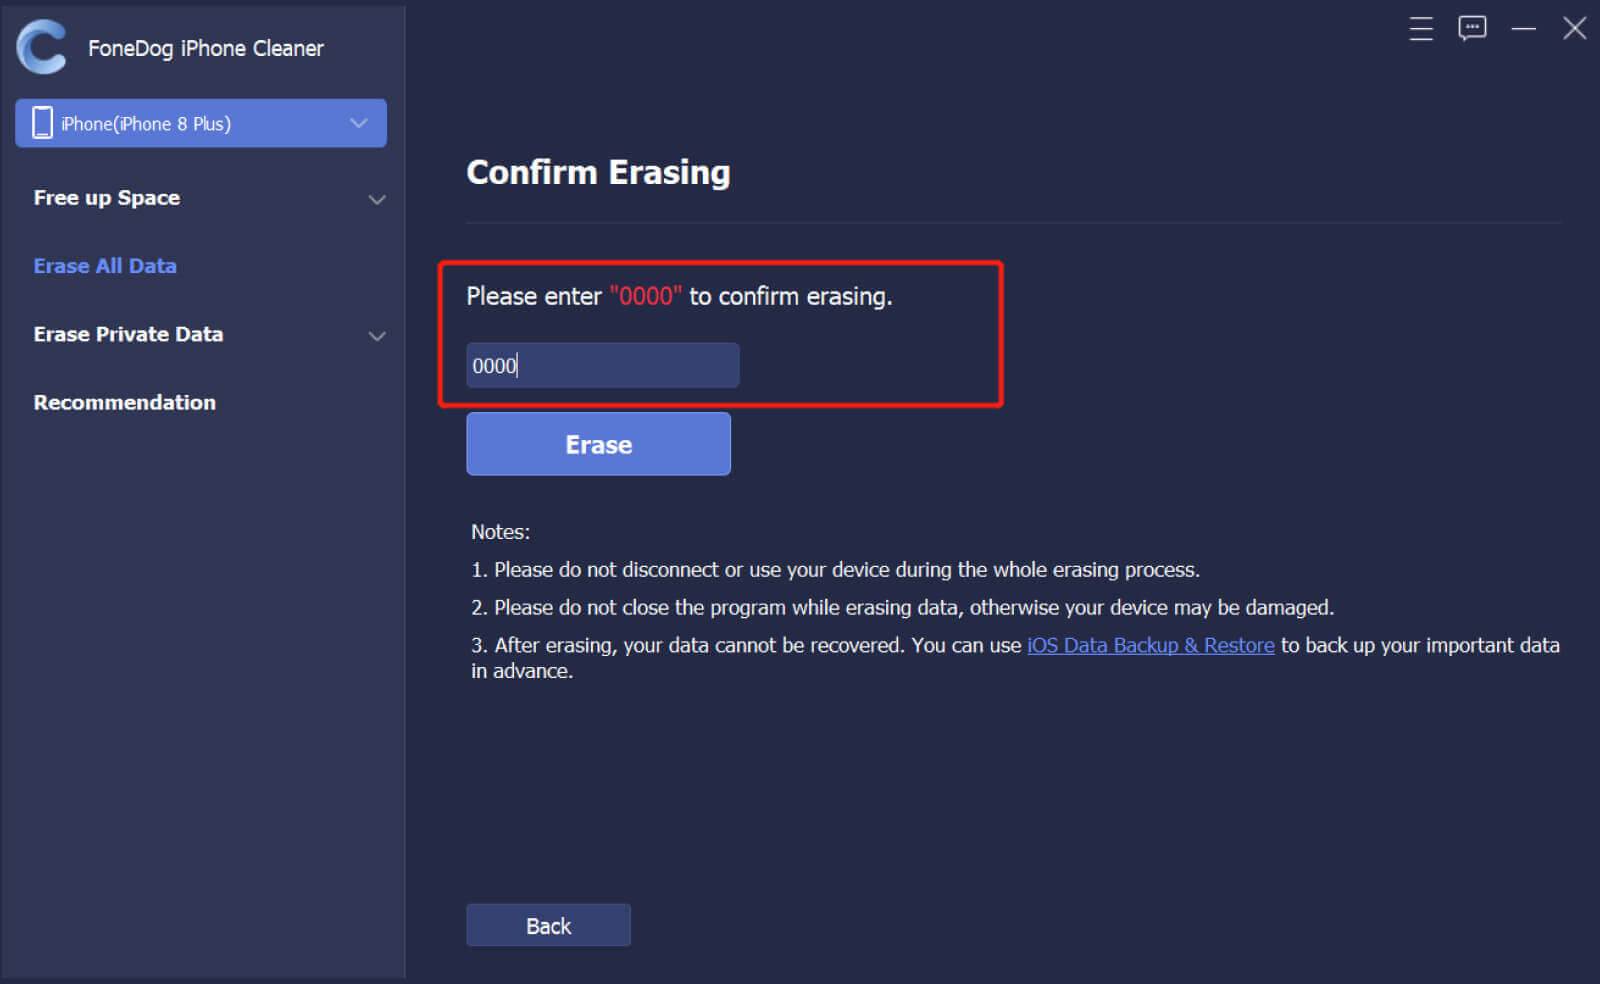
Step 2. Make sure no program is running or updating. Enter 0000 to confirm the erasing operation, and then click Erase button to completely wipe all data on your iPhone. Remember to make a backup before the erasing if you have important data on your iPhone.
Note: Some data will not be wiped by this function like data in the Files app, all of the passwords in Settings, Wi-Fi passwords, device passcode, Voice Mail, etc.
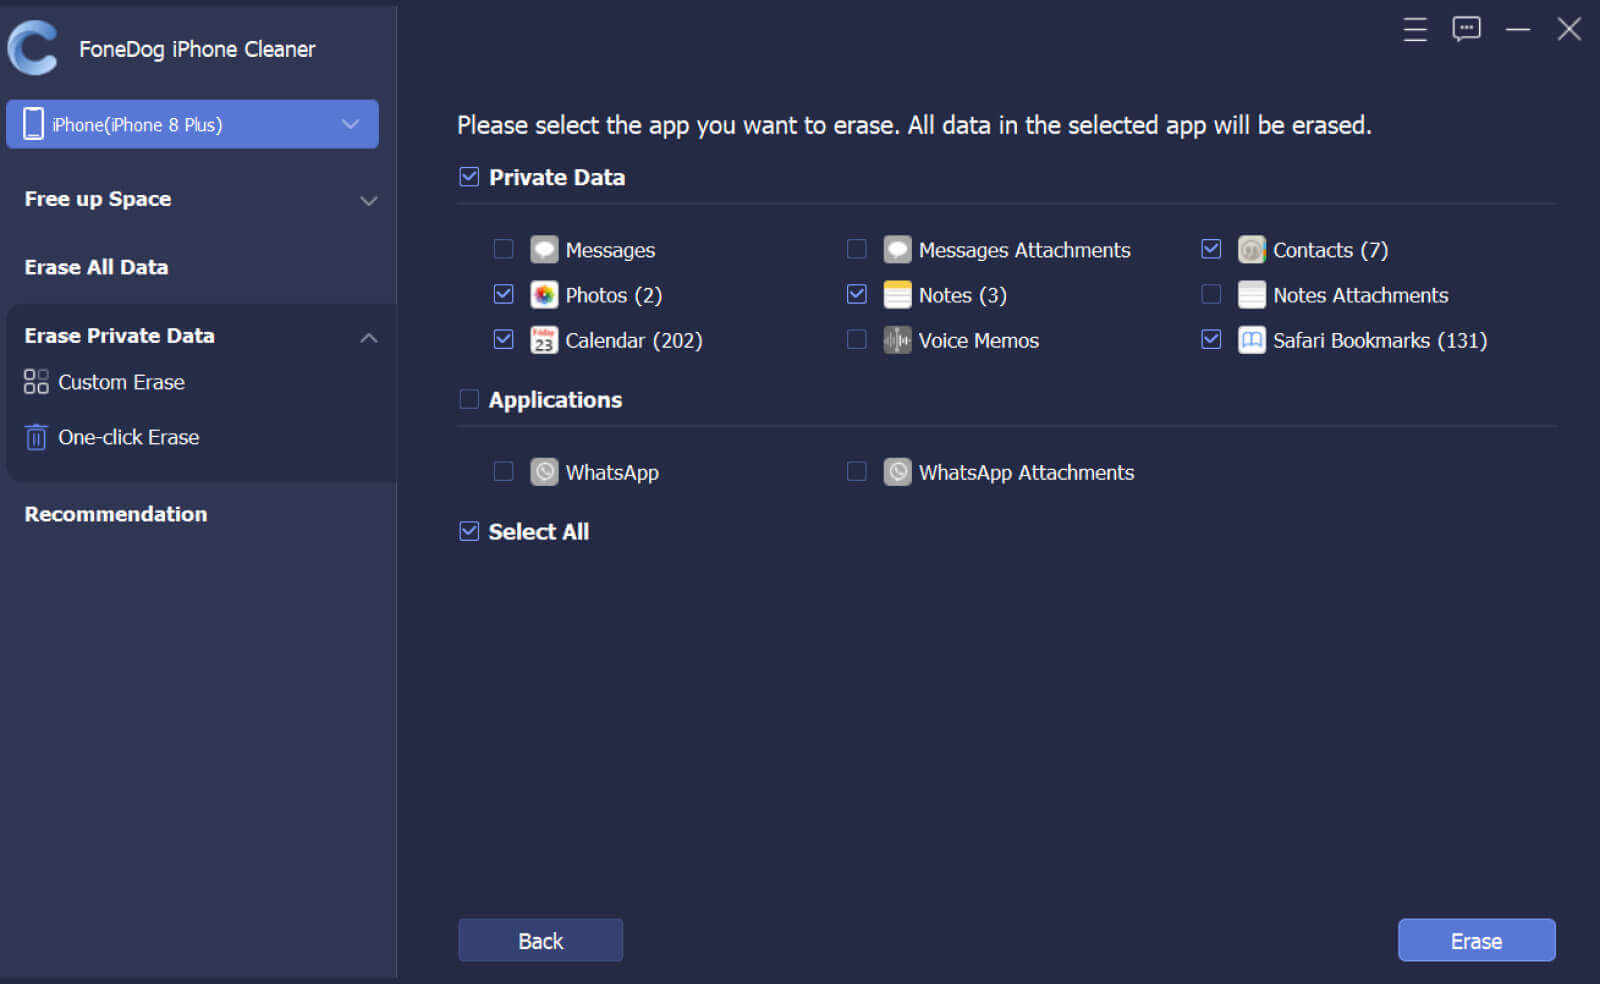
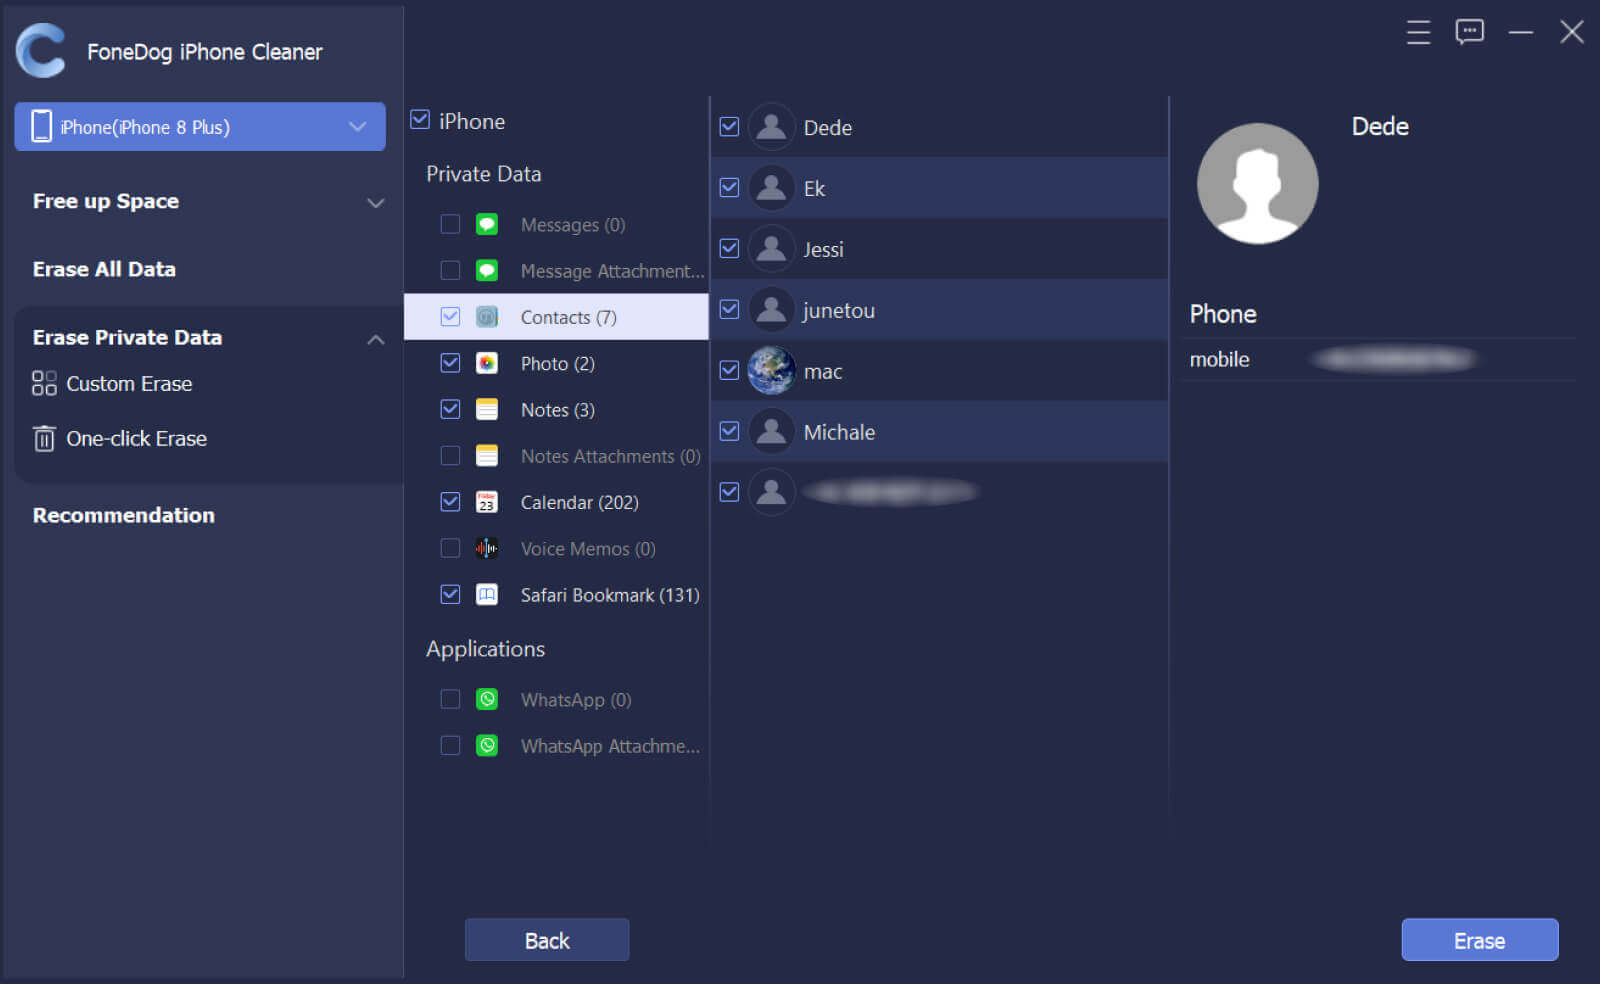
Part 4. Erase Private Data
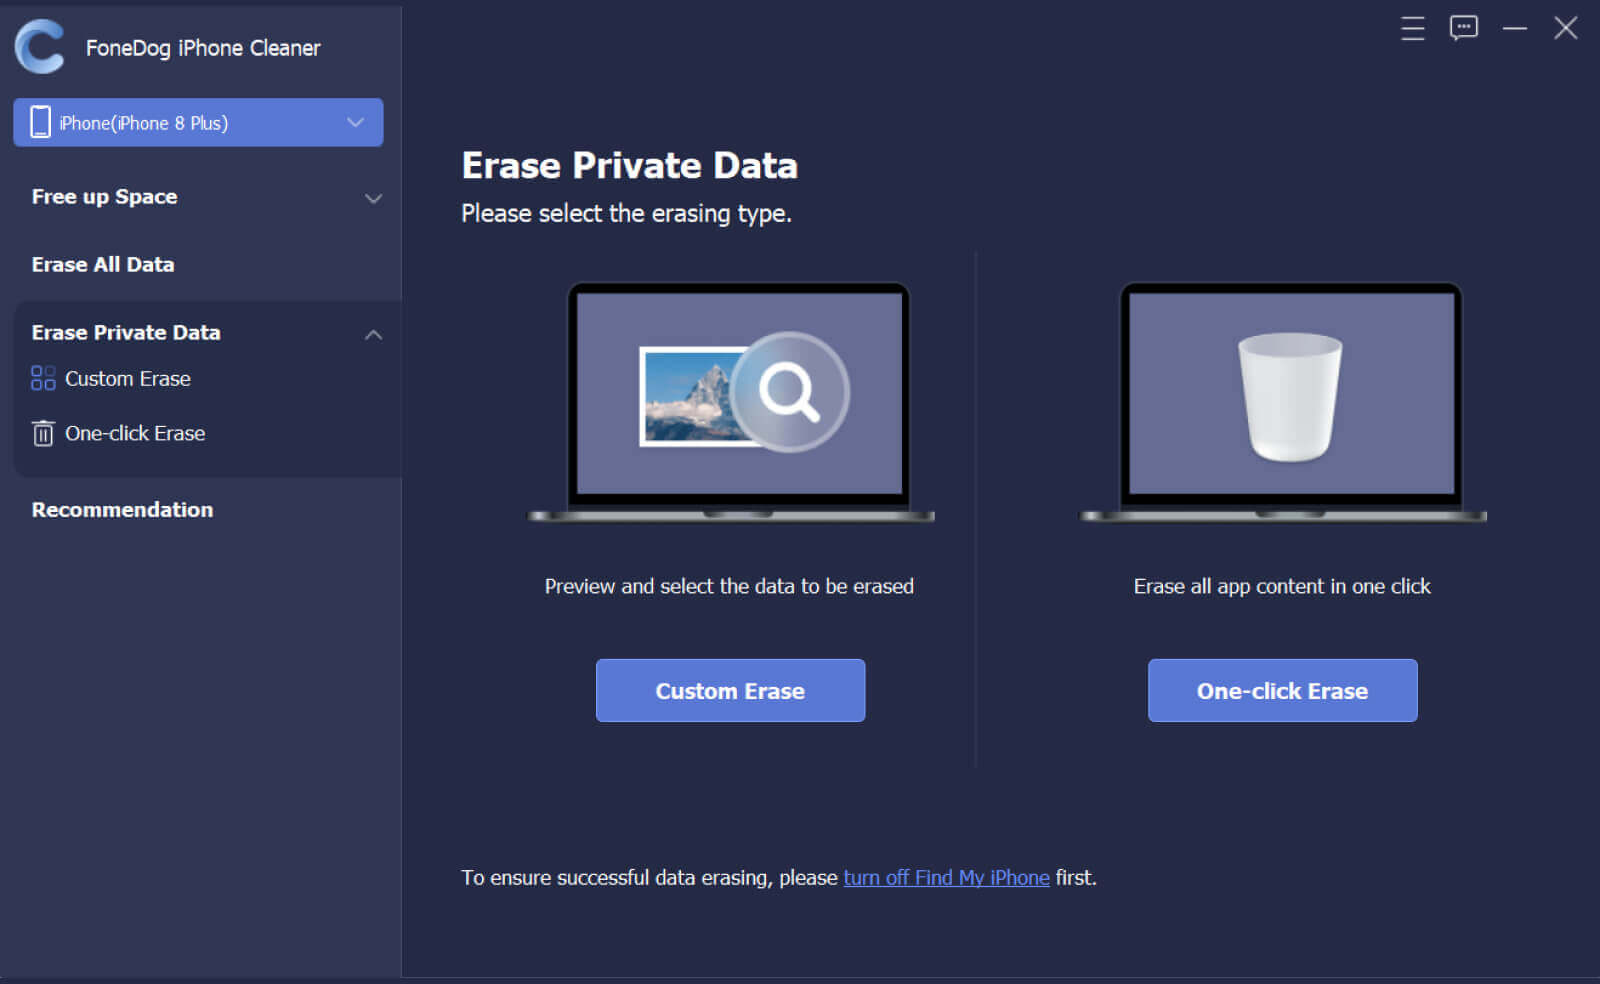
Step 1. Click Erase Private Data on the left side. Two options are provided: Custom Erase and One-click Erase.
Note: Please turn off Find My iPhone to avoid errors when erasing data.
Step 2. Click Custom Erase to start scanning your iPhone. When the scanning process is completed, all private data are listed. Then select the unnecessary ones by ticking the box before each item and click Erase to delete the selected data.
Step 3. If you choose the One-click Erase option, it will start scanning and erasing the private data automatically.