FoneDog Screen Recorder
FoneDog Screen Recorder
Special Offer
Special Offer


By Vernon Roderick, Last updated: January 6, 2024
Due to the advancement of the internet, browsers are now becoming more and more complex. However, we still can’t escape the fact that browsers like Google Chrome, Safari, and more have helped us since its founding.
We use it for our studies, work, and other stuff. Simply put, you won’t be able to pass up the opportunity to use a convenient technology such as this.
But as time passes by, we rely more and more on browsers for our daily needs. It is now where we store important data such as passwords, bank accounts, search queries, and more.
So what will you do if, for some reason, that information were lost or deleted along with all the browser data. This should be our main concern as browser users.
Fortunately, today we’re going to talk about what browser data really is and how to go about browser history recovery.
An Overview of Browser DataEasy Ways for Browser History RecoveryUsing Third-Party Software for Browser History RecoverConclusion

Browser data have different components including history. For example, it is where we can find bookmarks, passwords, and more. So while we call it browser history recovery, we should not only worry about it, and instead focus on browser data as a whole.
But for now, you should know that the history component is the records of web pages that you’ve visited in the past. This is where you’ll find the website name as well as its URL.
The browser data, including history, can be found on the hard drive of your device, be it a personal computer or a phone. In addition, if a browser account is linked to your current browser, such as Google Account, Firefox Account, etc., the data will be stored on their server.
You should take note of this since this will be important for browser history recovery.
As you may already know, you can recover deleted the browser data through different means.
Now that you know what browser data is, it should be easier to understand the different ways for browser history recovery, which was our point of discussing it first.
As previously said, there are countless methods that you can take for browser history recovery. So without further ado, let’s look at the first and perhaps the simplest one.
Google has a lot of features that help its users in their daily internet needs. However, what’s more important now is that they have a lot of features for browser history recovery.
This is only the first one. But, it’s important to remember that these features that we mentioned are only accessible if your browser is connected to your Google Account.
This is because the Google History that is found on their server is not deleted even with all the histories of your browser lost and deleted. Here are the steps to access the Google History.
If you see nothing on the History page, don’t worry because you still have to log in to your Google Account for it to work.
As I mentioned earlier, there are many methods that Google offers us for browser history recovery. So for now, let’s finish the it available in Google.
If you don’t know what cookies are, they are basically data stored in your computer which is sent by the browser. The reason why they are called “cookies” is that they are small pieces of data.
And as you may have already guessed, the browsing history is part of these cookies, and it will be therefore playing a vital role in our browser history recovery. To access cookies, you need to do the following steps:
This is the second method for browsering history recovery that Google offers its users. Now let’s proceed to the third and last one.
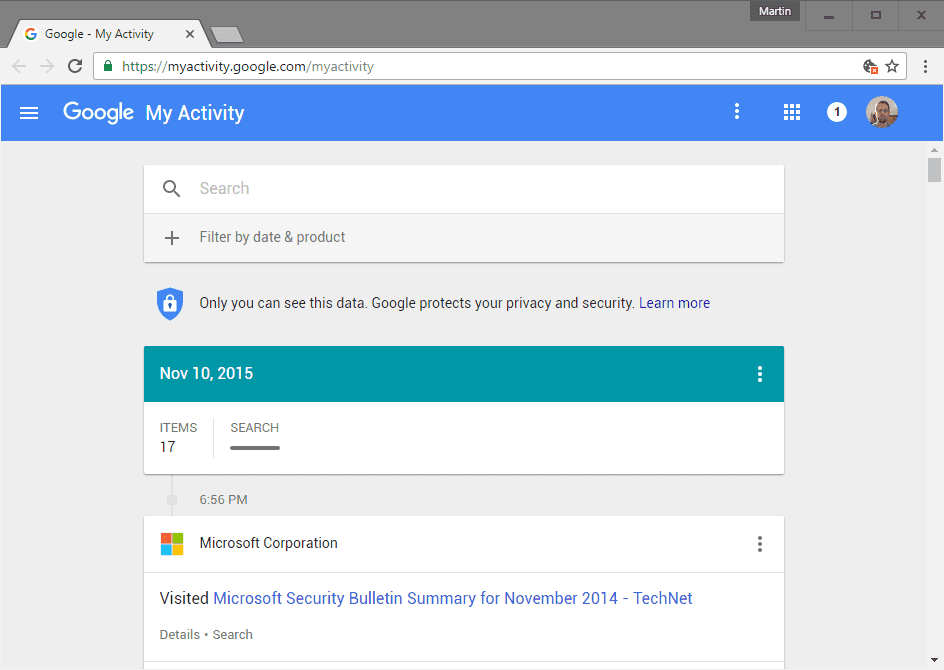
Google Chrome has this page called My Activity. This is where you can check the activities that you’ve done in your account. To access this tool, follow these instructions:
At that point, you can easily locate which activity you wanted that led you to this browser history recovery task.
And now that we’re finished with the last browser history recovery method that Google offers us, let’s get into other ways for browsering history recovery.
The System Restore feature is available in most operating systems. It allows you to restore your computer to an earlier version of itself. This is usually then when an update messed something up.
While it is one of the relatively easy ways to browser history recovery, System Restore takes time since you’ll have to wait for the process to finish itself.
But the great thing about this is that along with all the files in your computer, it can also do browser history recovery.
However, remember that this can only be possible if you create a restore point prior to the loss of your browser history. Additionally, before doing System Restore, make sure you make a backup of your current files that you didn’t have before since it might be erased during the process.
Here’s a step-by-step guide on how to do it, from creating a restore point to the actual restoration:
After the reboot, check your browser if the browser history recovery was successful. If it is, then you now have nothing to worry about anymore. However, if it wasn’t, proceed with using an older restore point. But if that’s still not enough, you might need to use third-party software.
People Also ReadFoneDog iOS Data RecoveryFoneDog: iPhone & Android Data Recovery, Mac Cleaner, Free PDF
If the other methods didn’t work, you can always make use of third-party recovery software. Fortunately, we have just the perfect recovery software for you, and it is the FoneDog iOS Data Recovery. But wait, what is this third-party software, exactly?
FoneDog iOS Data Recovery is a software that allows you to retrieve all kinds of information and data. It is made as an all-in-one software made just for the purpose of recovering deleted files and lost data by any means, be it through corruption, unintentional deletion, and more.
To give you a better understanding of this software, here’s a step-by-step guide to recovering deleted data.
The process is straightforward and there’s no complex part. You simply need to follow these instructions:
And this is the use of FoneDog iOS Data Recovery. You can easily recover different types of information.
Every once in a while, you have the need to use browsers. For each time we use it, the browser history and data is getting larger and larger, and in turn becoming harder to manage.
That’s why there’s no wonder that you’re here in this page looking for different methods for browser history recovery. Fortunately, there are lots of ways to go about it.
In total, we discussed five browser history recovery methods, including the use of third-party software. What’s more, the recovery software, FoneDog iOS Data Recovery, is very easy to use and is the most reliable one on this list.
Regardless, at the end of the day, you gained an understanding of what browser data is and the different browser history recovery methods.
Leave a Comment
Comment

Technical Expertise for PC/Website Optimization
One of my passion is to develop software of my own
I write articles to share knowledge about IT technology and some experience in developing my own software, and developing my own software is one of my passions for work.
Hot Articles
 /
/
INTERESTINGDULL
/
SIMPLEDIFFICULT
Thank you! Here' re your choices:
Excellent
Rating: 3.0 / 5 (based on 14 ratings)
