FoneDog Screen Recorder
FoneDog Screen Recorder
Special Offer
Special Offer


By Nathan E. Malpass, Last updated: November 16, 2019
Like any other device out there, Windows PCs are not perfect. That’s why you encounter issues with it. Sometimes, you may have handled the computer improperly. Or, you’re not a very technical person that you don’t know what to do or what you have done to the PC. Another reason why you face certain issues with your Windows computer is the fact that there’s actually a hardware or software problem with it.
Whatever the reason may be, there’s one important thing people come across when working with their computers -- the error “Folder Access Denied (Windows 10).” Typically, you are denied access to a specific folder because of the default permissions set in the file system of NTFS.
If you see this problem on your computer, you might be wondering why it happened. This article will walk you through different solutions to solve the issue. Let’s get started.
Part 1: Six Top Fixes to “Folder Access Denied (Windows 10)” ErrorPart 2: Other Fixes for File Access Denied (Windows 10) ErrorPart 3: To Wrap It All Up
If you can’t access a particular folder on your computer, then chances are the files within it will be lost. You can’t do anything with the contents of the folder. That’s why you have to recover the data from it.
Using a tool such as FoneDog Data Recovery can help you restore the contents of the folder you can’t access. In this way, you don’t lose important data you might need for school, work, or business.
Here are the steps you should follow in order to recover data using FoneDog:
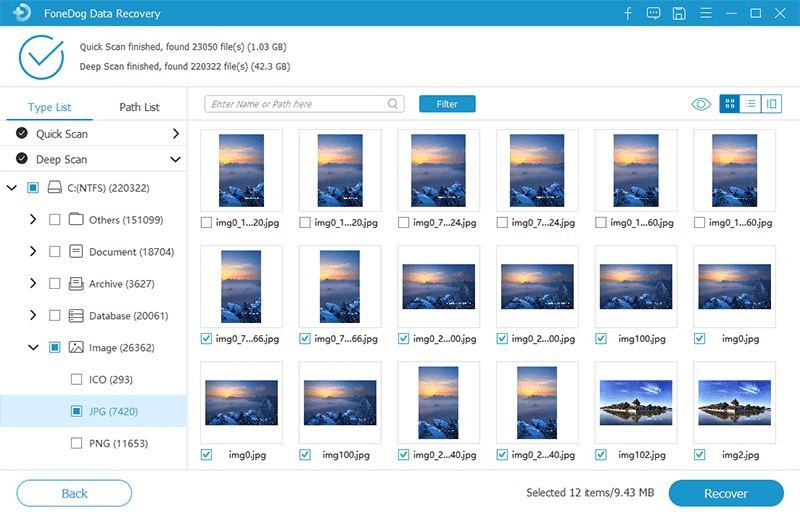
Step 01 - Download, install and launch FoneDog Data Recovery on your Windows PC.
Step 02 - On the main interface, select the device where you want the data to be extracted. In this case, you’re going to select the internal hard drive of your Windows PC. Then, select the type of files you wish to restore. Options include images, audio, video, email, documents, and others.
Step 03 - Click Scan. After this, wait until the process is complete.
Step 04 - FoneDog will display the results of the files you wish to recover. You can opt for Deep Scan if you wish to have more comprehensive results.
Step 05 - Preview the data found by the scan. Then, select the data types and actual files you want to restore.
Step 06 - Finally, click Recover.
FoneDog Data Recovery has a great user interface that’s easy to understand. Aside from recovering data on your computer’s internal hard drive, it can pull up files from memory cards, external drives, Recycle Bin, USB flash drives, and other storage devices.
Your data is 100% secure with FoneDog. While using the software, no data loss will occur within your storage device. The modification of data is not done by the tool. In addition, you can preview the scanned results before you actually recover them, Thus, you don’t need to purchase the software if the file you’re looking for is not in the results list.
Typically, administrators in Windows PCs are the only ones capable of making modifications to the ownership of files and/or folders. It might be possible for you to modify permissions of directories that you own. However, you won’t have ultimate control over others.
The reason being everybody’s files within a specific computer should be kept private. The administrators are the only ones that should be able to access files that are owned by other users. Plus, permission is necessary to modify system files including those located in Windows and Program Files folders. With this, you have to input the admin password.
Here are the steps you should do in order to change your account from the Standard one to the Administrator:
Step 01 - Log in to an Admin account within your Windows PC.
Step 02 - Launch Settings.
Step 03 - Then, I got to “Accounts.”
Step 04 - Press the tab labeled “Family & Other People.”
Step 05 - Select the account you wish to change to admin. This is located under the section “Other People.”
Step 06 - Press “Change Account Type.”
Step 07 - Modify it from Standard User to that of Administrator.
Moving forward, we’ll assume that you have an admin account already. Now, let’s get on to the next solution. 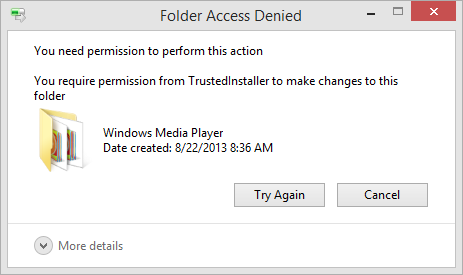
When you see the “folder access denied (Windows 10)” message, you can fix it easily by taking ownership of it using File Explorer. Here’s how you can do so.
Step 01 - Right-click the folder. Then, choose Properties. A new window will appear.
Step 02 - Go to the tab labeled Security. Then, press the Advanced button. Another window will appear.
Step 03 - At the upper part of the new window, it will display the “Owner of the folder.” Sometimes, it will say that it cannot show the current owner of the said folder. This means you have an issue. Press the “Change” link that is colored in blue. This is located on the right-hand side of the owner. As said previously, we are assuming that you are now an administrator in order to do this.
Step 04 - A new dialog box will appear. This will be labeled “Select User Or Group.” Inside it, you have to input a particular account name as the new owner of the folder. This can be users, a group of different users, or a specific account username.
It is important to note that putting in Users would make everybody own the folder. Groups of users, on the other hand, would refer to specific units (e.g., Administrators). Thus, when you set a group of users such as Administrators, all admins would own the folder. Usually, it is recommended that you place the ownership of the folder to one person only. This is true, especially if you are using the computer in a house.
Step 05 - Thus, if you want to make sure you are the owner, type in your username in this dialog box. When you utilize your own Microsoft account in order to log into Windows, the username you have to place is the initial five letters of the associated Microsoft account email address.
Step 06 - Press “Check Names” after you are finished typing in your username. In this way, you can check if it is actually correct. If the computer sees that you have placed the correct username, it will modify it to NAMEOFPC\USERNAME automatically. After this, click OK.
Step 07 - You will be taken back towards the Advanced window. Check the box that says “Replace All Child Object Permission Entries.” Doing so will make sure you are the owner of all folders inside the main one you are fixing. Press OK two times and that’s it. 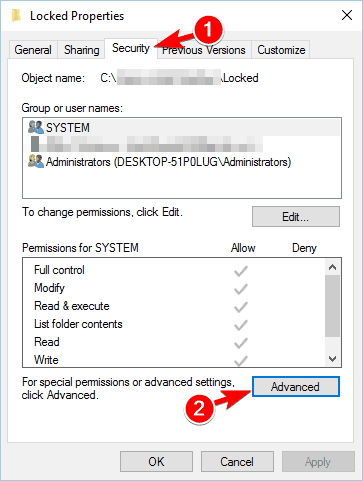
When dealing with errors like this, it is important to always be cautious. Do not take ownership of folders located within system directories. These include those in Program Files, Windows, and Program Data, among others.
When you do this, you are weakening the system’s security. The reason being that normal accounts shouldn’t be the actual owners of these folders or directories. These usually have very important folders regarding the Windows computer that shouldn’t be meddled with.
Windows have a lot of default folders and files which shouldn’t be touched by anybody else. However, you are still able to access these system folders if you wish to. This is true, even if you are not the owner.
When you have tried to take ownership of a specific folder and the method didn’t succeed, then you should try this next method. You should check which users have actual permissions to that folder you can’t access.
Here are the steps on how to do it:
Step 01 - Right-click the folder and click Properties.
Step 02 - Go to the Security tab. In the upper part, a list will be displayed. This will contain groups and users on your computer. Select one by clicking an entry.
Step 03 - Now, the panel at the bottom will display the permissions that a particular group or user has for the specific folder. When it says “Full Control,” it means they have ultimate power on the folder and the contents in it. When it says “Read,” it means the control is very restrictive. It only allows you to view the contents.
There are times when the antivirus software takes complete control over certain folders. That’s why you can’t access it. This may be the next step if you think the solutions above won’t work. There might be a file shield on your antivirus software.
Thus, you have to take a look at their settings and other similar ones. You can opt to deactivate the file shield first. Then, try if you can access the folder after doing so. If this doesn’t work, you can deactivate your antivirus software completely. Check out if that works too.
A reason for seeing the error “Folder Access Denied (Windows 10)” is that the contents of the folder in question are encrypted. Thus, you can’t access it since it is protected by a key. This is usually done by the owner to make it 100% private and secure.
Typically, you are able to encrypt the contents of the folder in Windows. However, the said capability is available only on Professional versions of the operating system. Here are the steps to review the encryption of files:
Step 01 - Right-click the folder and click Properties.
Step 02 - Go to the tab labeled “General” and then click “Advanced.”
Step 03 - Check if the box labeled “Encrypt Contents To Secure Data” is enabled. If it is, then it means your folder is locked with a key.
Usually, this encryption is very transparent. This means that the owner can’t notice the said encryption. When the owner is logged into the Windows PC, they have access to the folder and its contents. However, if the account you’re using doesn’t contain the certificate in order to encrypt the said folder, the PC won’t give you access to it. The person or account that actually encrypted the folder or file should unlock it first. 
We’ve gone through the most significant ways to fix the problem. A lot of advice can be seen on the web. However, not all of them are useful. Some advice would tell you that you should gain administrator permissions to fix the problem. This has been discussed above in this article.
Not all solutions may work for your case. However, showing you other potential solutions to the problem may still be worth it. These “other” solutions can be used when nothing works from the previous solutions above.
One thing you should do is to deactivate User Account Control (UAC). In order to do this, go to the Start Menu and type out “UAC.” After that, you have to select “Change User Account Control Settings.” Then, you should drag the displayed slider towards the bottom. Then, press OK.
After you have implemented this, you can try the solutions above one more time for taking ownership of folders. Once you’re done doing so, you can immediately reset the settings of the UAC back to the previous default one.
Another solution would be to boot your computer within Safe Mode. Then, go through the solutions above for taking ownership of the folder. In this way, incompatibility issues and interference with that of third-party apps can be ruled out.
Also, you have to ensure that other programs (or any system tools) are utilizing the folder you can’t gain access to. The process of the other program could be the reason why the file is locked. That’s why changes to it can’t be made.
We’ve taken the liberty to give you steps on how to solve the problem “Folder Access Denied (Windows 10).” If you want to make sure you don’t lose the files inside the folder, you can use FoneDog Data Recovery to restore the data.
Sometimes, you can fix the problem by troubleshooting the permissions. Ensuring you had administrator privileges is one step to doing it. Then, you adjust the permissions as necessary. Simply remember to avoid modifying ownership of system folders that are protected. The reason being that doing so will compromise the security of your system.
So, have you fixed the problem with our solutions below? Are there any other solutions you recommend? Let us know in the comments section below. We’d love to hear your thoughts.
Leave a Comment
Comment

iPhone/Android Devices’ Maintenance Expert
Staying home, listening to music, writing tech articles
Many people asked me to repair their mobile phones so I have a lot of experience in mobile phone repair, and I know a lot about Android or Apple phones.
Data Recovery
FoneDog Data Recovery recovers the deleted photos, videos, audios, emails, and more from your Windows, Mac, hard drive, memory card, flash drive, etc.
Free Download Free DownloadHot Articles
 /
/
INTERESTINGDULL
/
SIMPLEDIFFICULT
Thank you! Here' re your choices:
Excellent
Rating: 4.6 / 5 (based on 86 ratings)
