FoneDog Screen Recorder
FoneDog Screen Recorder
Special Offer
Special Offer


By Vernon Roderick, Last updated: November 19, 2019
You have several partitions located on your hard drive, and you now need to acquire one partition that is bigger than the other. After all, being able to manage more data is without a doubt the dream of many users.
For that, you will have to learn how to do a Mac resize partition without erasing. Fortunately, Apple made it easier to do so. This can be done with the Disk Utility tool on your Mac, but of course, there’s more to it than that.
Although there are testimonies of success around the internet, doing a Mac resize partition without erasing involves not only shrinking the partition but also enlarging it. Either way, with the right conditions, you will be able to do it without any problems. And that’s why we must first discuss the conditions or requirements for doing a Mac resize partition without erasing.
Part 1:Conditions for A Mac Resize Partition without ErasingPart 2:What to Do Before Mac Resize Partition Without ErasingPart 3:Mac Resize Partition without ErasingPart 4:Mac Resize Partition with Deleted VolumePart 5:Recover Data from Resized PartitionPart 6:Conclusion
We said “requirements” or “conditions”, but this is actually known to professionals as the “rules of partition Part 1:n resizing”. This is because it’s not necessarily required nor is it something that is doable, but you will have to remember them if you want to get the best results for it.
Regardless, here are the rules that you will need to remember:
It is important to understand how this works in order to do tasks related to it successfully. After all, just by the looks of it, these rules can definitely be used to help you towards doing a Mac resize partition without erasing.
Now with those rules out of your way, it might be time to proceed with the actual steps. However, we will first discuss the preparations, since preparing can also be considered as part of doing the task.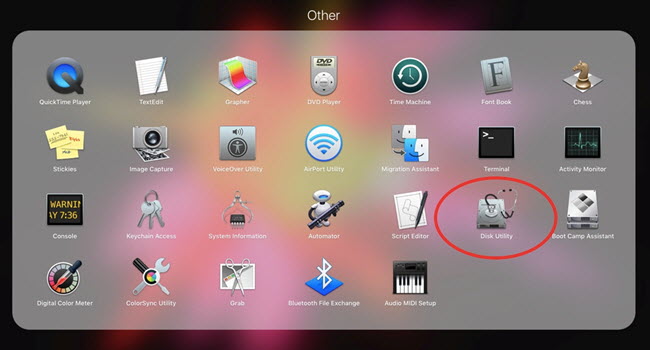
As we’ve said before, there are many users that became successful in their tasks to do a Mac resize partition without erasing. Nonetheless, some of them realized that there are a few things they needed to do first.
The common thing about them is that they’ve encountered some problems due to not realizing this sooner. So to avoid that from happening to you, let’s first discuss the preparation for this. Here are some of the few tricks that you have to learn before doing a Mac resize partition without erasing:
One of the main problems of users is that instead of being able to configure partitions in the Disk Utility, they see it as greyed out or locked out. This is mainly due to the user having inactive partitions.
To fix this, you have to follow these steps:
This should allow you to configure your partitions the way you want. Now let’s head to the second thing you need to do before resizing partitions.
Sometimes, the reason why users encountered errors when resizing partitions is that the partition wasn’t actually a normal partition. There are many types of volumes so this is common.
To turn an otherwise normal partition to the recommended type to do a Mac resize partition without erasing, you have to follow these steps:
This should revert that volume into a normal partition. After this, you won’t have to deal with trouble when resizing that particular partition. Now there is still one step left for the preparation stage.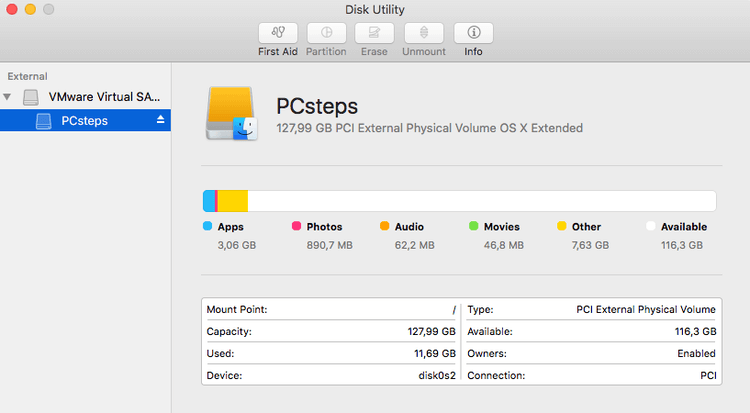
Since hard drives are sometimes not mounted automatically in Recovery Mode, you will have to mound them manually. In addition, in order to do a Mac resize partition without erasing, or any other configuration at that matter, the hard drive should be mounted.
So here’s how you can do this:
This should mount the hard drive, which would allow you to configure it as much as you like. During these three steps, it is natural to lose some files. For that reason, we recommend to make backing up your Mac the first thing you do.
Regardless, you should now be fully prepared to do a Mac resize partition without erasing.
To do a Mac resize partition without erasing, there are many obstacles that you will have to overcome. Perhaps one of the most troublesome problems might be the fact that you will have to have a certain amount of know-how to accomplish this.
For this, we will use the Disk Utility tool. The Disk Utility is a tool that allows users to configure their storage disks in several ways. This includes shrinking and enlarging, or in short, resizing partitions. The best thing about this is that you don’t carry the risk of erasing a disk. Thus, it’s the perfect method to do a Mac resize partition without erasing.
Under the right circumstances, you can make it possible. Just follow these steps carefully:
Disk Utility has a feature that allows you to decrease the size of a certain volume as long as the files that are contained within it will still be able to fit on the new size that you set.
For example, you can select B volume. If the current size is 100 GB and the used space is 25 GB, you can enter at least 25 GB on the Size field. Additionally, if you want to resize it into 60 GB, you need to enter 40 GB to the Size field since 100 GB with 40 GB deducted results to the 60 GB volume you desire.
Once you enter the size, press Enter. The pie chart will serve as a visual aid to what you did to the volume. Click on Apply to finish the resizing process. Now the next step is to transfer the leftover space to a third volume so that you won’t lose the data from the B volume. We can name the third volume as C.
There are many ways to resize a partition, but you will have to put extra effort if you want to avoid losing files from doing so. This is perhaps the only method to do a Mac resize partition without erasing. With that matter settled, let’s head to a simpler solution that carries more risks.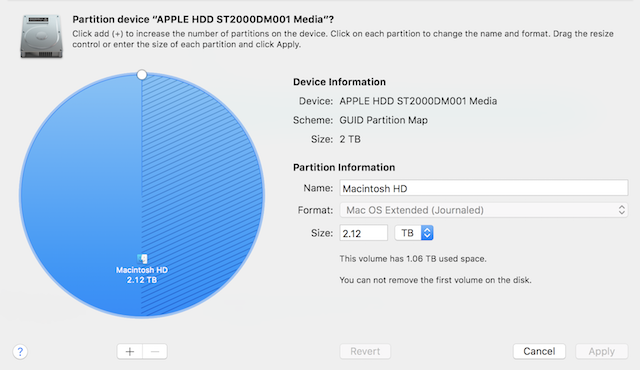
Compared to how you can do a Mac resize partition without erasing, not worrying about deleting a volume would, of course, be much easier. To accomplish this, you will still have to make use of the Mac Disk Utility.
The only difference between the two is that you will have to follow a few more steps in the previous section to compensate for the bonus of not having to delete a volume. So you can expect that this would be much easier.
Without further ado, here are the steps you need to follow:
Now there should be a new window appearing with a pie chart and some information about both the device and partition.
This, of course, won’t allow you to customize how much size you want to add or deduct.
With this, you will be able to resize a partition. Unfortunately, though, you will have to delete partitions to accomplish this. Of course, files contained within them will be deleted as well. It’s tragic, but what if you can recover the files that were deleted along the partitions?
The internet offers a lot of things. A way to completely control your computer, a tool for transferring files, and most importantly, a way to recover your files. Unfortunately, most of the data recovery tools out there are not exactly capable of recovering data from a resized partition.
That’s why we recommend FoneDog Data Recovery software. This is mainly because the software is capable of recovering data from all kinds of sources. This includes the Recycle Bin, a hard drive, memory cards, flash drives, and of course, partitions.
With this, you’ll be able to do a Mac resize partition without erasing without worrying about the risks of losing files, since you can recover it anytime with FoneDog Data Recovery.
As you may have already realized, resizing a partition relies on many factors. For one, you will have to set your Disk Utility tool to the appropriate version. There’s also the data loss issue that you need to worry about.
Fortunately, with what we discussed earlier, you won’t have to worry about much. You simply have to follow the steps and you’ll be done. If you find this tutorial on how to do a Mac resize partition without erasing helpful, feel free to share this with others.
Leave a Comment
Comment

Technical Expertise for PC/Website Optimization
One of my passion is to develop software of my own
I write articles to share knowledge about IT technology and some experience in developing my own software, and developing my own software is one of my passions for work.
Data Recovery
FoneDog Data Recovery recovers the deleted photos, videos, audios, emails, and more from your Windows, Mac, hard drive, memory card, flash drive, etc.
Free Download Free DownloadHot Articles
 /
/
INTERESTINGDULL
/
SIMPLEDIFFICULT
Thank you! Here' re your choices:
Excellent
Rating: 4.7 / 5 (based on 60 ratings)
