FoneDog Screen Recorder
FoneDog Screen Recorder
Special Offer
Special Offer


By Vernon Roderick, Last updated: April 2, 2021
Windows Services is an integral part of the Windows operating system. It is a computer program that runs in the background with no user interface. The service can get stuck at some point in the system, or went missing or deleted. One cause of this is malware or a virus that attacks your system which disabled or deleted the services. So we will show you how to use Windows undelete service methods?
A long-running application that gets started automatically when the Windows system has started and it can be stopped, restarted, disabled at any time. Many features and applications in Windows rely on the Services to do specific functions for its programs. Even if no one is assigned to do it, the service can run in the background and do its work. Examples of which are database and web servers that run as services in your Windows operating system.
There are several processes that you can follow in order to restore the services. To use Windows undelete service methods, follow the step-by-step instructions below.
Part 1. The Best Software to Restore FilesPart 2. Is it Possible to Restore the Missing or Deleted ServicesPart 3. Windows Undelete Service via SFC ToolPart 4. Windows Undelete Service via Process IDPart 5. Create a Windows ServicePart 6. Automatic Restart of Windows ServicePart 7. How To Repair for Windows UnDelete ServicePart 8. Restore Default Startup Type for Windows ServicePart 9. In Summary
An incredible and powerful data recovery software is here to help you with your problem with missing or deleted files and services. FoneDog Data Recovery program is reliable and professional software with an easy step-by-step wizard feature that will guide you to a simple data recovery process.
Trusted by many, this application can support the recovery of any type of file such as image, video, audio, archive, email, and documents from any type of device.
This is an easy and simple to use data recovery program that can be utilized in any problematic situation such as file recovery, hard drive recovery, flash drive recovery, memory card recovery, crashed Windows or Mac recovery, and partition recovery.
A free trial version of the application is available for you to download for Windows and Macintosh operating systems. Continue to read below on how to use the FoneDog Data Recovery program for your data recovery needs.
In addition, here is an article that also uses this tool to solve how to recover deleted data from SD cards.
Data Recovery
Recover deleted image, document, audio and more files.
Get deleted data back from computer (including Recycle Bin) and hard drives.
Recover loss data caused by disk accident, operation system crushes and other reasons.
Free Download
Free Download

Open the FoneDog Data Recovery program after you have downloaded and installed it on your computer. Go to the Start menu and search for the FoneDog Data Recovery application from the Programs list.
As a shortcut, you can double click the application’s shortcut icon found on the desktop or click the pinned icon on the taskbar (if a shortcut is made or the tool is pinned to the taskbar).
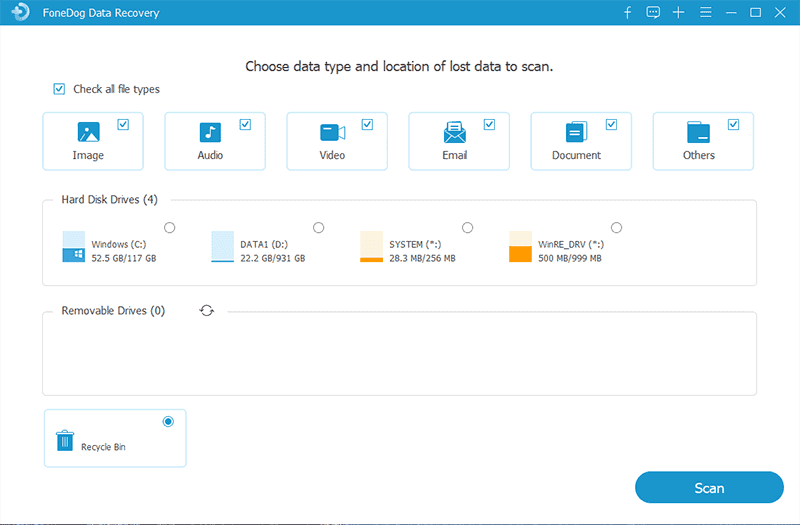
Select the types of files you want to restore such as the Services files and the hard disk drives where you want to restore the deleted or missing files. The types of files that can be restored are photos, audio, video, email, archive, documents, applications, and other file types.
To begin scanning your computer, hit the Scan button located in the bottom right corner of the wizard. By default, the tool will perform a quick scan on your chosen device.
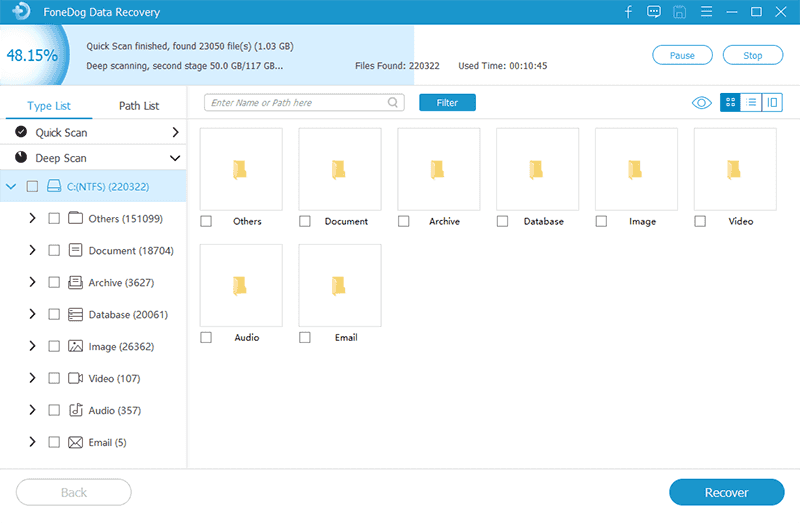
By default, the FoneDog Data Recovery tool will do a quick scan which will work at a speedier speed. You can choose also to run a Deep scan which will show more contents and will take longer to finish. You can also apply some search filters when you want to search for specific files after the scan such as the file name or file path.
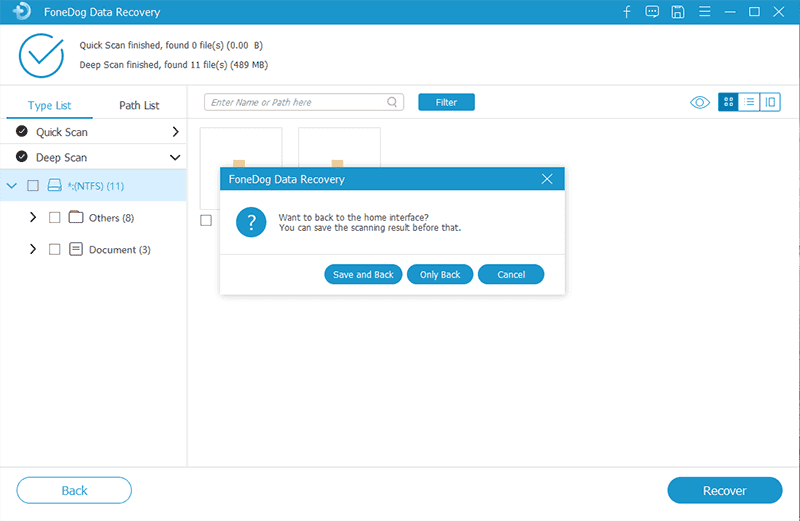
After the scan has finished its run, the file results are shown by type or path. Choose the files that you wish to be recovered. Press the Recover button found at the bottom right corner of the window to start the data recovery process. Remember, do not close the window but wait for the file recovery process to complete.
If there are malware or viruses in your computer system, it is possible that the Services in Windows operating system are disabled, deleted, or went missing. This issue can be addressed and made possible by manual methods to restore the service. Another automated process is by using a data recovery program that is available today.
FoneDog Data Recovery software can support file recovery on your computer or any device that you are using. It can support any type of data for retrieval and restoration such as the Services files. Presented in this article are the various methods for Windows undelete service. Make sure to make a backup of your important files first.
The previous section talked about various methods of Windows undelete service. This section provides information on how to restore Windows Services using the System File Checker tool.
Run the SFC or System File Checker tool to restore Windows services or repair the system files that are corrupted, missing, or cannot be started and stopped (in the stuck state). Open an elevated Command Prompt (with full Administrator access) to run the SFC.exe tool. To do this, follow the steps below.
Step 01: Launch the Run dialog window. Shortcut: Press Windows Logo + X keys and select Command Prompt (Admin) from the menu.
Step 02: Type cmd on the Open field.
Step 03: Then, press Enter or click OK.
Step 04: The Command Prompt window appears. Type in
DISM.exe /Online /Cleanup-image /Restorehealth
to run a Deployment Image Servicing and Management (DISM) scan. Then, press Enter. Wait for the command operation to be completed.
Step 05: On the Command Prompt, type in SFC /scannow and hit the Enter key.
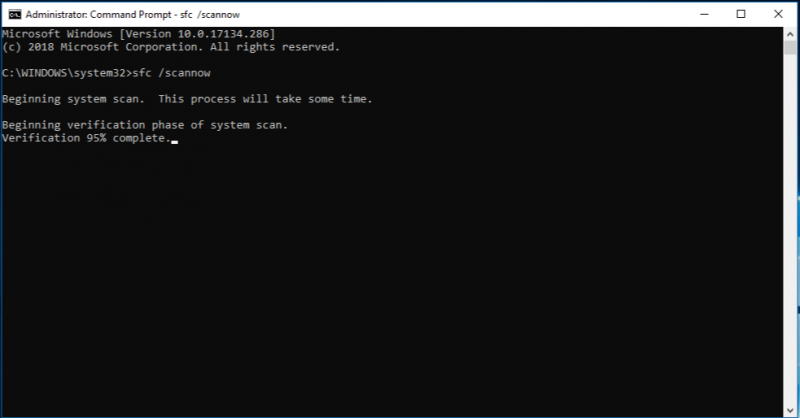
The command will check the integrity of the system files and restore a cached copy of the corrupted files from the Windows operating system.
Step 06: The scan may take some time. Wait for the scan to finish which will return the results after. Do not close the Command Prompt window when the scan and restoration have not yet completed.
Step 07: Reboot your computer after the System File Checker tool has finished running. Check if Windows Services are restored properly.
Here are the possible message results returned after the System File Checker tool has completed its run:
If the requested operation is not successful, try performing the System File Checker scan again in Safe Mode or manually repair the corrupted files. You can also try using the FoneDog Data Recovery software introduced in Part 1: Restore Files Using FoneDog Data Recovery.
This section provides detailed information for Windows undelete service. This will recover the Services in Windows operating systems that are in a stopped state or stuck in starting and stopping state. This will also help restore the Services that are in Error 1053: The service did not respond to the start or control request in a timely fashion.
You can use this app to help with the play service error. Two options are presented here. One involves killing the service if you do not want a reboot of your computer. The second option is faster to implement but will restart your computer.
Step 01: Take note of the Service Name. Go to Services and double-click the service which is stuck. Under the General tab is the identified Service name.
Step 02: Get the Process ID (PID) of the service by going to the Command Prompt. Launch the Run dialog window. Press Windows logo + R keys as a shortcut.
Step 03: On the Open field, type cmd.
Step 04: Then, press Enter or click OK.
Step 05: The Command Prompt window appears. Type in sc query ex [service name] where the [service name] is the name of the Service you have gotten from Step 01.
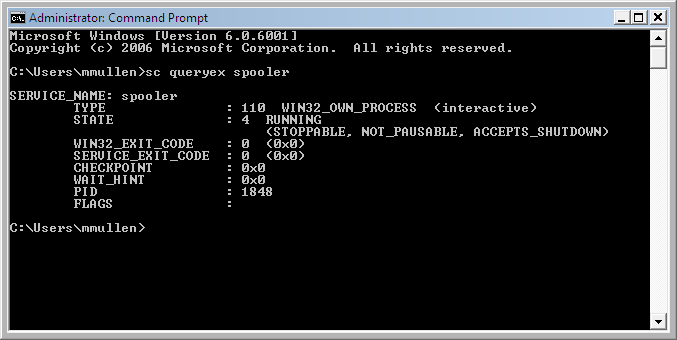
Step 06: Take note of the PID from the returned results in the Command Prompt. PID is short for Process ID. It is a unique identifier number that is tagged to each running process in an operating system.
Step 07: Kill the service through its Process Identifier (PID). On the same Command Prompt window, type in taskkill /f /PID [PID] where the [PID] is the PID number from the previous step.
Step 08: The result will return a successful termination of the service. The success message will be shown as “SUCCESS: The process with PID [number] has been terminated.”
This will fix most problems and your operating system will begin to run in a fresh new state. To restart your computer, simply follow these steps:
Step 01: Go to the Start menu.
Step 02: Select Power Options.
Step 03: Click Restart.
This basic method provided will assist you in how to create a Windows service after happen Windows Undelete Service, accidentally or intentionally. This applies to Windows Server 2003 only. You can use the SC tool (SC.exe) which is included in the Resource Kit.
Step 01: Launch the Run dialog window.
Step 02: The Run window appears. Type in services.MSC on the Open field.
Step 03: Then, press Enter or click OK.
Step 04: The Services window appears. Go to the Recovery tab.
Step 05: On the First failure, Second failure, and Subsequent failures dropdown, select Restart the Service.
Step 06: Set the Reset to fail to count after and Restart service after to 0 (zero).
The basic process provided here will guide you on how to do an automatic restart of your Windows service should it fail or crash.
Step 01: Launch the Run dialog window.
Step 02: The Run window appears. Type in services.MSC on the Open field.
Step 03: Then, press Enter or click OK.
Step 04: The Services window appears. Go to the Recovery tab.
Step 05: On the First failure, Second failure, and Subsequent failures dropdown, select Restart the Service.
Step 06: Set the Reset to fail to count after and Restart service after to 0 (zero).
Step 07: Click OK.
This section provides step-by-step instructions on how to do Windows repair to restore the missing or Windows Undelete Service. Reinstall the Windows system using its installation disc or via the command prompt. Make sure to restart your computer in Safe Mode and do the necessary backup of your files before doing the system repair.
Step 01: Go to Advanced Startup options. While the system is getting started, press the key. F11
Step 02: Select the Troubleshoot option from the menu.
Step 03: Next, select Advanced options.
Step 04: On the list, select Startup Repair.
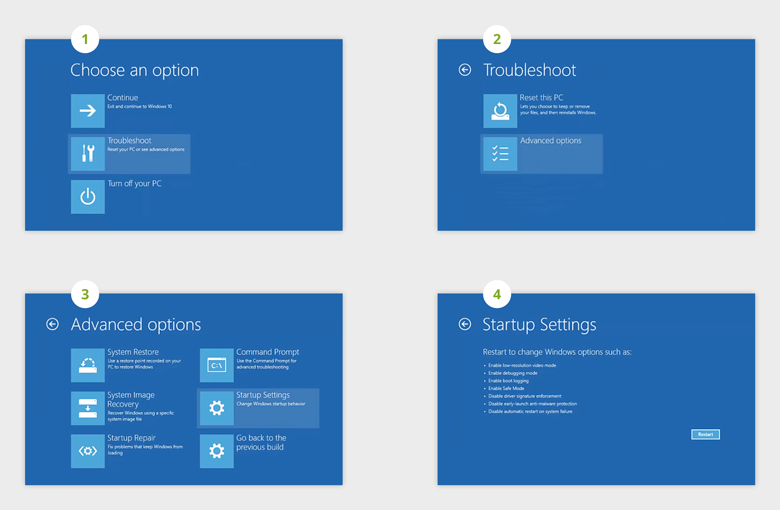
Step 05: Type the number key that corresponds to the option, in this case, Enable Safe Mode with Command Prompt.
Step 06: The system will restart in Safe Mode. After, press the Windows and X keys and select Command Prompt (Admin).
Step 07: The Command Prompt window appears. Type in DISM.exe /Online /Cleanup-image /Restorehealth and press Enter.
Step 08: Wait for the command to finish its run. Then, restart the system in normal mode.
This section will help you restore the Windows Services using the batch files created in the Command Prompt. Each service has its own batch file which you can download on this link. This will work for Windows 10 version only.
Step 01: Download the batch file of the service from the given link above.
Step 02: Right-click on the downloaded file and choose Run as administrator.
Step 03: Wait for the batch run to complete. When it is finished, reboot your computer to reflect the changes.
People Also ReadUndelete Plus for Data Recovery and Its Effective AlternativeMac Undelete: How to Undelete Files from Mac
Because of the malicious software that exists on the web, may it be virus or malware, it is advisable to use anti-virus and anti-malware scanners, plus creating backup copies of your important files from time to time.
The malicious software can attack the services in your Windows operating system, which makes the services be in a stuck state or worse, get deleted. To resolve this problem, there are several methods introduced in this article as to the Windows undelete service processes to restore the Windows services.
Also presented here is to utilize a data recovery software called FoneDog Data Recovery which is a recommended program for an easy and convenient data recovery process. It can help restore any type of file from any device or disk drive. It supports the recovery of files in any situation. A tool is a reliable software that has a high success rate and provides 100% data security from loss.
Leave a Comment
Comment

Technical Expertise for PC/Website Optimization
One of my passion is to develop software of my own
I write articles to share knowledge about IT technology and some experience in developing my own software, and developing my own software is one of my passions for work.
Data Recovery
FoneDog Data Recovery recovers the deleted photos, videos, audios, emails, and more from your Windows, Mac, hard drive, memory card, flash drive, etc.
Free Download Free DownloadHot Articles
 /
/
INTERESTINGDULL
/
SIMPLEDIFFICULT
Thank you! Here' re your choices:
Excellent
Rating: 4.8 / 5 (based on 66 ratings)
