FoneDog Screen Recorder
FoneDog Screen Recorder
Special Offer
Special Offer


By Vernon Roderick, Last updated: July 3, 2020
It’s common to delete some of your files, especially when you’re just getting used to Mac after spending most of your time on a Windows computer. However, what’s not common is losing them permanently, since it’s practically improbable. There are many Mac undelete solutions out there that it’s fairly rare to see someone complaining about not being able to retrieve their files.
This article will talk about some of the most effective Mac undelete solutions so you don’t become one of the very few that lost their files permanently. Let’s start with what I consider to be the best solution.
Part 1. Mac Undelete Freeware: Computer Data RecoveryPart 2. Mac Undelete Backup: Time MachinePart 3. Mac Undelete Shortcut: Undo Delete FeaturePart 4. Mac Undelete Utility: Recover from TrashPart 5. Conclusion
The best way to recover files would be to use specialized software. It is proven to be very effective and has a high chance of success, on top of being easy to operate. Now if you’re looking for free software that is capable of doing Mac undelete, or in short, Mac undeletes freeware, I suggest FoneDog Data Recovery.
Data Recovery
Recover deleted image, document, audio and more files.
Get deleted data back from computer (including Recycle Bin) and hard drives.
Recover loss data caused by disk accident, operation system crushes and other reasons.
Free Download
Free Download

FoneDog Data Recovery can recover all kinds of files, which should be a given to all data recovery software. However, the best thing about this particular tool is it supports not only Windows but also Mac.
Below are the steps on how to do Mac undelete with this tool
Open the FoneDog Data Recover on your Mac computer. At the very top of the main interface is a list of file types, and at the bottom are the storage drives. Select the file types that you want to include, but I suggest clicking Check all file types. Next, select the drive where the files that you lost were originally located.
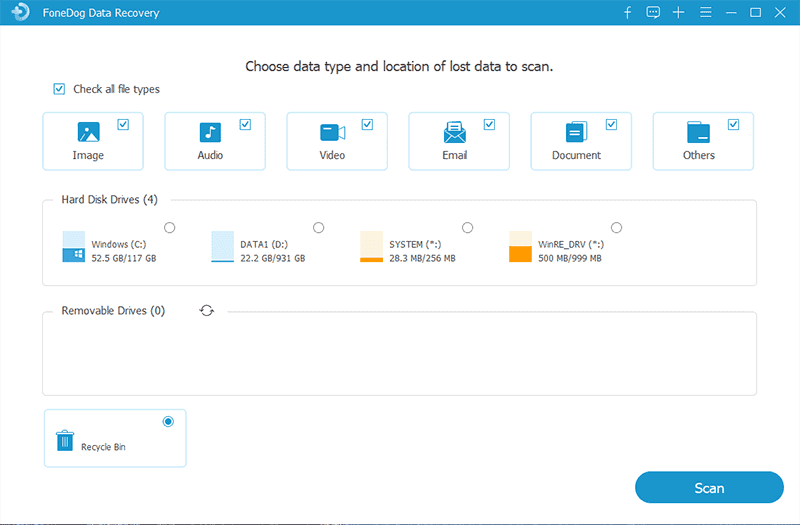
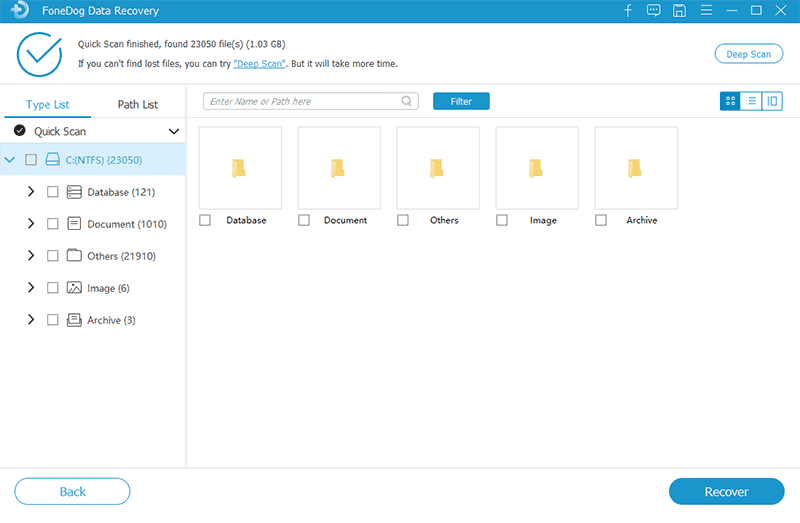
Click on the Scan button at the bottom-right corner of the window. This will initiate a Quick Scan by default. After the initial scan, you will be asked if you want to continue with Deep Scan, which will give you more accurate results.
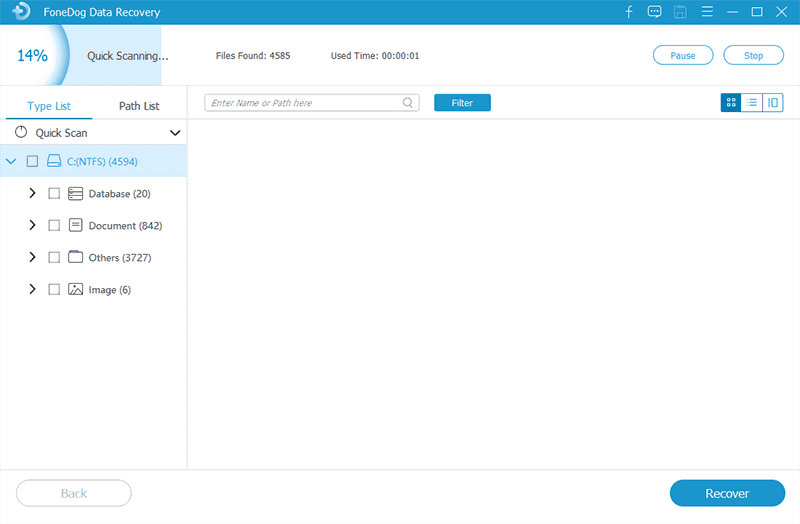
Once the scan is complete, regardless of whether you chose Quick Scan only or Deep Scan, you will get a list of files on the next page. Select the files that you want to recover by clicking on their corresponding boxes. Click on Recover once you are finished with selections.
With this Mac undeletefreeware, it will be very easy to retrieve your files no matter where it came from and why it got lost in the first place. Unfortunately, not many people prefer using third-party software. In that case, I have just the Mac undeletesolution for you.
Mac has a feature called Time Machine. As the name suggests, it can take your computer back in time to a point where your files were still where it should be. There are two parts of using the Time Machine to do Mac undelete, (1) creating the backup and (2) restoring from the backup.
If you haven’t created the backup before, you can’t restore from it since the said backup doesn’t exist in the first place. In such a case, doing Mac undelete will be impossible. However, there is a huge chance that you can still do Mac undelete since backups are created automatically by Time Machine.
With that being said, we will be talking about how you can create the backup. But first, here’s a look at what you need:
Below are the steps on how to create the backup for future Mac undelete:
Note: Check the Encrypt Backup Disk option if you want to add a password on the said disk.
Take note that it may not ask you to make the disk as a backup disk, so here’s how to do it manually instead:
Now simply wait until all the files are backed up into the selected disk. The next step would be the actual part where you do the Mac undelete.
Once you have created the backup, you should now be able to restore it. In other words, you can now do Mac undelete. Below are the steps on how you can do Mac undelete by restoring from a backup:
It may take a while, depending on how many files you have. Either way, this is a very effective method if you plan on doing Mac undeleteon your whole computer.
While the previous Mac undelete solution is viable, it takes too long. This is a no-no if you only lost a few files. You can say that the effort is not worth it. So how much effort would be worth it if you only intend to do Mac undelete on a few files? The easiest method to retrieve files would be pressing only two keys on your keyboard, and that would be Command + Z.
So what does Command + Z do? Command + Z will undo the most recent action that you took on your Mac. In other words, if you have just deleted the file, pressing Command + Z will result in undoing the deletion. If it didn’t work, you can take a slightly longer method. Just go to the Edit menu on your Mac and select the first option from the dropdown menu which is Undo.
That’s the easiest Mac undelete solution, but it is also the most ineffective. This is because if you lost the file long ago, it would be impossible to retrieve it using this method, no matter how many times you press Command + Z, but you do have one last chance.
The last Mac undeletesolution is a simple and straightforward method. You simply get the file from the Trash. The Trash is where all deleted files end up. However, if you press Command + Delete, the selected file would be deleted without sending it to the trash first. Specialized software is used for those kinds of situations.
Either way, you can do a Mac undelete using the Trash with these steps:
Note: This will send the file into where you drag it into. If you want to send it back to where it originally was located, you can click the File menu and select Put Back.
Remember that all files on the Trash will be automatically deleted after 30 days. As such, I recommend going there immediately if you think the time is about to run out. You can disable to expiry concept by going to Finder > Preferences > Advanced. There, make sure the option for Remove items from the Trash after 30 days is not selected.
Now, what if the file that you want to recover was originally located on your USB? Files deleted from the USB is not sent to the Trash. It is sent to a hidden folder on the USB. Press Command + Shift + Period to show the hidden folder. It should be named. Trashes. Simply cut and paste the files outside of the. Trashes hidden folder.
These are the different Mac undelete solutions. Although they are different, the end result is the same. You will get your files back from non-existence. While you may have struggled this time, it should be easier in the future.
Nevertheless, you should always take care of your files. It’s not every time that you get to recover your files as easily as today, so make sure you don’t lose them a second time.
Leave a Comment
Comment

Technical Expertise for PC/Website Optimization
One of my passion is to develop software of my own
I write articles to share knowledge about IT technology and some experience in developing my own software, and developing my own software is one of my passions for work.
Data Recovery
FoneDog Data Recovery recovers the deleted photos, videos, audios, emails, and more from your Windows, Mac, hard drive, memory card, flash drive, etc.
Free Download Free DownloadHot Articles
 /
/
INTERESTINGDULL
/
SIMPLEDIFFICULT
Thank you! Here' re your choices:
Excellent
Rating: 4.7 / 5 (based on 97 ratings)
