FoneDog Screen Recorder
FoneDog Screen Recorder
Special Offer
Special Offer


By Nathan E. Malpass, Last updated: November 2, 2023
In the ever-evolving landscape of mobile technology, smartphones have become indispensable tools for modern living. With their increasing capabilities, iPhones have transformed into digital hubs where we capture memories, communicate with loved ones, and manage our daily lives. As our reliance on these devices grows, so does the need for efficient data management. This is where something similar to the Recycle Bin in iPhone comes into play.
Much like the familiar concept of a physical recycling bin, the iPhone Recycle Bin serves as a repository for files that have been deleted but not permanently removed from the device. This innovative feature, introduced in recent iOS updates, empowers users to regain control over their storage space while providing a safety net for accidental deletions.
In this article, we will delve into the depths of the iPhone Recycle Bin, uncovering its functionalities, benefits, and strategies to make the most of a top phone file recovery tool. Whether you're an avid photographer, an app enthusiast, or simply someone who loves their iPhone running smoothly, understanding how to effectively utilize the Recycle Bin is a skill worth mastering. Join us as we navigate through the intricacies of managing deleted data on your iPhone and optimizing your device's performance.
Part #1: Where Is the Recycle Bin in iPhone?Part #2: How to Recover Files If You Can’t Find Recycle Bin in iPhone?Conclusion
While the concept of a recycle bin is a common fixture in desktop computing, the iPhone ecosystem introduces a slightly different approach to managing deleted files. Unlike computers where a universal recycle bin exists for all deleted items, the iPhone employs a more nuanced system due to the diversity of apps and data types it accommodates.
Understanding this decentralized approach to the Recycle Bin in iPhone is crucial for effective data management. Knowing where to find the respective recycle bins within different apps will help you recover accidentally deleted files and maintain a clutter-free device.
In the absence of a conventional recycle bin on your iPhone, recovering deleted files might seem like a daunting task. However, there are alternative methods you can employ to retrieve lost data. One of these methods involves utilizing iTunes backups – a feature that can be a lifesaver when all else fails.
Begin by connecting your iPhone to your computer using a USB cable. Launch iTunes if it doesn't open automatically.
In iTunes, locate your device. Click on it to access the summary page for your iPhone.
Under the "Backups" section, you'll find the option to "Restore Backup". This allows you to choose from the available backups that you've previously created.
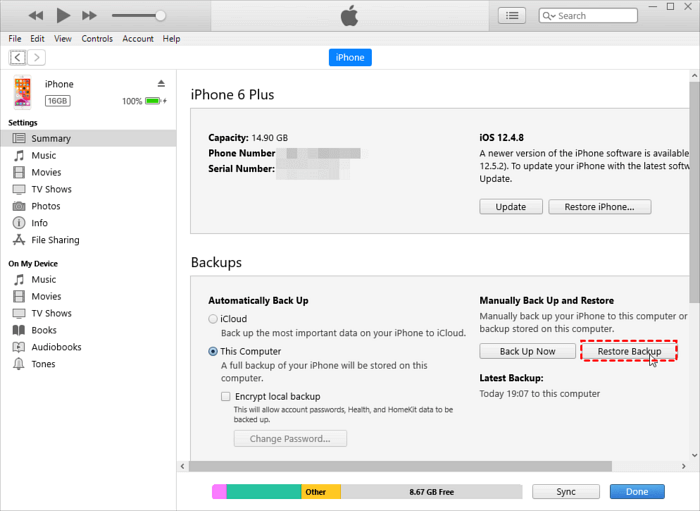
Select the backup that contains the data you wish to recover. Keep in mind that the more recent the backup, the closer it will be to your current data. Click "Restore" and let the process complete.
After the restoration process is done, your iPhone will restart. Ensure you sync your device with iTunes to ensure that all recovered data is updated on your phone.
Note: While iTunes backups can be a reliable method for data recovery, it's important to understand that this process will replace your current data with the data from the chosen backup. Therefore, you may lose any new data or changes made since the backup was created.
Remember, prevention is the best policy. Regularly backing up your iPhone to iTunes or iCloud can significantly reduce the impact of accidental data loss. While this method might not resemble the traditional recycle bin concept, it offers a valuable lifeline when it comes to salvaging lost files. In the next section of this article, we'll explore another method that involves iCloud backups, providing you with multiple options to cater to different scenarios of data loss.
When the Recycle Bin in iPhone isn't readily available, turning to iCloud backups presents another effective way to recover lost files and restore your device to a previous state. iCloud backups capture your device's data and settings, allowing you to retrieve crucial information even in the absence of a traditional recycle bin.
Before proceeding, ensure that you have iCloud backups enabled on your device. To do this, navigate to "Settings", tap your name, select "iCloud", then "iCloud Backup". Make sure the feature is turned on and initiate a backup if needed.
If you've lost data and need to recover it, one option is to erase your device and restore it using an iCloud backup.
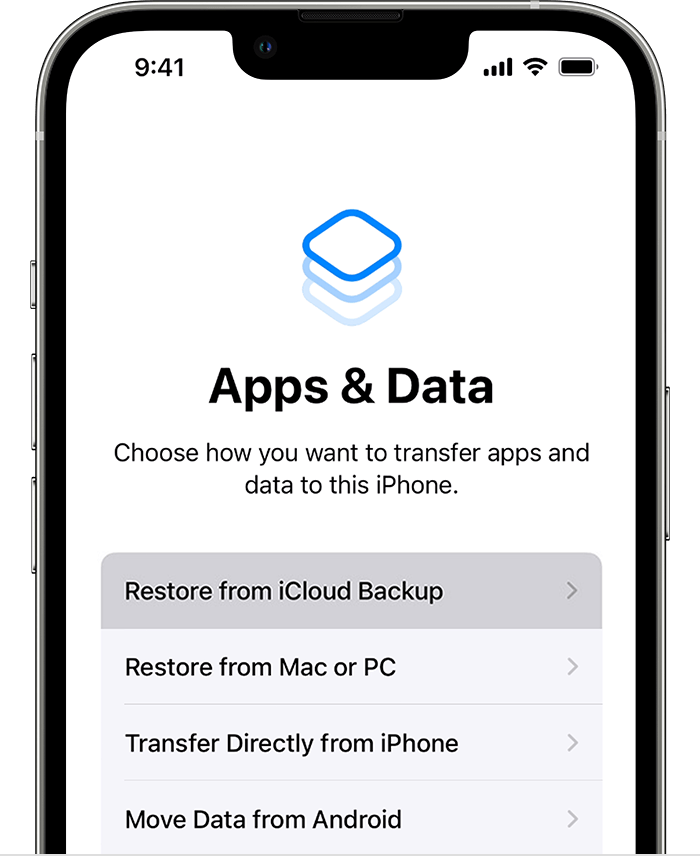
Your device will begin restoring from the chosen iCloud backup. This may take some time depending on the size of the backup and the speed of your internet connection. Once the restoration is complete, your device will restart. Note: Similar to using iTunes backups, restoring from an iCloud backup means reverting your device to the state captured by the backup. Any changes made since the backup was created will be lost.
If you're hesitant about restoring the entire device due to the possibility of overwriting new data, you can choose to merge your iCloud data during setup. This option helps you retain new files while integrating data from the backup.
By leveraging iCloud backups, you gain a powerful tool to reclaim lost files and restore your device to a previous state. This method provides an additional layer of data security, ensuring that even without a conventional recycle bin, your important information remains within reach.
When conventional methods fail and the built-in recycle bin options don't suffice, turning to specialized data recovery software can be a game-changer. FoneDog iOS Data Recovery stands out as a powerful tool designed to retrieve lost files from the Recycle Bin in iPhone, providing an extra layer of recovery potential.
Start by downloading and installing the FoneDog iOS Data Recovery software on your computer. Make sure to choose a reputable and trusted source for downloading the software to avoid any potential security risks.
Launch the FoneDog iOS Data Recovery software and connect your iPhone to your computer using a USB cable.
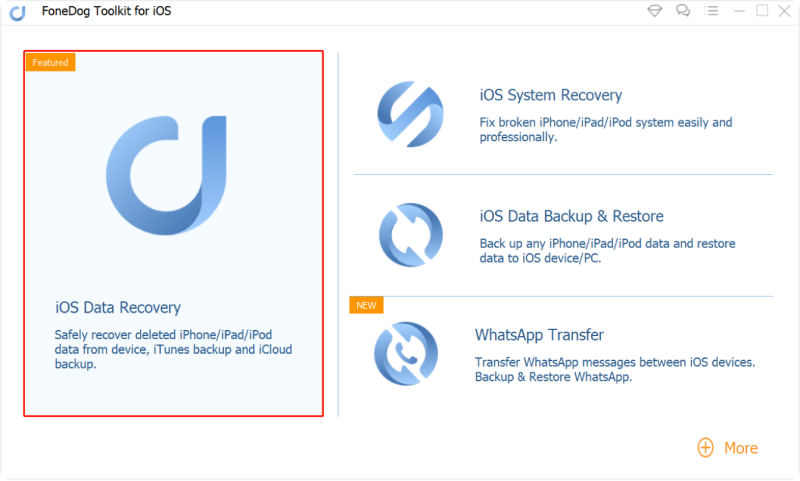
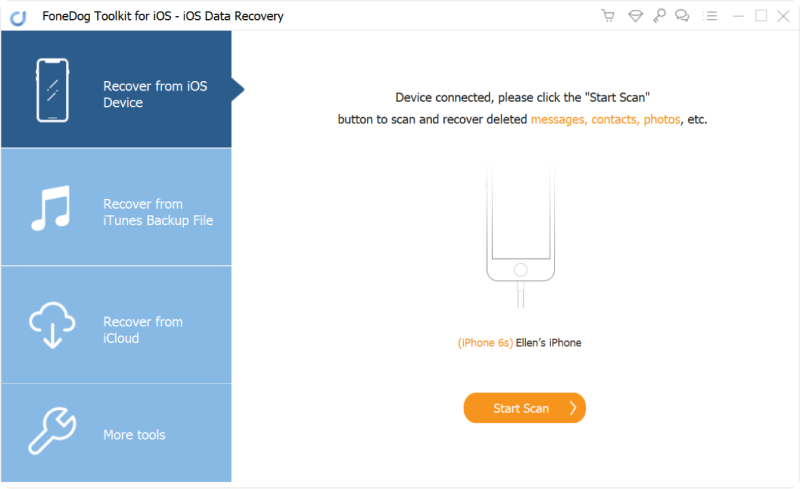
FoneDog iOS Data Recovery typically offers different recovery modes, such as "Recover from iOS Device", "Recover from iTunes Backup", and "Recover from iCloud Backup". Select the mode that aligns with your situation.
Follow the on-screen instructions to initiate the scanning process. The software will analyze your device or chosen backup to identify recoverable data. Once the scan is complete, you'll be presented with a preview of the recoverable files.
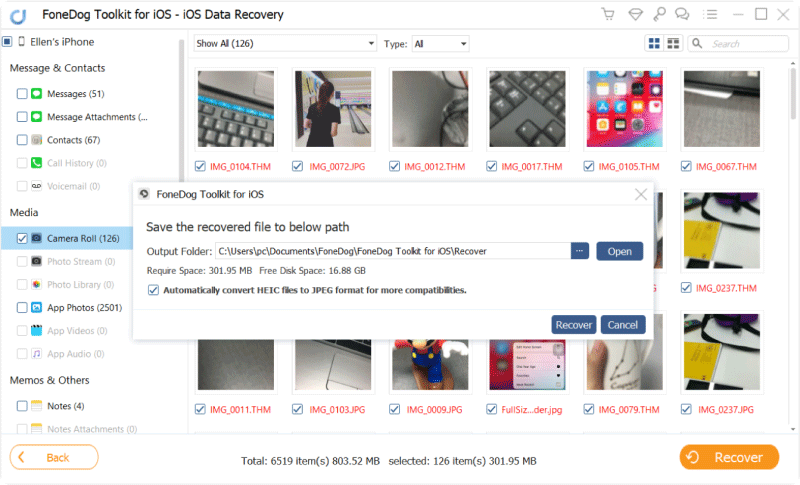
Browse through the previewed files and select the ones you wish to recover. Click the "Recover" button to start the recovery process. Choose a location on your computer to save the recovered files.
After the recovery process is complete, transfer the recovered files back to your iPhone using iTunes or other methods.
In situations where the iPhone recycle bin options are insufficient, or your iTunes, and iCloud backup vanishes, FoneDog iOS Data Recovery, an iPhone 15-supported tool, offers a robust alternative. Remember that preventing data loss is always the preferred approach. Regular backups, careful data management, and cautious usage of your device can go a long way in ensuring that your valuable information remains safe and accessible.
People Also ReadHow to Fix No Recently Deleted Notes Folder on iPhone Issue?How to See Recently Deleted Photos on Your Android or iOS Devices
In the realm of iPhones, the concept of a Recycle Bin in iPhone takes on a more decentralized form. Rather than a single repository, various apps offer their own "Recently Deleted" folders to temporarily house deleted files. Apps like Photos, Notes, and Files employ this approach, providing a grace period during which you can recover items.
For deeper data recovery, methods like utilizing iTunes and iCloud backups prove valuable. iTunes backups let you restore your device to a previous state, while iCloud backups safeguard your data off-device. Specialized data recovery software, like FoneDog iOS Data Recovery, offers an extra layer of assistance.
While the iPhone's recycling landscape may not mirror that of traditional computers, these methods empower you to regain control over your data. Embracing preventive measures, such as regular backups and mindful data management, ensures that your iPhone remains a streamlined hub of productivity and memory.
Leave a Comment
Comment

iPhone/Android Devices’ Maintenance Expert
Staying home, listening to music, writing tech articles
Many people asked me to repair their mobile phones so I have a lot of experience in mobile phone repair, and I know a lot about Android or Apple phones.
iOS Data Recovery
3 Methods to recover your deleted data from iPhone or iPad.
Free Download Free DownloadHot Articles
 /
/
INTERESTINGDULL
/
SIMPLEDIFFICULT
Thank you! Here' re your choices:
Excellent
Rating: 4.8 / 5 (based on 65 ratings)
