FoneDog Screen Recorder
FoneDog Screen Recorder
Special Offer
Special Offer


By Nathan E. Malpass, Last updated: July 16, 2025
Switching from a Samsung smartphone to an iPhone can be an exciting move. Whether it's the allure of Apple's ecosystem, the promise of a new iOS experience, or simply a desire to try something different, making the transition is a significant decision. However, one common concern that arises during this transition is how to transfer photos from Samsung to iPhone easily.
We've all been there, wondering how to safely move our cherished memories from one device to another without losing a single snapshot. Fortunately, we're here to guide you through the process, step by step, on how to transfer photos from your Samsung device to your shiny new iPhone. Say goodbye to worries and technical jargon, and say hello to a smooth and stress-free photo migration.
Part 1. Basic Ways to Transfer Photos from Samsung to iPhonePart 2. One-click to Transfer Photos from Samsung to iPhonePart 3. Conclusion
How to transfer photos from Samsung to iPhone? It doesn't have to be a daunting task. In fact, one of the simplest and most effective ways to do it is by using Google Drive. Google Drive allows you to seamlessly move your photos across devices without the need for any additional software. Here's how you can do it:
Step 1: Install Google Drive on Both Devices
If you don't already have Google Drive installed on your Samsung device, head over to the Google Play Store and download it. On your iPhone, you can find Google Drive on the App Store. Install the app on both devices and sign in with your Google account.
Step 2: Upload Photos from Samsung to Google Drive
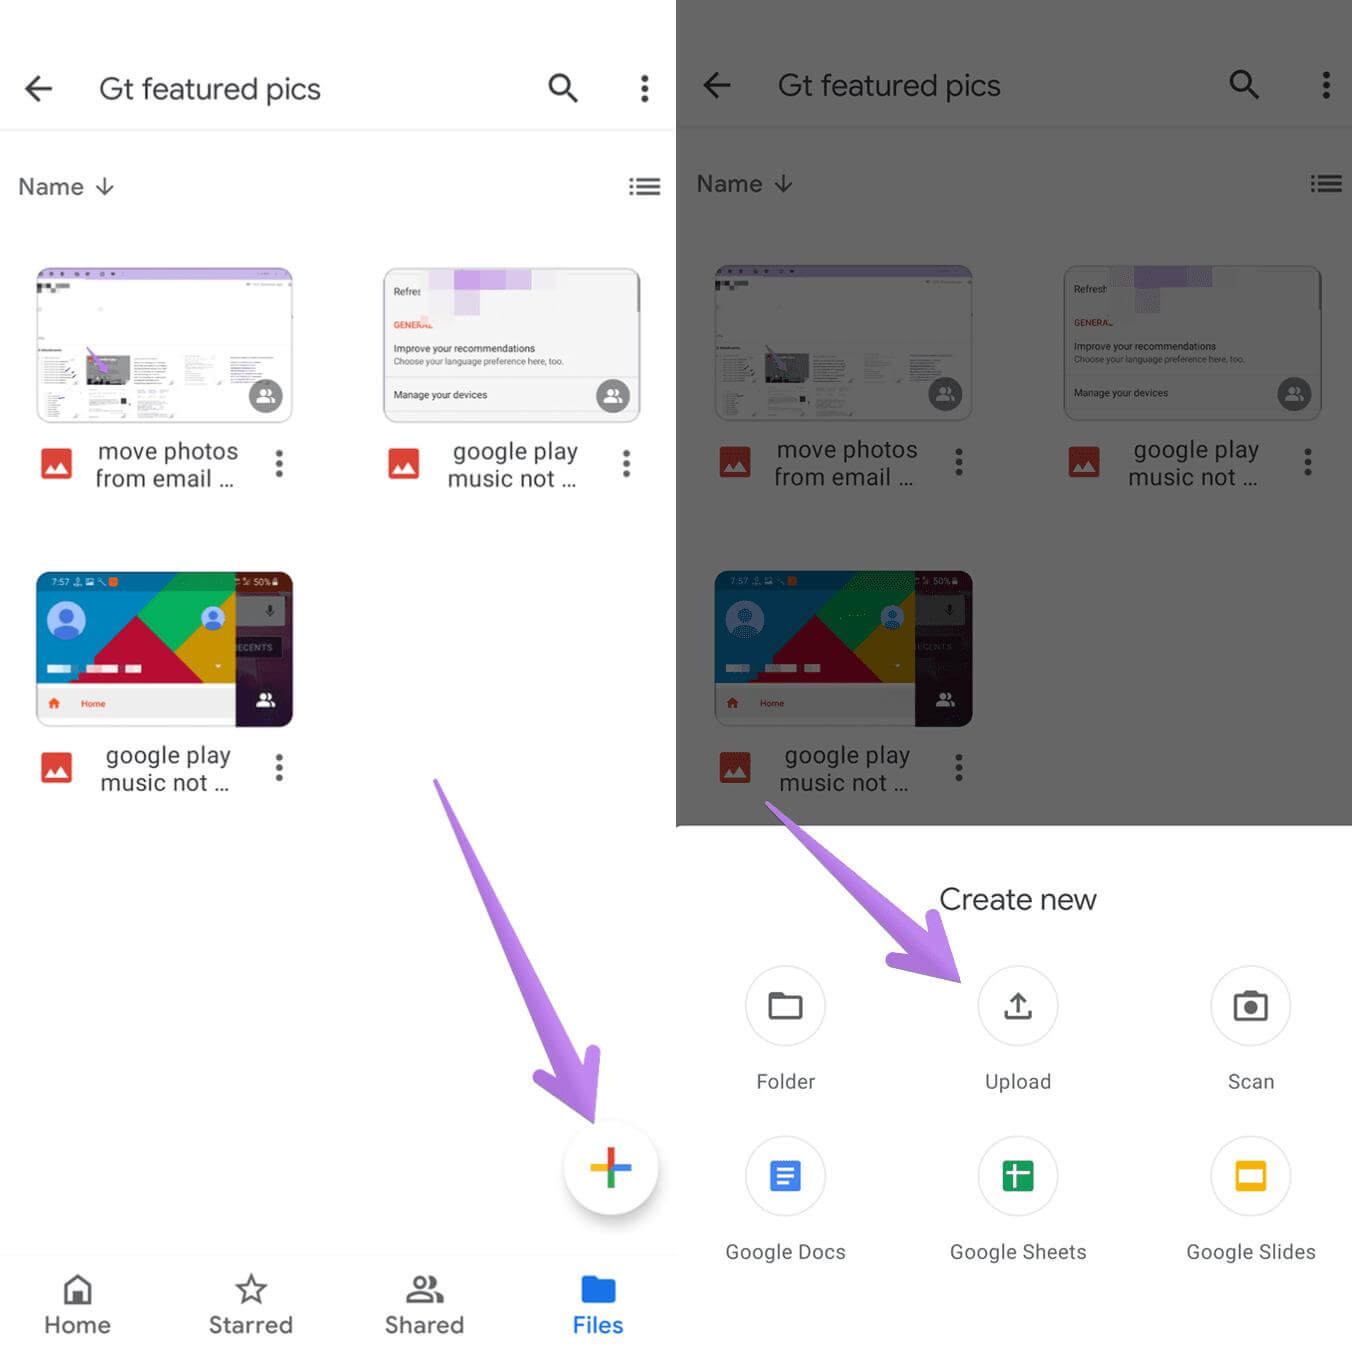
Open the Google Drive app on your Samsung device and tap the '+' icon. Select "Upload" and choose the photos you want to transfer. Once selected, tap "Upload" again, and your photos will be uploaded to your Google Drive account.
Step 3: Access Google Drive on Your iPhone
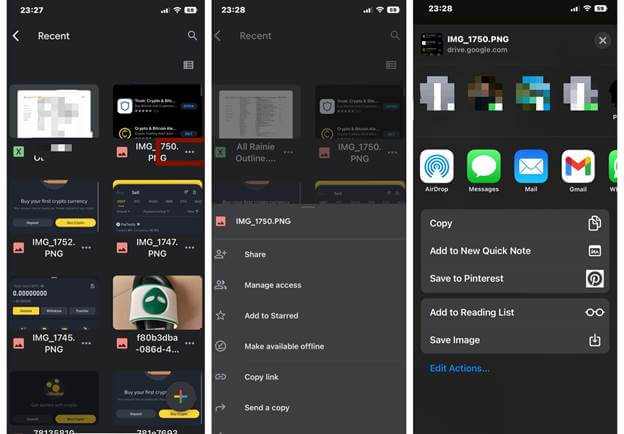
Now, switch over to your iPhone and open the Google Drive app. Sign in with the same Google account you used on your Samsung device. You should see the photos you uploaded in the previous step.
Step 4: Download Photos to Your iPhone
To transfer the photos to your iPhone, tap on the photos you want to download. Then, tap the three vertical dots (options menu) and select "Send a Copy/Save Image." The selected photos will be downloaded to your iPhone's camera roll.
Step 5: Enjoy Your Photos on Your iPhone
That's it! You've successfully transferred your photos from your Samsung to your iPhone using Google Drive. You can now enjoy your cherished memories on your new device.
Using Google Drive is a straightforward and reliable method for transferring photos, and it also ensures your photos are safely stored in the cloud. However, if you're looking for alternative methods, keep reading as we explore more options to suit your preferences.
How to transfer photos from Samsung to iPhone? Another efficient way is by utilizing iCloud.com, Apple's cloud storage service. While this method involves a few more steps, it's still a viable option for those who prefer using a web browser. Here's how to do it:
Step 1: Create an Apple ID (If You Don't Have One)
If you don't already have an Apple ID, you'll need to create one. Visit the Apple ID website (appleid.apple.com) and follow the prompts to set up your account. Ensure you remember your Apple ID and password, as you'll need them for this method.
Step 2: Enable iCloud on Your iPhone
On your iPhone, go to "Settings," tap on your name at the top, then select "iCloud." Sign in with your Apple ID and turn on "Photos" in the iCloud settings. This will ensure that your iPhone is connected to your iCloud account.
Step 3: Upload Photos to iCloud from Samsung
Using a web browser on your Samsung device, go to iCloud.com and log in with the same Apple ID you set up in Step 1. Once logged in, click on the "Photos" icon. Click the upload icon (a cloud with an arrow pointing upward) and select the photos you want to transfer. The selected photos will begin uploading to your iCloud account.
Step 4: Access iCloud on Your iPhone
Switch to your iPhone, open the Photos app, and wait for it to sync with iCloud. Your uploaded photos will start appearing in your iPhone's Photo Library.
Step 5: Download Photos to Your iPhone
To ensure the photos are downloaded to your iPhone for offline access, simply tap on each photo to view it. The photo will then be stored locally on your device.
Step 6: Enjoy Your Photos on Your iPhone
You've now successfully transferred your photos from your Samsung to your iPhone using iCloud.com. Your photos are securely stored in your iCloud account, accessible from any Apple device signed in with the same Apple ID.
This method offers the added benefit of keeping your photos in sync across all your Apple devices, making it an excellent choice if you own multiple Apple products.
Transferring photos from your Samsung to your iPhone via email is a straightforward and convenient method. While it may not be suitable for transferring a large number of photos due to attachment size limitations, it works well for sending select pictures. Here's how to transfer photos from Samsung to iPhone using email:
Step 1: Compose an Email on Your Samsung
Step 2: Attach Photos to the Email
Step 3: Send the Email
Step 4: Open the Email on Your iPhone
Step 5: Download Photos to Your iPhone
Step 6: Enjoy Your Photos on Your iPhone
You've successfully transferred photos from your Samsung to your iPhone using email. While this method is best suited for sending a limited number of photos, it's quick and doesn't require any additional apps or accounts. Just be mindful of attachment size limits, especially if you're sending high-resolution images.
How to transfer photos from Samsung to iPhone? Another convenient method is by using popular messaging apps like WhatsApp or Telegram. These apps allow you to send photos as messages to yourself, making it easy to access them on your iPhone. Here's how to do it:
Step 1: Install the Messaging App
If you don't have WhatsApp or Telegram installed on both your Samsung and iPhone, you'll need to download and install the app on both devices. You can find them on the Google Play Store for Samsung and the App Store for iPhone.
Step 2: Set Up the App
Step 3: Send Photos to Yourself
Step 4: Access the Photos on Your iPhone
Step 5: Download Photos to Your iPhone
Step 6: Enjoy Your Photos on Your iPhone
You've now successfully transferred photos from your Samsung to your iPhone using a messaging app. This method is not only practical but also allows you to easily organize and access your photos within the messaging app. Just ensure that you have enough storage space on your messaging app to store the transferred photos.
How to transfer photos from Samsung to iPhone? Dropbox is a versatile cloud storage service that can help you transfer photos from your Samsung to your iPhone seamlessly. Here's how to use Dropbox for this purpose:
Step 1: Install Dropbox
Step 2: Upload Photos from Samsung
Step 3: Access Dropbox on Your iPhone
Step 4: Download Photos to Your iPhone
Step 5: Enjoy Your Photos on Your iPhone
You've now successfully transferred photos from your Samsung to your iPhone using Dropbox. Dropbox's cross-platform compatibility and cloud storage make it a reliable option for photo transfers, and it ensures your photos are backed up in the cloud as well.
Remember that you can create folders within Dropbox to organize your photos, making it easy to manage your transferred images.
FoneDog Phone Transfer is a powerful and user-friendly software solution designed specifically for transferring data between different smartphones, including moving photos from a Samsung device to an iPhone. And aside from photos, it can also help you in transferring other data from your smartphone devices such as music, messages, videos, and your contacts. It offers a convenient and efficient way to migrate your cherished memories while ensuring data integrity and security. What sets FoneDog Phone Transfer apart are its unique features and hassle-free process.
Phone Transfer
Transfer files among iOS, Android and Windows PC.
Transfer and backup text messages, contacts, photos, video, music on computer easily.
Fully compatible with the latest iOS and Android.
Free Download

Unique Features:
How to Use FoneDog Phone Transfer:
Here’s how to transfer photos from Samsung to iPhone with this top iOS third-party transfer app :
Step 1: Download and Install FoneDog Phone Transfer
Visit the official FoneDog website and download FoneDog Phone Transfer for your Windows or Mac computer. Install the software by following the on-screen instructions.
Step 2: Launch FoneDog Phone Transfer
After installation, launch FoneDog Phone Transfer on your computer.
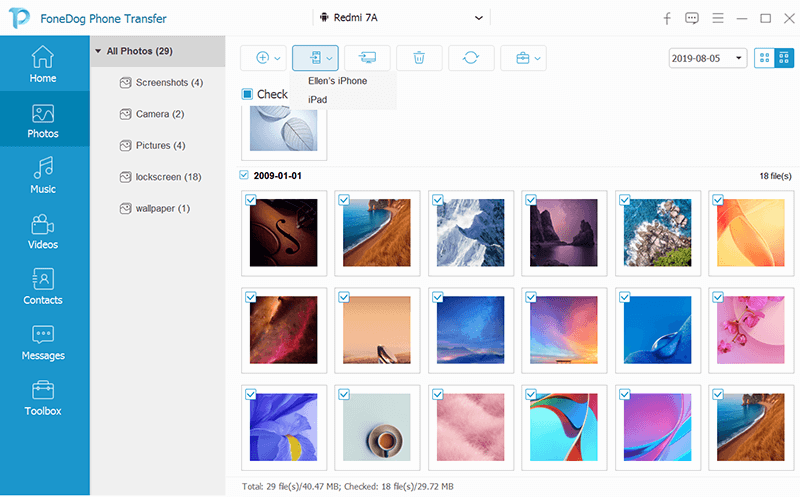
Step 3: Connect Your Samsung and iPhone
Using USB cables, connect both your Samsung and iPhone to the computer. Ensure that you have enabled USB debugging on your Android device if prompted. Once connected, you will see both devices displayed on the FoneDog interface. Ensure that your Samsung device is the source and the iPhone is the destination. You can click on the "Flip" button to swap their positions if necessary.
Step 4: Select "Photos"
In the data transfer options, select "Photos" as the data type you want to transfer from your Samsung to your iPhone.
Step 5: Start the Transfer Process
Click the "Start Transfer" button to initiate the transfer process. FoneDog Phone Transfer will begin transferring your photos from your Samsung to your iPhone.
Step 6: Transfer Completed
Wait for the transfer process to complete. The time required will depend on the number and size of the photos being transferred. Once the transfer is finished, you will receive a notification indicating that the process was successful.
Step 7: Enjoy Your Photos on Your iPhone
Disconnect both devices from your computer. You can now enjoy your photos on your iPhone, as they have been successfully transferred from your Samsung device.
FoneDog Phone Transfer offers a convenient and reliable method for transferring photos and other data between smartphones, ensuring a smooth transition from your old Samsung device to your new iPhone. Its user-friendly interface and unique features make it a valuable tool for anyone looking to preserve their memories during a device switch.
In conclusion, transferring photos from a Samsung device to an iPhone is a vital step in ensuring that your cherished memories and valuable data make the transition seamlessly. Whether you choose to use popular methods like Google Drive, email, or messaging apps, or opt for specialized software like FoneDog Phone Transfer, the process can be relatively straightforward. Each method offers its own advantages, allowing you to select the one that best suits your preferences and requirements.
Ultimately, the choice of method depends on factors such as the number of photos to transfer, your familiarity with the tools, and your need for additional features like cross-platform compatibility and data security. By following the steps outlined in this article, you can successfully transfer your photos from your Samsung to your iPhone, allowing you to continue enjoying your cherished memories on your new device.
Remember that the key to a successful photo transfer is ensuring that your photos remain safe and intact throughout the process. Whichever method you choose, rest assured that your photos are in good hands, and you can look forward to reliving your favorite moments on your iPhone.
Leave a Comment
Comment

iPhone/Android Devices’ Maintenance Expert
Staying home, listening to music, writing tech articles
Many people asked me to repair their mobile phones so I have a lot of experience in mobile phone repair, and I know a lot about Android or Apple phones.
Phone Transfer
Transfer data from iPhone, Android, iOS, and Computer to Anywhere without any loss with FoneDog Phone Transfer. Such as photo, messages, contacts, music, etc.
Free DownloadHot Articles
 /
/
INTERESTINGDULL
/
SIMPLEDIFFICULT
Thank you! Here' re your choices:
Excellent
Rating: 4.6 / 5 (based on 87 ratings)
