FoneDog Screen Recorder
FoneDog Screen Recorder
Special Offer
Special Offer


By Vernon Roderick, Last updated: July 31, 2020
There are a couple of ways to restore your files, but if you’re using a Dell laptop, computer, or any Dell product, it would be a lot easier. So why would it be easier, you ask? Dell has a feature called Dell Data Safe Restore and Emergency Backup. Basically, it is a built-in feature, but since it’s found deep within the operating system, not everyone knows about it. Not what it is or what it does.
This article will put a stop to that lack of knowledge about the Dell Data Safe Restore and Emergency Backupby teaching you everything you need to know about the aforementioned feature.
Part 1: Dell Data Safe Restore and Emergency Backup: OverviewPart 2: Dell Data Safe Restore and Emergency Backup: InstallationPart 3: Dell Data Safe Restore and Emergency Backup: LaunchPart 4: Dell Data Safe Restore and Emergency Backup: BackupPart 5: Dell Data Safe Restore and Emergency Backup: Recovery, Restore, and RepairPart 6: Dell Data Safe Restore and Emergency Backup: AlternativePart 7: Conclusion
Dell Backup and Recovery is an application designed for backup and recovery of the files of users. It is a reliable tool for protecting digital documents on Dell products. The aforementioned application has a lot of features and functions, and one of them happens to be Dell Data Safe Restore and Emergency Backup.
There are two versions of the application, Basic and Premium. Lately, many users are saying that they can’t do Dell Data Safe Restore and Emergency Backupon Basic, and they need to go Premium to access such functions. However, it is most likely not true since tests done by experts doesn’t show any perks besides some differences here and there. In short, you can still do recovery without paying money.
Since the Dell Backup and Recovery application is a built-in app, it should be installed on the operating system ever since it was manufactured.
However, if for some reason you can’t find the application when you want to do Dell Data Safe Restore and Emergency Backup, you can always go to https://www.dell.com/backupandrecovery to download it. Some users also go here when they want to reinstall the app. But there are a couple things you have to follow in order to install the app.
Here’s a look at the procedure for installing the app:
That is how you can install the Dell Backup and Recovery application on your computer. With this, you can do Dell Data Safe Restore and Emergency Backupeasily.
Before anything else, you have to learn how to launch the app. After all, you won’t be able to do Dell Data Safe Restore and Emergency Backupif you can’t open the application in the first place. There are two ways to open the application. The first one is when the system is still booting up, while the second one is after the system has booted up. Let’s start with the former:
This is how you can launch the applications. Now that it is opened, you can now start with Dell Data Safe Restore and Emergency Backup, but there’s something you have to know first.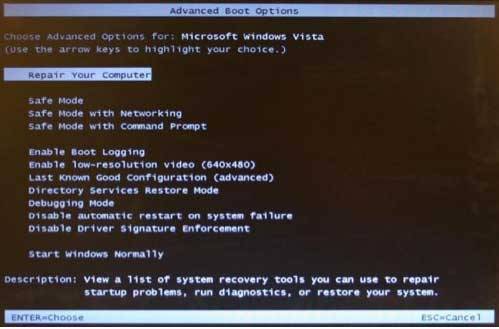
Before you can restore your files from a backup, you will have to create the backup first. And there are a couple of things you have to know about creating backups. First, there are two types of backups that you can create with Dell Data Safe Restore and Emergency Backup. These are System Backups and Data Backups.
System Backups is a file that will store the whole system, hence the name. This will include drivers, software, data files, and more. Data Backups, on the other hand, are backups that store individual files, which you can then restore one by one.
Let’s start by discussing the steps on how to create System Backups:
That’s how you can create System Backups. Now let’s head to the steps for Data Backups:
With this, you will have your backup ready, but you have to wait for a while. Now let’s proceed to how you can do Dell Data Safe Restore and Emergency Backup.
There are three different ways to retrieve your files namely Recovery, Restore, and Repair. Here’s an overview of what each of them does.
If you lost your personal files and have created a Data Backup that contains the lost files, this will be applicable. Here are the steps to follow:
If you lost your system files and have created a System Backup that contains the lost files, this will be applicable. Here are the steps to follow:
If you lost your personal files or system files or a combination of both through a system issue, this will be applicable. Here are the steps to follow:
Although Dell Data Safe Restore and Emergency Backup are very powerful, it’s not so powerful that it can solve everything on its own. You will always have to prepare a contingency, and in our case, a third-party tool would be a good contingency, which takes us to FoneDog Data Recovery.
FoneDog Data Recovery is a likewise powerful tool that can recover all kinds of files from all kinds of storage devices. Of course, it supports Dell products, too, so that’s a plus. Either way, if you want to have a contingency, FoneDog Data Recovery would be the ideal tool to help you out if things didn’t go as planned with Dell Data Safe Restore and Emergency Backup.
It’s not very easy getting used to a new device, but if your device has a feature like Dell Data Safe Restore and Emergency Backup, then it’s very worth it to continue using it. After all, nowadays, most brands focus on improving the looks of their product instead of its utility.
Data Recovery
Recover deleted image, document, audio and more files.
Get deleted data back from computer (including Recycle Bin) and hard drives.
Recover loss data caused by disk accident, operation system crushes and other reasons.
Free Download
Free Download

With this feature, you should be able to do what most third-party tools cannot do. Still, it would be wise to keep a tool ready in case things go south with the aforementioned feature.
Leave a Comment
Comment

Technical Expertise for PC/Website Optimization
One of my passion is to develop software of my own
I write articles to share knowledge about IT technology and some experience in developing my own software, and developing my own software is one of my passions for work.
Data Recovery
FoneDog Data Recovery recovers the deleted photos, videos, audios, emails, and more from your Windows, Mac, hard drive, memory card, flash drive, etc.
Free Download Free DownloadHot Articles
 /
/
INTERESTINGDULL
/
SIMPLEDIFFICULT
Thank you! Here' re your choices:
Excellent
Rating: 4.7 / 5 (based on 64 ratings)
