FoneDog Screen Recorder
FoneDog Screen Recorder
Special Offer
Special Offer


By Nathan E. Malpass, Last updated: May 24, 2021
Now, you are part way through your documentation work, and all of a sudden your application throws out an error, your computer system crashes, or a power outage happens. Do not fret. Various methods are provided that will fit with the current setting you have.
Do you want to recover Word document after a crash? Is your document missing or lost? Did you forget to save your work? Or worse, did you accidentally delete your Word document file? How about a data recovery application that will allow you to quickly and safely retrieve and restore your data files? In addition to word documents, another document is often used in EXCEL documents. Here is another article about restoring EXCEL documents for reference.
Part 1. Recover Word Document Using A SoftwarePart 2. Recover Unsaved Word DocumentPart 3. Recover Deleted Word DocumentPart 4. Recover Lost Word Document
Here comes a professional data recovery wizard that lets you quickly and safely recover Word document, FoneDog Data Recovery is an easy and convenient to use toolkit that does quick and deep scans of your files with a high success rate and is 100% secure for your data. You do not need to worry because you can preview the files before recovery and you are assured that no data is lost.
You can recover from any device and restore any data type such as image, video, audio, email, archive, and documents, may it be deleted file recovery, hard drive, memory card, flash drive, crashed Windows or Mac, and partition recovery. The supported file system of storage devices is NTFS, FAT16, FAT32, EXT, and exFAT – computers including Recycle Bin, hard drive, USB, memory cards, digital camera, and removable drives.
A free trial of the application is available. You are offered a 30-day money-back guarantee once you purchase it. You can choose to download the software according to your computer’s operating system (OS) like Windows or Macintosh.
Just three clicks to recover your deleted data: launch, scan, and restore. The steps are detailed below on how to use the FoneDog Data Recovery software.
Step 1. Launch FoneDog Data Recovery
On your computer, after you have downloaded and installed the FoneDog Data application, launch the FoneDog Data Recovery by double-clicking its shortcut icon found on the desktop or click its pinned icon on your taskbar (if a shortcut is created or it is pinned to the taskbar). You can also find the installed application by going to Start and then search from the Programs list.
Data Recovery
Recover deleted image, document, audio and more files.
Get deleted data back from computer (including Recycle Bin) and hard drives.
Recover loss data caused by disk accident, operation system crushes and other reasons.
Free Download
Free Download

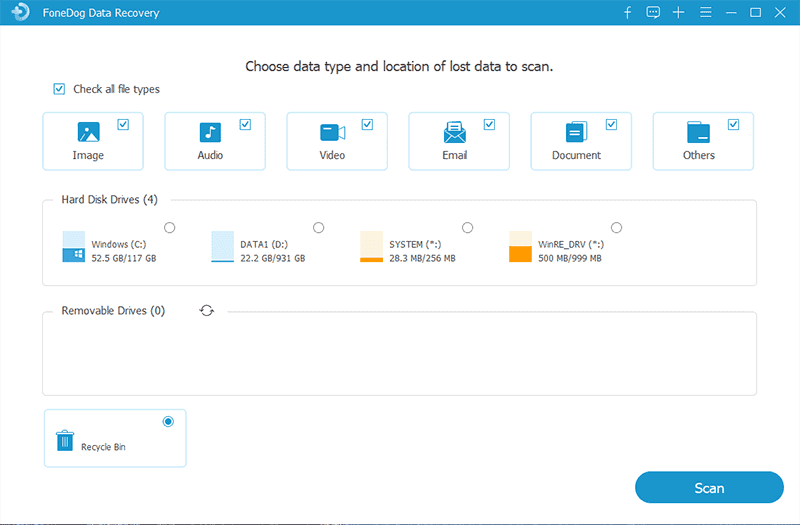
Step 2. Select Data Type and Storage Device
On the main page, select the specific file types to recover Word document and the drives (hard disk or removable) where you want to retrieve the deleted files. Then, hit the “Scan” button to start scanning the deleted files. Note that while recovering the data, you need to have a stable connection between your computer and your removable devices. The data types that you can choose to recover can be image, audio, video, email, document, and others. You can retrieve it from any storage device.
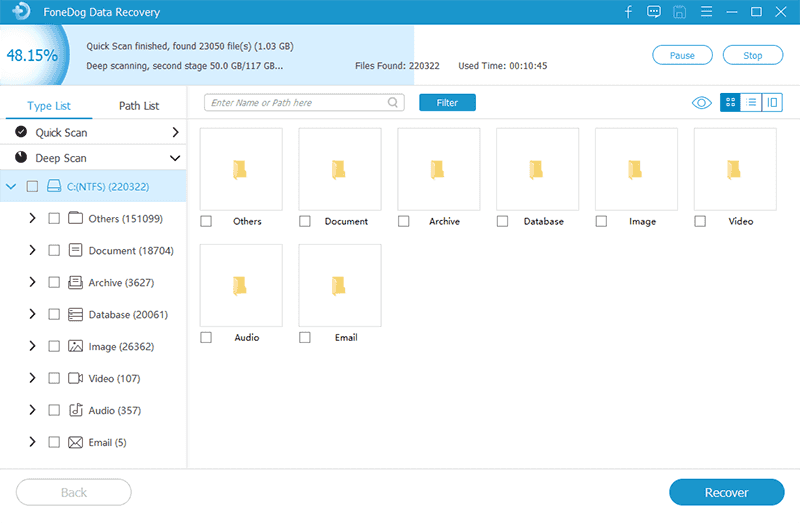
Step 3. Scan and Show the Data
Wait while FoneDog Data Recovery is scanning the data. It will show the results based on the values you have selected. There are two scans available to choose from: Quick Scan, and Deep Scan. The first will scan at a fast speed while the latter will show more data contents but will take more time to scan.
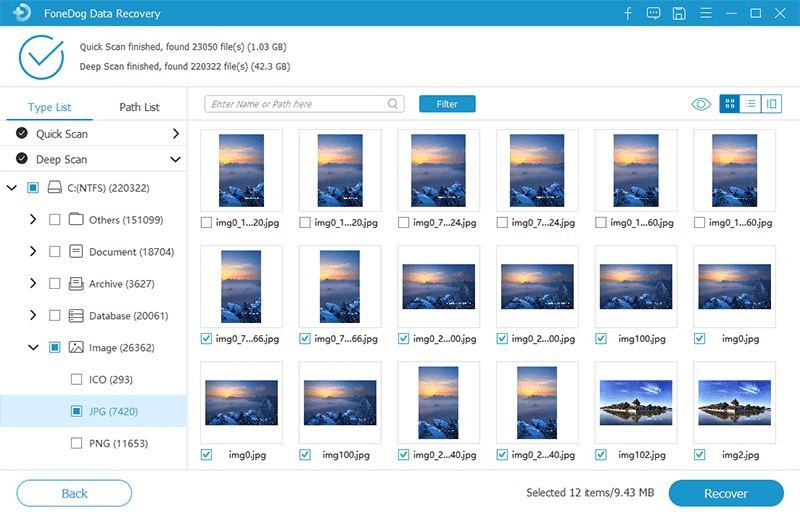
Step 4. Preview and Recover the Data
After the scan, the data will be shown by type or by the path. Select recover Word document. You can also quickly locate the specific data files by entering the file name or path in the search bar, then hit Filter. When you have selected the data files to be recovered, hit the Recover button to restore the data files.
This simple process will guide you on how to recover Word document on your computer. The unsaved file is a recovered document that is temporarily saved on your PC.
First, exit all instances of Microsoft Word via the Task Manager.
Step 01: On your taskbar, right-click and select “Task Manager”.
Step 02: Go to the “Processes” tab and select any instance of “Microsoft Word” or “Winword.exe”.
Step 03: Right-click on the Microsoft Word instance and click “End Task”.
Step 04: Close the Task Manager.

To open unsaved Word documents, follow these steps:
Step 01: Open Microsoft Word and select “File” from the menu.
Step 02: In the Info tab, click “Manage Document” or “Manage Versions” (in earlier app versions, e.g. MS Word 2010).
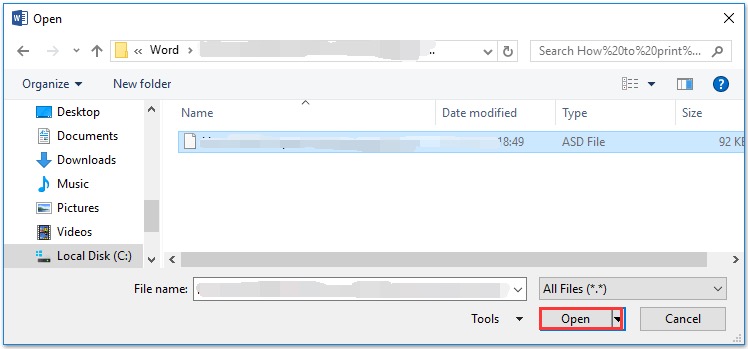
Step 03: Select “Recover Unsaved Documents” from the dropdown list to browse recent copies of unsaved files.
Step 04: In the Open dialog window, select your unsaved document file and click “Open”.
Step 05: The recovered document is opened. Click “Save As” in the top banner to save the file.
Alternatively, you can manually search for the AutoRecover files (*.asd) in your computer if you still cannot locate the file.
Step 01: Go to “Start”. Type “.asd” in the Search box and hit “Enter”.
Step 02: If you found the file, open Word, go to “File” and click “Open”.
Step 03: In the dialog window that appears, select “All Files” in the Files of type list and browse for the AutoRecover (.asd) file that you found. Select the .asd file and click “Open”.
Note that you can customize how Microsoft recover Word document are saved. You can choose to set the frequency with which MS Word will autosave your document.
Step 01: Go to “File” and click “Options” tab. Then, select “Save”.
Step 02: Update the number of minutes that AutoRecover information is saved and make sure to tick the “Keep the last auto saved version if I close without saving” checkbox to make sure that you have recoverable versions every time you work on your Word documents.
If you have any questions about restoring an unsaved word document, please refer to the linked article.
This is a simple method to recover Word document that may have been accidentally deleted from your computer.
Step 01: On your desktop, launch the “Recycle Bin”.
Step 02: Go through the list to check your document file, or you can also search it via the Search box in the Recycle bin.
Step 03: Take note of the Original Location of the file. Right-click on the file and select “Restore”. This step is to restore the file to its original location.
Step 04: Go to the original location of the file and open the Word document, or you can go to “Quick Access” in the left panel of the Recycle Bin window to find the file in the “Recent Files”.
This simple method provides step-by-step instructions to recover Word document that are missing or lost but may just be in your computer which needs to be searched on. You can search for the original document file or the Word backup file by following these steps:
Step 01: Go to “Start”. Type the document file name (.doc, .docx) in the Search box and hit “Enter”.
Step 02: If your Word document file is listed in the search results, double-click to open it. If your Word document file is not listed, locate the folder where you saved your document.
Step 03: In the Search bar, type “*.wbk” to search for the Word backup file in the folder. Then, hit “Enter”.
Step 04: If still there is no backup file found, search the computer by going to “Start” then type “*.wbk” in the Search box and hit “Enter”.
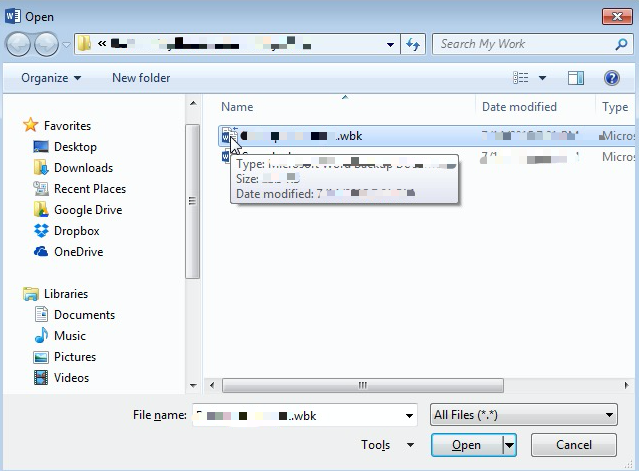
Step 05: If a backup file is found, open MS Word. Go to the “File” menu and click “Open”. In the dialog box that appears, select “All Files” in the Files of type list and browse for the backup file that you found.
Step 06: Select the backup file and click “Open”. If a backup file is not found when you search the computer, follow the steps detailed above on how to recover Word document.
Note that the “Always create backup copy” option must be enabled in Word so that there will be a backup copy created for your document. To do this, open Word, go to “File”, click “Options” then “Advanced”. On the “Save” section, tick the “Always create backup copy” checkbox to enable the feature.
Another method to recover lost Word documents is by searching for the temporary files (the file name ends with .tmp extension or starts with the ~ tilde character). A temporary file is created automatically whenever you work on a Word document. It contains the same data as your working document. Below are the steps on how to search for the temporary files.
Step 01: Go to “Start”. Type “.tmp” in the Search box and hit “Enter”.
Step 02: Click “Other” on the “Show only” toolbar.
Step 03: Browse through the files that match the last date and time of your edited document.
Step 04: Open Word, go to “File” and click “Open”.
Step 05: In the dialog window that appears, select “All Files” in the Files of type list and browse for the “.tmp” temporary file that you found. Select the file and click “Open”.
-OR-
Step 01: Go to “Start”. Type the “~ “(tilde character) in the Search box and hit “Enter”.
Step 02: Click “See more results”.
Step 03: Browse through the files that match the last date and time of your edited document.
Step 04: Open Word, go to “File” and click “Open”.
Step 05: In the dialog window that appears, select “All Files” in the Files of type list and browse for the “~” temporary file that you found. Select the file and click “Open”.
People Also ReadHow To Recover Accidentally Saved Over Word DocumentAsoftech Photo Recovery Reviews: Full Feature Review
Oftentimes, when you are working on your Word documents, uncontrollable situations occur such as a sudden system error, application or computer crash, accidental deletion, or power outage which can affect the working file in any way. This tutorial is created to provide multiple options for you that will help resolve issues on missing, deleted, or unsaved Word documents.
As an added bonus for you, provided here is a quicker and safer alternative to recover Word document by utilizing a professional data recovery wizard called FoneDog Data Recovery. It is recommended to use this user-friendly, easy-to-use application that is available for any device and recovery of any file type from any situation. If you need a quicker and safer solution, try this professional data recovery program with a high success rate and 100% secure for your data. Just Launch, Scan, and Restore. You wouldn’t have to find any other.
Leave a Comment
Comment

iPhone/Android Devices’ Maintenance Expert
Staying home, listening to music, writing tech articles
Many people asked me to repair their mobile phones so I have a lot of experience in mobile phone repair, and I know a lot about Android or Apple phones.
Data Recovery
FoneDog Data Recovery recovers the deleted photos, videos, audios, emails, and more from your Windows, Mac, hard drive, memory card, flash drive, etc.
Free Download Free DownloadHot Articles
 /
/
INTERESTINGDULL
/
SIMPLEDIFFICULT
Thank you! Here' re your choices:
Excellent
Rating: 4.6 / 5 (based on 104 ratings)
