FoneDog Screen Recorder
FoneDog Screen Recorder
Special Offer
Special Offer


By Vernon Roderick, Last updated: June 18, 2021
If you’re using Microsoft Outlook, then perhaps you’ve heard of the SCANPST file that everyone’s struggling to find. Perhaps it’s because you are having trouble with your Outlook that you’re here, but it’s a fact that you need to find the SCANPST location. After all, you won’t be able to use this without knowing where it is in the first place.
Also, although it is a built-in function, you still need to learn about how it works so you may be able to use it. So to begin with, let’s discuss what SCANPST is.
Part 1. What is SCANPST?Part 2. Different SCANPST Locations for Each Outlook VersionsPart 3. How to Carry Out Repair After Finding SCANPST LocationPart 4. Can’t find SCANPST LocationPart 5. What should you do if SCANPST isn’t working?Part 6. Final Words
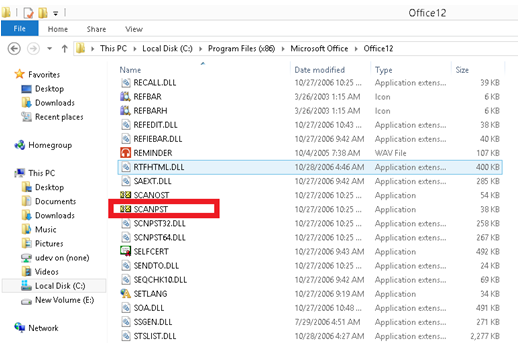
SCANPST is not the exact name for the built-in tool. Rather, it is the file name of the .exe file that opens the tool. The exact name is Inbox Repair Tool, but if you want to use this tool, you will need to find the SCANPST file, hence this article.
So what is the Inbox Repair Tool?
The Inbox Repair Tool is what you might expect from its name, a tool that will repair your Outlook inbox. It was designed for users that are having trouble with their Outlook. This is especially true if the problem has something to do with the Outlook inbox.
Normally, it is found on the default SCANPST location, otherwise, it won’t work properly. However, it’s important to note that the SCANPST location will depend on the version of your Outlook, the version of your Windows, and whether you are using a 32-bit or a 64-bit.
As we’ve said before, there are many factors that will affect the SCANPST location. But ultimately, it all comes down to the version of Microsoft Outlook. We all know how hard it is to get lost just because you went to the wrong file path. For that reason, here’s a look at a list of the paths for the SCANPST location for each Outlook versions:
Once you know where to find the SCANPST location, using the Inbox Repair Tool to repair your Outlook files will be a breeze. But before we discuss the steps to carry out Inbox Repair Tool, you have to know that it won’t always go the way we planned. For that reason, we have yet another method to find the SCANPST location.
There is a way to open the Inbox Repair Tool without having to go through the trouble of finding the SCANPST location. That would be by installing a bat file that will automatically open the tool. To do this, you have to open the file that you’ll download here at this link:
Now that that’s settled, let us discuss the different things you can do once you find the SCANPST location.
You now know the SCANPST location on your Windows PC, now what? Now you can access the numerous functions that are available to the Inbox Repair Tool. But to access it would require a certain amount of know-how with such a topic. To begin with, let’s start with the most commonly used function of the Inbox Repair Tool.
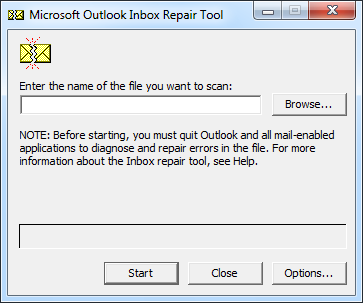
First of all, you have to double-click the SCANPST file in order to open the Inbox Repair Tool. Upon doing so, you will receive a pop-up message asking you to select the PST file that you want to repair.
On the pop-up message window that you’ll see, click on the Browse… button. This will open yet another window where you can navigate through your computer. Simply locate and select the PST file that you’re having problems with. Once you find and select the file, click on Start. The repair process will start, but it may take a while since the process will repeat over and over until the file is completely repaired.
In some cases, the repair function would not work well. The PST file would either stay the same as it was when it was still damaged, or the problem might get worse. And that’s why there’s another method for using the tool once you find the SCANPST location.
Unfortunately, the steps you’ll need to follow would differ according to the version of Outlook. For that reason, it might be best if we discuss the different steps for each version, but let’s start with the step inclusive to all versions.
This method will involve the management and configuration of folders. That’s why you have to enter Folder List View first, and this can be done by pressing Ctrl + 6 on your keyboard. There should be tons of items here such as Calendar, Contacts, Inbox, etc.
This is where the steps would be different for each version. Either way, let’s start with the steps for the latest version of Outlook.
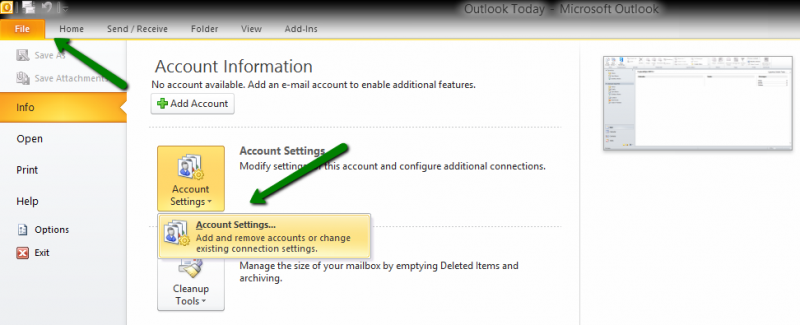
On your Inbox Repair Tool, go to the File tab followed by Info. Now click on the Account Settings option then click on the same option if it appears again. Next, head to the Data Files tab. Here, click on Add, and on the dialog box that will appear, enter the file name that you want your new PST file to have. Finally, click on OK.
On your File menu, select Data File Management. Then click on Add which should open a new dialog box just like with Outlook 2010. Now on the Types of storage section, click on Office Outlook Personal Folders File followed by OK. There, you should navigate to where you want to save the PST file and the name you want to use for it. Lastly, click on OK.
Again, on the File menu, navigate to New then from the dropdown menu, click on Outlook Data File followed by OK. On the new dialog box, enter the file name of your choosing, and finally, click on OK.
The first steps are similar to 2003 but instead of Outlook Data File, select Personal Folders File. Then click on Create and enter the file name that you want for the new PST file.
There should be a Lost and Found folder where the lost files are found. Drag the files that you want to recover into the new PST folder that you’ve just created. Once that’s done, delete the profile that was originally the place for the lost PST files.
At this point, you’d have already learned how to find the SCANPST location and even the two methods for using the Inbox Repair Tool. Still, you need to understand that it won’t always go as planned. Sometimes, you’ll be facing some issues.
One of the many issues that you’ll face when finding the SCANPST location is that you won’t find it anywhere even after looking through all the folders on your computer. This is mainly because it doesn’t exist yet.
In the event that this situation really happens, the only thing you can do is fix the problem. To do so, you have to download the file from this link:
https://aka.ms/SaRA-officeUninstallFromPC
Once this is downloaded, open it and there should be onscreen instructions on what to do next. Simply follow the instructions and it will lead you to how you can repair the SCANPST file. At the end of the day, you should be able to access the file by returning the file to where the SCANPST location was supposed to be.
If even downloading the aforementioned file isn’t working, then perhaps your only choice is to rely on another tool to resolve your problem. As luck would have it, there are countless programs out there that were designed specifically to solve your problem. And that is why we suggest using FoneDog Data Recovery.
FoneDog Data Recovery is what you can call data recovery software. It is capable of recovering all sorts of files such as videos, photos, documents, and even PST files if it is preserved properly.
The best thing about this is that it supports all Windows versions. The only downside is that you might need an internet connection to download the software. Overall, it’s a plausible option if you’re really not capable of finding the SCANPST location.
Data Recovery
Recover deleted image, document, audio and more files.
Get deleted data back from computer (including Recycle Bin) and hard drives.
Recover loss data caused by disk accident, operation system crushes and other reasons.
Free Download
Free Download

People Also ReadWhere to Find Android Text Message Folder LocationHow to Change WhatsApp Storage Location
You are not the first one to have a problem with Outlook. That’s precisely why they’ve built a tool designed to help Outlook users solve their issues with the said program. Although the tool is powerful, you won’t be able to take advantage of it if you can’t even find where it is.
That is precisely why we’ve tackled everything you need to know about the SCANPST location and more, including the ways to use the tool and some tips in case it doesn’t work. Hopefully, this would help you resolve any issues with your Outlook.
Leave a Comment
Comment

Technical Expertise for PC/Website Optimization
One of my passion is to develop software of my own
I write articles to share knowledge about IT technology and some experience in developing my own software, and developing my own software is one of my passions for work.
Data Recovery
FoneDog Data Recovery recovers the deleted photos, videos, audios, emails, and more from your Windows, Mac, hard drive, memory card, flash drive, etc.
Free Download Free DownloadHot Articles
 /
/
INTERESTINGDULL
/
SIMPLEDIFFICULT
Thank you! Here' re your choices:
Excellent
Rating: 4.7 / 5 (based on 64 ratings)
