FoneDog Screen Recorder
FoneDog Screen Recorder
Special Offer
Special Offer


By Vernon Roderick, Last updated: November 13, 2019
The iOS 10 packs with new features and exciting applications that can make your Apple devices to be more powerful and more suitable for your needs. Upgrading to this latest version is relatively easy, and once it’s a success, you can now start exploring the new stuff that has been added to your iOS device. However, not all people get the same outcome, as some issues happen even during the upgrade process. Two of these issues are the “Verifying Update” and the “Slide to Upgrade” that both can get stuck as you proceed into upgrading your current iOS version to iOS 10. If you’re encountering one or both issues now, follow through with our quick and easy solutions to resolve these glitches.
Part 1: Causes of the “Verifying Update” and “Slide to Upgrade” IssuesPart 2: Solution to Fix The “Verifying Update” and “Slide to Upgrade” IssuesPart 3: Fixing the Stuck “Verifying Update” or “Slide to Upgrade” Issues using FoneDog ToolkitPart 4: Video Guide - Fix Verifying Update & Slide to Upgrade Error During iOS 10 Upgrade
Before we proceed in fixing these two issues, it’s important to know first what might have caused these problems to come out. By doing so, you’ll be able to know further how exactly such issues can be fixed.
Getting the latest iOS 10 version to be downloaded will need you to connect your Apple device to the Internet, and the connection must be stable at all times until the download and upgrade processes have been completed. The “Verifying Update” message might get stuck on your screen if your network connection is unstable, as it constantly picking up signal to reach the download source and bring all the necessary files for the iOS 10 upgrade to your device. But when this process is being disrupted due to an unstable network connection, the device will keep trying until all files have been downloaded; thus, the “Verifying Update” message will continue showing up.
If your Apple device has inconsistent network settings, it can cause disruptions to network connections that are prerequisite to a successful iOS 10 download and upgrade. You must ensure that all network settings in the device are correctly configured – from the Wi-Fi settings to the mobile data setups.
When you’re doing the download and upgrade while your device keeps running multiple applications from the background, it can affect how your device performs during the process. The “Slide to Upgrade” option might get stuck if your device’s internal memory is already running low due to such applications running from behind. This is also a prevailing issue on Apple devices of older models.
Getting the “Slide to Upgrade” feature to be stuck on your screen can be a sign that your Apple device has software glitches on its current iOS version. It’s best to inspect this first by researching on your current iOS’ potential software issues and by updating to the next release it has before iOS 10 through iTunes.
Now that we know the possible causes of the two issues, it’s time to fix them. Follow through the steps below on how to fix the “Verifying Update” and “Slide to Upgrade” issues to successfully proceed in your iOS 10 download and upgrade.
Your Apple device might just need a fresh start before doing the iOS 10 download and upgrade. To begin, simply press the Sleep/Wake button until the slider appears on your screen, which you’ll swipe to the right to shut off your device. Then, wake it up again and proceed to the Settings > General > Software Update and see if the “Verifying Update” will take too long to finish again. If not, perform another soft reset.
If doing some iterations of soft reset on your Apple device didn’t work, doing a hard reset might resolve the problem. To do this, press and hold the Sleep/Wake button and the Home button simultaneously, and keep still until the device shuts off and powers up again with the Apple logo showing on the screen.
You might need to bring your Apple device to a really brand new start by restoring its default settings. You must do this one through iTunes, but before that, perform a backup of all your files and data first. Once ready, proceed in doing the following:
You can spare yourself some time in downloading and upgrading to iOS 10 by doing it through iTunes and not from your device. To do this:
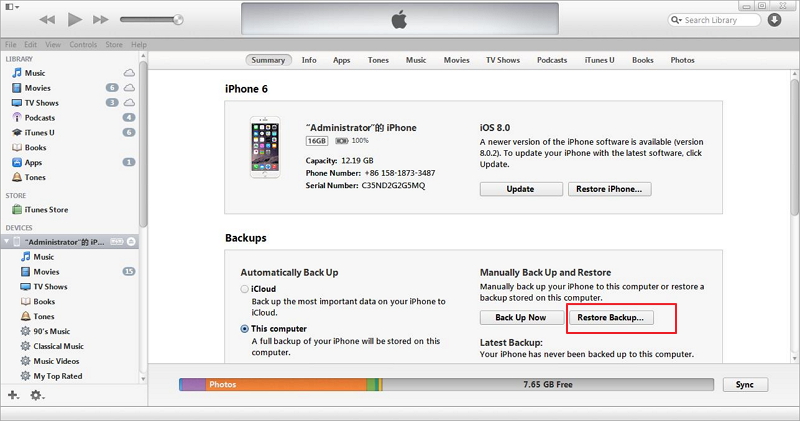
It’s possible that the “Verifying Update” and “Slide to Upgrade” issues are persistently appearing due to some phone settings and system files your phone currently has that might be contributing to these problems. Review your previous backups and identify which ones you remember not encountering the said issues as you upgrade to a certain iOS release. If you believe you have such backups, restore them through iTunes. To do this:
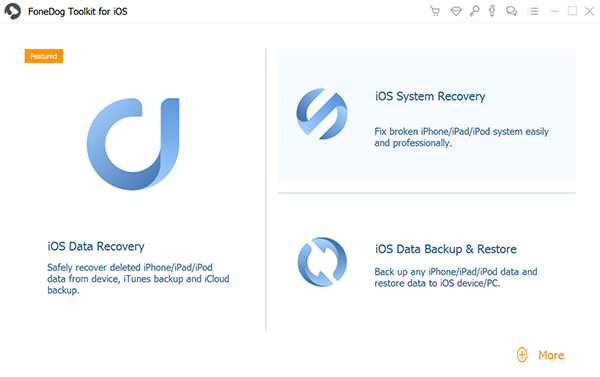
If you’re still experiencing the “Verifying Update” or the “Slide to Upgrade” issue after performing the common solutions we have provided above, it’s now time to turn to our FoneDog toolkit – iOS System Recovery. This software can help you in fixing the iOS system of your device and recover it back to its original settings through downloading a firmware and using it for repairing. Our toolkit can do this by providing you easy-to-follow instructions and modules to help fix such problems. To begin with FoneDog toolkit, here are the things you’ll need to do:
Using your desktop computer or laptop, download our FoneDog toolkit application and install. At the same time, connect your affected iPhone device to the computer where FoneDog toolkit will be installed.
After installing FoneDog toolkit and connecting your iPhone to the computer, make sure that the toolkit has detected your mobile device. This is an important step so our application can connect to your phone and have its iOS be repaired or recovered.
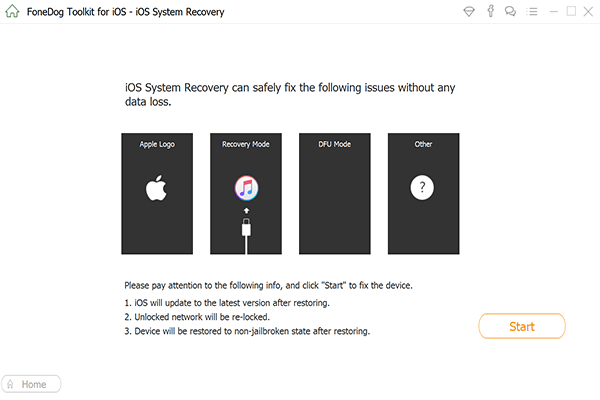
Our FoneDog toolkit hosts several menus depending on your needs for your iPhone device (and for Android mobile phones as well). Since your goal is to repair your iOS and ultimately fix the stuck “Verifying Update” and/or “Slide to Upgrade” issues, you’ll need to go to the “System Recovery” module. To locate, just find the gear icon with a wrench inside of it. After selecting the menu title for this module, you’ll be brought to the next page for the reminders to take note before doing the repair process.
Before going to the next phase of recovering your iPhone’s iOS system, please keep in mind the following:
Once you have taken note of these reminders, proceed to the next step by clicking the “Start” button.
Through FoneDog toolkit’s “System Recovery” module, a new firmware will be installed on your iPhone device to bring a brand new start on your iOS system, to eliminate the “Verifying Update” and/or “Slide to Update” issues that get stuck on your device every moment you attempt to upgrade your phone’s current iOS. But first, the firmware package must be downloaded.
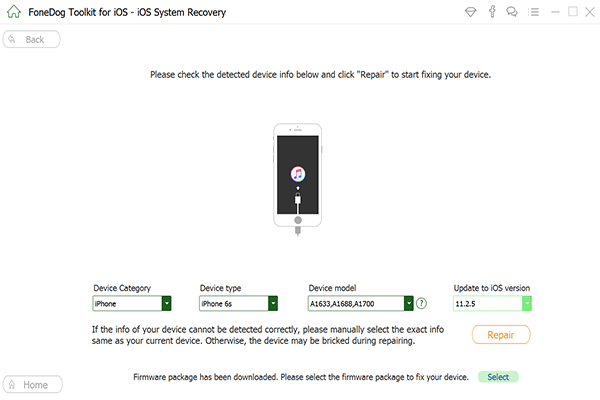
Our FoneDog toolkit will show to you a number of dropdown fields with preselected values corresponding to your device type, model, serial number and current iOS version. The program will use these specifications to find the firmware that will be most suitable for your phone. To proceed on this, click the “Download” button.
You can also download the firmware straight from the browser of your choice, and this can be done by clicking the “Copy” button. Once the firmware has been downloaded on your computer, FoneDog toolkit can use it by locating the file through the “Select” button. The program will detect your selection and will be the trigger to initiate the recovery process.
The first phase of the system recovery procedure that will be performed by FoneDog toolkit is the firmware package downloading. If you didn’t use the “Copy” button to personally download the firmware, you’ll need to wait for a few minutes until the application has downloaded the package for your iPhone device.
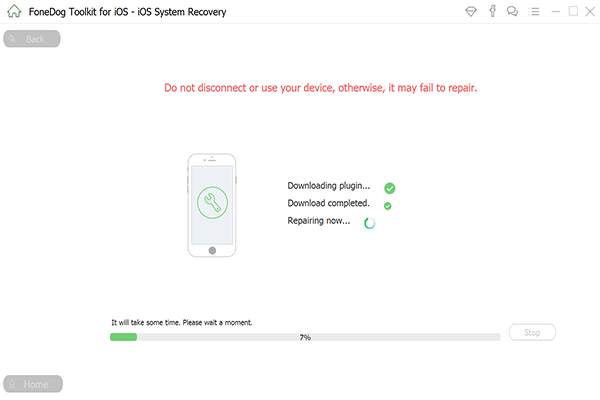
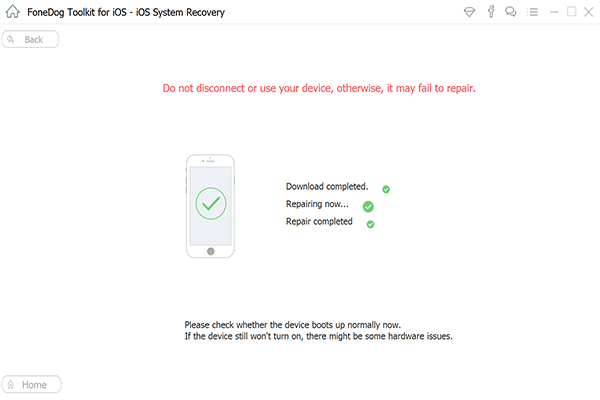
After getting the correct firmware package for your device, FoneDog toolkit will immediately begin the repair. You’ll again need to wait for a few minutes until the program has finished updating your phone’s current iOS and replace it with the firmware that was downloaded during the first phase. After the repair, your iPhone will automatically trigger a reboot, showing to you the Apple logo and fully turning on your device.

You can now check your iPhone if it will still encounter either the stuck “Verifying Update” message and/or the “Slide to Upgrade” option. Go to Settings > General > Software Update and perform an upgrade of your software. Check well if these issues will persist.
Both the “Verifying Update” and the “Slide to Upgrade” issues are very infuriating to have, especially if you’re really into getting the latest iOS 10 update to make use of the new and exciting features it has to offer. For most users, performing a hard reset on the phone has immediately solved the problem, but fixing the issue through our FoneDog toolkit has provided a faster interval time for resolving the two issues. Nevertheless, if still encounter these issues getting stuck in your way as you upgrade to iOS 10, we highly recommend doing the system upgrade through iTunes instead.
Leave a Comment
Comment

Technical Expertise for PC/Website Optimization
One of my passion is to develop software of my own
I write articles to share knowledge about IT technology and some experience in developing my own software, and developing my own software is one of my passions for work.
iOS System Recovery
Repair various iOS system errors back to normal status.
Free Download Free DownloadHot Articles
 /
/
INTERESTINGDULL
/
SIMPLEDIFFICULT
Thank you! Here' re your choices:
Excellent
Rating: 4.5 / 5 (based on 94 ratings)
