FoneDog Screen Recorder
FoneDog Screen Recorder
Special Offer
Special Offer


By Vernon Roderick, Last updated: September 5, 2019
We all know just how important it is to know how to transfer videos from iPhone to computer. Firstly, videos tend to be used in editing purposes. That’s why it needs to be transferred to a computer so the editing process can be done. In addition, videos take up much space in any smartphone. iPhone videos are no exception. If these files pile up on your phone, it might reduce all that’s left of your storage to nothing.
That’s why we made sure to create an article that talks about how to transfer videos from iPhone to computer, whether it’s for reclaiming some space for your phone or using the videos in your computer.
Using FoneDog Software to Transfer Videos from iPhone to ComputerHow to Transfer Videos from iPhone to Computer with iTunesHow to Transfer Videos from iPhone to Computer with DropboxHow to Transfer Videos from iPhone to Computer Using AutoPlayHow to Transfer Videos from iPhone to Computer with Windows ExplorerHow to Transfer Videos from iPhone to Computer Using iCloud PhotosHow to Transfer Videos from iPhone to Computer Using Photos App
People Also Read2 Ways On Transferring Photos From iPhone To AndroidTWO Methods of How To Transfer iPhone Contacts To Android Phone
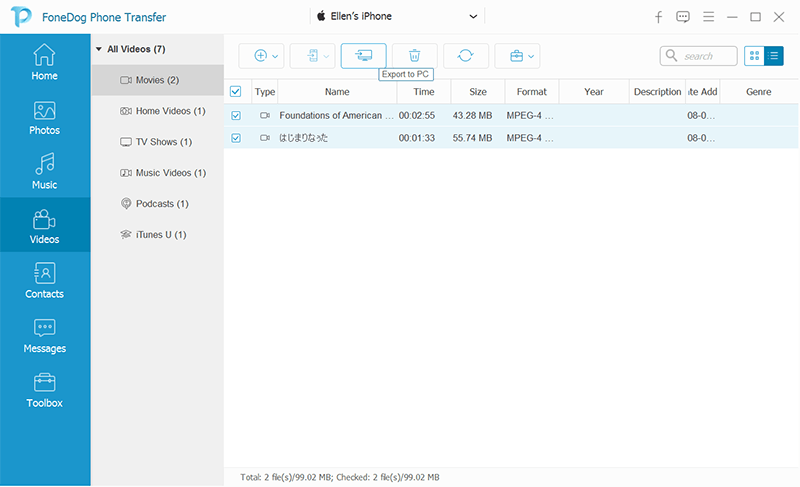
FoneDog Phone Transfer is a software that allows for the transferring of data from different devices, including iOS and Android smartphones as well as computers.
However, Phone Transfer is a lot more convenient than the options we’ve discussed. To give you a better idea, here are the advantages of using FoneDog Phone Transfer:
If you think these advantages are very tempting, just know that you can also use FoneDog Phone Transfer for free, although there will be limitations. Regardless, I’m sure anyone would find it very useful even if they have to pay to keep using the software.
If you’ve owned an iOS device for some time, then you’re probably already aware of iTunes. iTunes is an app developed by Apple for the purpose of managing an iOS device. It allows for syncing your photos, contacts, music, and most importantly, videos.
It is one of the first options of users when learning how to transfer videos from iPhone to computer. Before that, however, you need to make sure your iTunes is updated to the latest version. So without further ado, here’s how you can transfer videos using iTunes:
This is how to transfer videos from iPhone to computer using iTunes. However, sometimes you won’t be able to use iTunes due to problems with updating the app. In this case, you should check out the rest of the options in this article.
There are many options left for you to learn how to transfer videos from iPhone to computer. iTunes is not the only thing that allows for transfer of videos. There are many more, and some of them can be found on the internet.
One such tool found online is Dropbox. Dropbox is a place in the internet where you can store different types of files and that includes videos.
There are pros and cons with using Dropbox. To start with, Dropbox is something you can use wirelessly. Check out this steps on how to transfer videos from iPhone to computer using Dropbox.
Another option is to drag and drop the videos into the folder. Wait a while until the video is uploaded.
With this, you can now download the files easily through a stable internet connection. However, even after learning how to transfer videos from iPhone to computer using Dropbox, you still can’t guarantee the success of the transfer of data.
The downside of Dropbox is that you’ll have to pay for more storage. While it is a convenient way to transfer videos, there is a limit as to how much you can transfer.
With that said, you might want to opt for more options on how to transfer videos from iPhone to computer.
Until now, we’ve talked about ways on how to transfer videos from iPhone to computer of any kind of operating system. That means the previous two options are applicable to both Windows and Mac.
So, it’s about time we talked about ways that only applies to a specific operating system. Let’s start with Windows.
AutoPlay is a feature in Windows 7 that allows for the import of pictures and of course, videos, from your iPhone to your Windows PC.
The steps for this option is a bit easier than the previous two so we’re sure you won’t be having problems with this. So to put it shortly, here are the step-by-step guide on how to transfer videos from iPhone to computer using AutoPlay.
As previously said, AutoPlay is a feature available in Windows 7. So if your operating system is either outdated or updated, then it might not work. So here’s another way on how to transfer videos from iPhone to computer with a Windows operating system.
Compared to the AutoPlay feature, using Windows Explorer to learn how to transfer videos from iPhone to computer is a bit easier.
Windows Explorer is a system app of computers with a Windows OS. However, if you have Windows 10, then it would be called File Explorer.
Either way, the process as to how to transfer videos from iPhone to computer will be the same. So here are the steps to pull off the transferring of data.
Not only is this less complicated compared to the AutoPlay, it also offers a higher chance of success since it can be done in other versions of Windows and not only on Windows 7.
Now that we’re finished with how to transfer videos from iPhone to computer with a Windows operating system, let’s proceed to its competitor, Mac OS.
iCloud Photos is a library where you can access all the videos and photos in your iPhone device using your computer. This will then allow you to download those items in order to transfer videos from iPhone to computer.
This is one of the most convenient ways on how to transfer videos from iPhone to computer because it allows for transferring of data wirelessly.
So without further ado, let’s proceed on the step-by-step guide on how to transfer videos from iPhone to computer using iCloud Photos:
At this point, the videos that were accessible in the iCloud Photo Library in your iPhone will also be available from your computer. You can then choose the files you want to download from there.
Obviously, you’ll have to have a stable internet connection with this option. However, if you have no internet, you still have another option on how to transfer videos from iPhone to computer with a Mac OS.
The Photos App is similar to the Windows Explorer in Windows 10. So you’ll find that using the Photos App is actually very easy. Here are the steps you need to follow:
As you can see, using the Photos App is awfully similar to using the Windows Explorer.
Either way. All of these options are convenient in a way that it allows you to transfer videos from iPhone to computer without much complexity.
However, it doesn’t change the fact that there are flaws in these options. For example, you’ll be limited on how much you can transfer. Additionally, it would also take a lot of time if you are to transfer a lot of videos.
So to make up for that, we’ve prepared another option on how to transfer videos from iPhone to computer that will allow the transfer of data to be as quick as possible while maintaining the quality of videos.
Videos are a very delicate file. It consumes a lot of space in any device. Plus, with just a single mistake, the file can be unreadable. Thus, you’ll need to make sure that the option you’ll choose on how to transfer videos from iPhone to computer will be the most effective.
That’s why we introduced to you a lot of ways to transfer videos from your iPhone to computer. However, all of them seems to have a flaw.
Fortunately, with FoneDog Phone Transfer, you’ll be able to compromise with those flaws with the features of the software. So if transferring videos is too much of a hassle for you, we recommend using FoneDog Phone Transfer.
Leave a Comment
Comment

Technical Expertise for PC/Website Optimization
One of my passion is to develop software of my own
I write articles to share knowledge about IT technology and some experience in developing my own software, and developing my own software is one of my passions for work.
Phone Transfer
Transfer data from iPhone, Android, iOS, and Computer to Anywhere without any loss with FoneDog Phone Transfer. Such as photo, messages, contacts, music, etc.
Free DownloadHot Articles
 /
/
INTERESTINGDULL
/
SIMPLEDIFFICULT
Thank you! Here' re your choices:
Excellent
Rating: 4.7 / 5 (based on 90 ratings)
