FoneDog Screen Recorder
FoneDog Screen Recorder
Special Offer
Special Offer


By Adela D. Louie, Last updated: April 25, 2019
Nowadays, Android users are very fond of taking photos using their Android devices. This is also the main reason as to why many phone makers are trying their very best for them to be able to enhance their camera features. And with that, we tend to save a lot of photos on our Android devices.
However, there is actually a bad side on keeping so many photos on your Android device. Some of its bad sides are that these photos can take up a lot of space on your Android device. And the fact that many Android users actually dodo not have the habit of editing or backing up their Android device, then there is a chance that your Android device might slow down in terms of performance.
That is why in this article, we are going to show you different ways on how to transfer photos from Android to PC effectively. Transferring your photos from your Android device to your PC is one way for you to be able to free up space on your Android device.
Tips:
Part 1: An Easy Way to Transfer Photos From Android Device to PCPart 2: Different Ways to Transfer Photos from Android to PCPart 3: Conclusion
There is an easy way for you to be able to transfer your photos from your Android device to your PC. And this is by using one of the best software there is. And this is the by using the FoneDog Toolkit – Android Data Backup and Restore.
The FoneDog Toolkit – Android Data Backup and Restore has the ability to back up any types of files that you have on your Android device and save them all on your PC. This includes the photos that you have and want to transfer over to your PC from your Android device.
And another thing is that, aside from backing up your photos using the FoneDog Toolkit – Android Data Backup and Restore, you can also have the photos that you backed up restored to another Android device if you wish to do so. And you do not have to worry about your precious data because the FoneDog Toolkit – Android Data Backup and Restore is very safe and easy to use.
Now, to know on how you can transfer your photos from your Android device to your PC here is a quick and easy step by step method that you can follow.
First is that you have to download the FoneDog Android Toolkit from our official website at www.fonedog.com. And once that you are done with the download process, go ahead and install the program on your PC.
Once that the installation process is complete, go ahead and have it launched on your PC. You have to make sure that aside from the FoneDog Android Toolkit, there is no other backup application running in the background.
Once that you have launched the FoneDog Android Toolkit on your PC, go ahead and connect your Android device. Do this by using your USB cable.
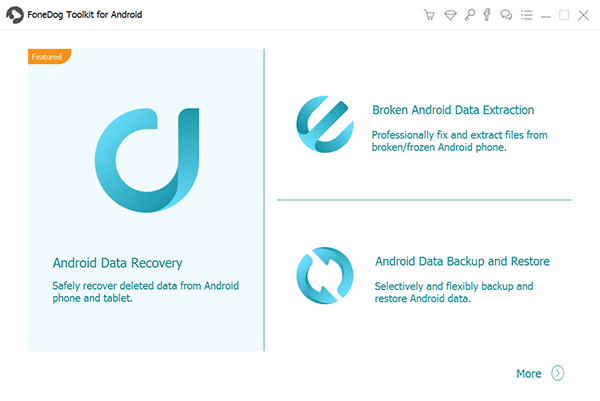
And once that you have connected your Android device, go ahead and choose a feature from the main screen. From there, just go ahead and simply choose “Android Data Backup and Restore”.
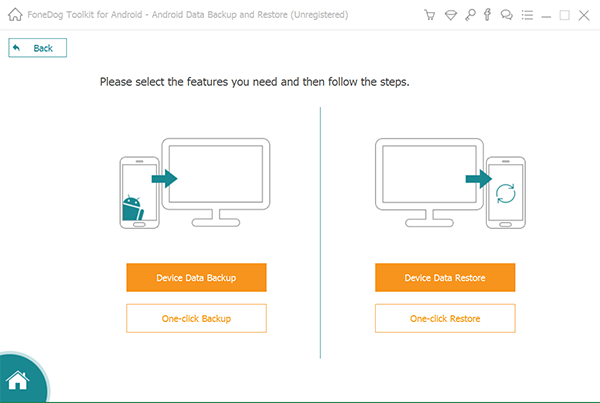
After that, go ahead and choose the option to backup your photos. On your screen, go ahead and simply choose “Device Data Backup”.
Once that you have chosen the option to backup your photos, the FoneDog Toolkit – Android Data Backup and Restore will then show you a list of files that it supports. From that list of file types, go ahead and choose “Gallery”.
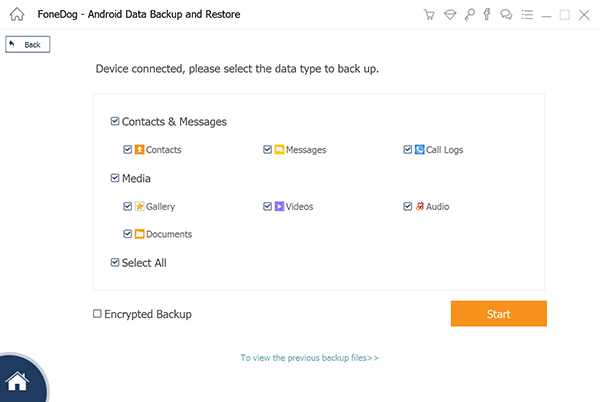
After choosing the Gallery, go ahead and click on the “Start” button. The FoneDog Toolkit – Android Data Backup and Restore will then start to scan your Android device for all the photos that you have. Make sure that you do not disconnect nor use your Android device while the process is ongoing.
Once that the program is done with the scanning process, the FoneDog Toolkit – Android Data Backup and Restore will then show you all the photos that you have on your Android device. From there, you can now choose the photos that you would want to transfer over to your PC.
And once that you have chosen all the photos that you would want to transfer, just go ahead and simply click on the “Start” button. The process of backing up your photos will then start. Again, make sure that you do not use your Android device while the process is still running.
And once that the backup process is done, all of the photos that you have chosen earlier will then be saved on a folder on your PC. Now, you were able to transfer your photos from your Android device to your PC.

Now, just in any case that you would want to have your photos restored into another Android device, then you can do that with the help of the FoneDog Toolkit – Android Data Backup and Restore. Here is how.
Do the same process on Step 3 and 4 from the backup process. The only difference is that you have to choose the “Device Data Restore” option.
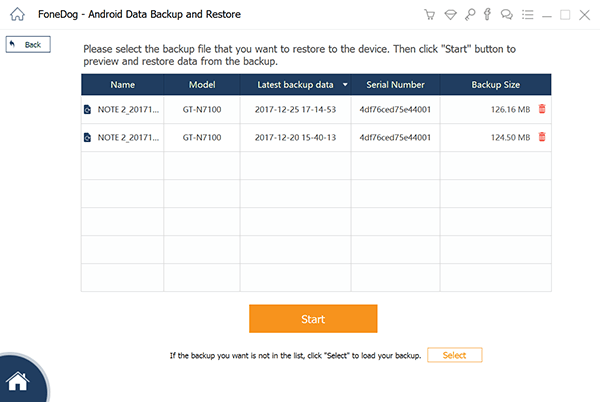
And once that you have chosen that, the FoneDog Toolkit – Android Data Backup and Restore will then show you a list of backup files that you have made. You can also see the time and the date as to when you have made the backup. So from there, all you have to do is to choose the most recent backup that you just made. And then click on the “Start” button below.
Then, the program will show a list of a file type on the left side of your screen. From there, just go ahead and choose “Gallery”. Then the program will show you all the data the file type contains on the right side of your screen.
From there, all you have to do is to choose all the photos that you would want to restore from your PC to another Android device.
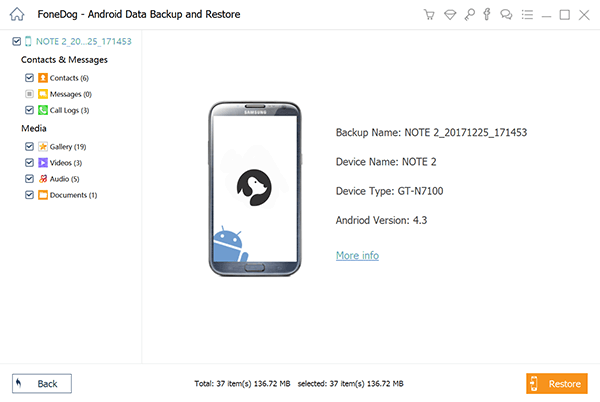
And once that you have chosen all the photos that you want to restore, just go ahead and simply click on the “Restore” button. Then the process will start so all you have to do is to wait until the process is complete.
Now, there are actually a lot of ways on how you can transfer your photos from your Android device to your PC. And that is what we are going to show you here. No matter what method you are going to choose, we are pretty sure that you will be able to transfer them over to your PC.
Using a USB cable is one of the traditional ways for you to be able to transfer any photos from your Android device to your PC. This is also considered to be the easiest way for you to have your photos over to your PC. And the only downside of this method is that in order for you to do this, you will be needing your USB cable and your PC as well.
If you are actually using a Windows PC, then the USB connection will then show you some options on how you can manage your Android device. And if you are using a Mac, then there are actually some other options that you will need which includes the Android File Transfer tool.
Using Google Drive is also considered to be as one of the simplest ways for you to be able to back up your photos from your Android device. It is also one way for you to take off your photos from your device. Once that you have uploaded your photos to your Google Drive from your Android device, then you can easily access them using another device such as your PC.
And if you would want to access your photos using your PC, then all you have to do is to access Google Drive using your web browser on your PC. From there, you will be able to see all the photos that you have transferred from your Android device. Then, you will have the option to download those photos to your PC or to just leave them on your Google Drive account.
Google Photos is actually somewhat similar to Google Drive. The only difference is that Google Photos is only intended for photos and videos only but Google Drive can handle any types of files. However, Google Photos comes with some tools that you can use for you to be able to edit and share your photos with other people. And the best part of it is that you can access your Google Photos from any other devices that you have. This means that you can access Google Photos using your PC.
Google Photos can be easily set up and use. And once that you have used it via your Google ID, it will then have the ability to upload any content automatically. So if you use it on your Android device, just go ahead and have your photos sync with Google Photos, and then you can access your photos using your PC via Google Photos app as well. Just make sure that you are using the same Google ID for both devices.
Dropbox is another platform that you can use for you to be able to transfer your photos from your Android device to your PC. All you have to do is to download the photos that you have on your PC to your Dropbox account. You can do it using the web browser on your Android device and access www.dropbox.com or you can also download the Dropbox application from Google Play Store.
And once that you have uploaded your photos to your Dropbox, then you can access it using your PC. All you have to do is to log in to your Dropbox account using the web browser on your PC. You have to make sure that you are using the same log in the account that you have used on your Android device. Then once that you are in, go ahead and download the photos from Dropbox.
One of the traditional ways for you to be able to transfer your photos from your Android device to your PC is using your email. This is actually very simple. All you have to do is to send your picture to another email that you have access on, or you can also send it to your own email. You can do this by attaching the photos to your email.
Then, you can try to log in using the email address where you sent the photos from your Android device using your PC. And once that you have opened the email, you have the option then to download the photos to your PC. Very simple isn’t it?
People Also ReadSamsung Recovery Guide: Recover Deleted Videos from Samsung Note 8How to Recover WhatsApp Messages Deleted by Accidentally from Samsung
So, there you go. As you can see, there are actually a lot of ways on how you can transfer your photos from your Android device to your PC. And among all of the method that we have shown you above, the most recommended program that you can use will be the FoneDog Toolkit – Android Data Backup and Restore. It is easy, safe, and very efficient to use.
Leave a Comment
Comment

Tech Website Writing /Content Optimization
Singing, smiling, surprising every day!
So as a technical writer, it is my duty to gather effective and reliable solutions to answer questions on how to deal with the issues they are having with their devices.
Android Toolkit
Recover deleted files from your Android phone and tablet.
Free Download Free DownloadHot Articles
 /
/
INTERESTINGDULL
/
SIMPLEDIFFICULT
Thank you! Here' re your choices:
Excellent
Rating: 0 / 5 (based on 0 ratings)
