FoneDog Screen Recorder FoneDog Screen Recorder
Special Offer Special Offer
Only Only
$4.49 $4.49
to get a ONE-month license to get a ONE-month license
Sale ends in xx days Sale ends in xx days
Buy Now
sale

6 Easy Ways: How to Screen Record on Surface Pro

By Adela D. Louie, Last updated: March 14, 2024

Have you ever wondered about the methods to record those extraordinary gaming moments, produce captivating instructional videos, or just document your device's screen for problem-solving purposes? There is no need to search any longer! This article will explain the process of how to screen record on Surface Pro, allowing you to become proficient in this technology quickly.

If you have an interest in technology, are involved in education, or create material, utilizing screen recording capabilities can provide limitless opportunities. If you are interested in recording screen with sound, then explore this article to uncover the strategies, techniques, and resources that will enable you to easily generate and distribute engaging content to a global audience.

Part 1. Overview: What Is Windows Surface Pro?Part 2. Top Tool for Screen Recording on Surface Pro Windows (with Sound)Part 3. 5 Different Methods on How to Screen Record on Surface ProPart 4. Tips on How to Maximize Screen Recording on Surface ProPart 5. FAQs of Recording Surface ProConclusion

Part 1. Overview: What Is Windows Surface Pro?

The Surface Pro, the first version of Microsoft's Surface series, is widely recognized for its versatility as a two-in-one tablet featuring convertible features. Powered by the Windows operating system, it is very popular among a large user demographic.

If there is a need to capture the screen of the Surface Pro, one might proceed as follows. Under such circumstances, users may effortlessly do this task by acquiring screen recording solutions that are compatible with their tablet, therefore streamlining the procedure for a smooth recording experience.

Part 2. Top Tool for Screen Recording on Surface Pro Windows (with Sound)

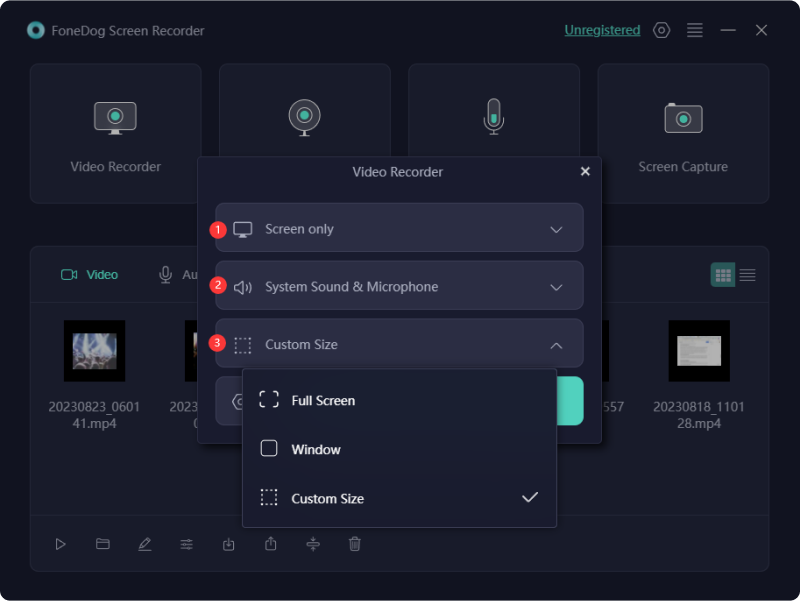
FoneDog Screen Recorder is a top-notch application specifically designed for screen recording within Surface Pro Windows. This adaptable program has an intuitive interface as well as a powerful range of capabilities, which render it an exceptional option for taking video material of superior quality. Its seamless compatibility with Surface Pro Windows enhances the overall recording experience. You can easily record screen on Windows 11 or older system versions.

To make the most of FoneDog Screen Recorder on your Surface Pro, follow these simple steps:

windows Free Download For Windows mac Free Download For normal Macs mac Free Download For M1, M2, M3

  1. Install FoneDog Screen Recorder on your Surface Pro. Adhere to the directions displayed on the screen to complete the installation effortlessly. After installation, launch the application on your Surface Pro.
  2. Select the region of your screen that you wish to record. FoneDog Screen Recorder enables users to capture the entirety of their screen or choose a specific area to record, allowing for more targeted recording.
  3. Before starting recording, adjust the parameters to suit your tastes. Press the "Record" button to start the recording process.
  4. Upon finishing your recording, you may refine your video by trimming, cutting, or adding annotations.
  5. After being content, store the recording in your desired format and place. The FoneDog Screen Recorder enables you to export your films in many formats, facilitating easy sharing across numerous platforms.

Screen Record on Surface Pro Using FoneDog Screen Recorder

Part 3. 5 Different Methods on How to Screen Record on Surface Pro

Screen recording is extremely advantageous for developing educational content, capturing presentations, or documenting technical support issues. If you own a Microsoft Surface and need assistance with screen recording, you have come to the correct place. This portion of the post will provide you with precise instructions and methods on how to screen record on Surface Pro.

Method 1. How to Screen Record on Surface Pro with Keyboard

In case your Surface Pro operates on Windows 10 or a later version, you have the option to employ Game DVR for screen capture. The key advantage lies in the fact that there's no necessity to seek or download alternative third-party screen capture software for your Surface. Additionally, it exerts minimal impact on your CPU performance, even when simultaneously engaged in gameplay and recording.

  1. Before starting on the Game DVR, you have to make sure that your Surface Pro is equipped with a keyboard.
  2. From there, you may enable the toolbar by simultaneously hitting the "Windows + G" key combination right within your keyboard.
  3. Afterward, you must then initiate the execution of the program or even the application that you plan to record on your Surface Pro.
  4. After doing such, you must go back to the recording toolbar and indeed start recording by simply clicking on that very red "Rec" button.
  5. After finishing, you must then return to Game DVR and either you have to click the "Record" button once again or even simply utilize such of keyboard shortcut "Windows + Alt + R" to end the recording.

Screen Record on Surface Pro with Keyboard

Method 2. How to Screen Record on Surface Pro – Xbox Game Bar

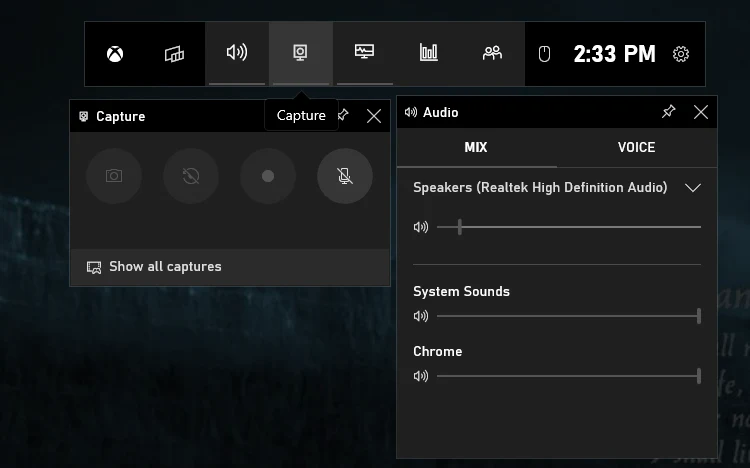
A built-in program that is specifically developed for screen recording on the Microsoft Surface is included as part of the Windows operating system. The Xbox Game Bar functions as a simple yet efficient tool for instantly collecting gameplay, such as lectures, seminars, also online webinars, or other types of data onto your device.

  1. To gain access to the Xbox Game Bar, you may either hit that “Windows” key and also that “G” key at the same time or you may then simply type "Xbox Game Bar" right within the search box and after that start the application.
  2. Within this juncture, the screen ought to be populated with several widgets, so what you must do is to indeed locate and make sure that you have then chosen the “Record” button positioned below the Capture module.
  3. After that, a timer bar will appear right within the upper-right-hand corner of the display screen on your Microsoft Surface Pro.
  4. To bring the screen recording procedure to a close, you should click the “Stop” symbol button after your recording is finished.

Screen Record on Surface Pro via Xbox Game Bar

Method 3. How to Screen Record on Surface Pro – Microsoft Steam

If you're utilizing the most recent versions of Microsoft Edge or Google Chrome on your Windows 10 system, consider exploring Microsoft Stream for screen recording. This comprehensive video management software facilitates video playback, recording, and audio capture. The procedures involved are straightforward.

  1. The first step in using Microsoft Stream is to pick the "Create" option, and then you should click on the option that says "Record screen."
  2. If you are prompted, you just then simply select the option to enable Microsoft Stream (Classic) access to your microphone and camera.
  3. Make adjustments to the settings of your camera as well as for the microphone so that they correspond with your preferences.
  4. After that, you must then click the red button, and then select whether you would like to share your complete screen, a window from an application, or perhaps a tab from your browser. The next step is to select that option which implies "Share".
  5. It is time to start the recording procedure. Please keep in mind that the recording time is restricted to a maximum of fifteen minutes.

Method 4. How to Screen Record on Surface Pro – OBS Studio

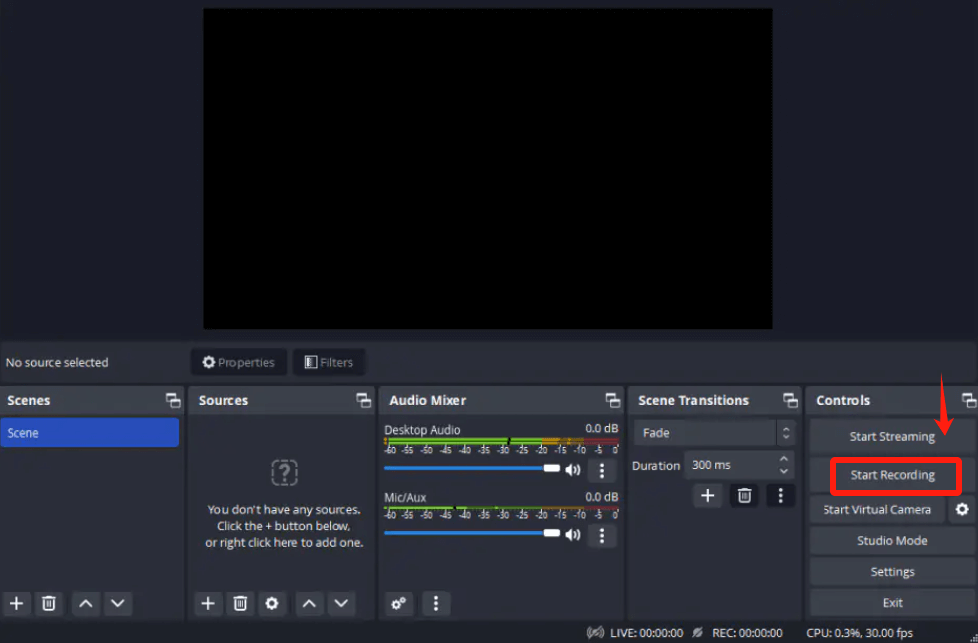
OBS Studio serves as a wholly complimentary and open-source screen recording tool, catering to both your screen capture and live streaming requirements. This application allows you to construct scenes comprising various elements, such as window captures, images, capture cards, and more.

  1. Start by acquiring and activating OBS Studio onto your Surface Pro, after which you may then indeed proceed to run the application when it has been installed.
  2. After that, press upon the "+" symbol which is then located under the Scene tab, you have to choose that option which thus implies “Display Capture”, and don't forget to click after the “OK” button to confirm your selection.
  3. After that, you will need to enter the Settings option to set the destination for the films that you have shot.
  4. Afterward, by simply pressing the “Start Recording” button, which is found in the bottom right corner of the screen, you may begin the recording process once you are ready.
  5. Following the completion of the recording, the video that was shot will be saved on your computer. To stop the recording, you just have to simply click the “Stop Recording” button.

Record Screen on Surface Pro with OBS Studio

Method 5. How to Screen Record on Surface Pro – ScreenApp

ScreenApp is a unique internet-based screen recording application that not only provides the ability to record but also gives users the freedom to record camera video and gives them the option to select their favorite audio recording channels. The procedure is not only quick but also uncomplicated because it provides the comfort of internet recording with only one click.

Additionally, the fact that it is compatible with Surface Pro makes it simple to access. The steps involved in the procedure are as follows:

  1. Start up Chrome or perhaps any other web browser, and from that, you have to head over to the Screen App website.
  2. After that, simply press the “Start Recording” button to get the recording started.
  3. Upon doing such, you may then adjust your recording and audio settings so that they are specifically tailored to your needs. Once everything is set up, you have to simply select the “Share Your Screen” option.
  4. From that, such a pop-up window will appear which then prompts you to choose the specific content you wish to share with others.
  5. After selecting the desired content, you must then fully click on the “Share” button to proceed.
  6. Thereafter, you have to simply press the button which is then labeled "Start Recording." As soon as the process is finished, such a window will appear for you to save the movie. This window will allow you to choose the storage place to suit your preferences.

Part 4. Tips on How to Maximize Screen Recording on Surface Pro

Here are some useful tips on how to maximize screen recording within your Surface Pro device:

  • Optimize Settings for Smooth Recording: Adjust your Surface Pro's display settings to strike a balance between resolution and performance. Lowering the resolution can reduce the strain on your system, ensuring smoother screen recording.
  • Utilize Keyboard Shortcuts: Familiarize yourself with keyboard shortcuts for initiating and stopping screen recordings. On Surface Pro, pressing "Windows + Shift + Q" starts recording, enhancing efficiency and capturing the desired content promptly.
  • Manage Storage Space: Regularly check and clear unnecessary files from your device to free up storage space. Screen recordings might make use of such an extensive amount of storage space hence having such enough capacity guarantees those ongoing recording sessions.
  • Consider External Microphones for Better Audio: Enhance the audio quality of your screen recordings by using external microphones. Although Surface Pro has been equipped with an integrated microphone, such of adding another microphone to it might greatly enhance the sound quality, which then fully results in more polished along captivating recordings.

Part 5. FAQs of Recording Surface Pro

Does the Surface Pro come equipped with such a built-in microphone?

Certainly! The Surface Pro is furnished with an integrated microphone for user convenience. To locate this microphone, navigate towards Control Panel, then Sound, you may click on the Recording tab. There, you'll locate this NVIDIA Tegra Wave Tool identified as the primary microphone.

Is the Surface Pro suitable for music recording?

The Surface Pro is specifically designed for individuals who have a strong interest in music. It features an amazing quad-core that has an Intel Core i7 CPU. Featuring a turbo boost capability of up to 4.2GHz which was a generous 16GB of RAM, this device offers an optimal setting for effortless audio recording along with production tasks.

Can you perform recording tasks on the Surface Pro?

While the Surface Pro may resemble a PC-like tablet, it operates with distinct workstations. This device may not cater to users seeking intricate applications like website development. Nevertheless, it proves capable of video recording with the assistance of various utilities.

Where can I locate my screen recordings on the Surface Pro?

Your screen recordings are automatically stored in the "Videos" folder within your user profile by default.

People Also ReadHow to Screen Record on Windows [Easy Methods]8 Ways to Screen Record on Netflix [PC/Mac/iOS/Android]

Conclusion

In conclusion, mastering screen recording on Surface Pro opens doors to seamless content creation. With versatile tools like FoneDog Screen Recorder, users can effortlessly navigate the process, customizing recordings to their needs. Elevate your Surface Pro experience and unleash your creativity through the power of screen recording. Happy recording!

Leave a Comment

Comment

Comment ()
author image

Adela D. Louie

Tech Website Writing /Content Optimization

Singing, smiling, surprising every day!

So as a technical writer, it is my duty to gather effective and reliable solutions to answer questions on how to deal with the issues they are having with their devices.

Screen Recorder logo

Screen Recorder

Powerful screen recording software to capture your screen with webcam and audio.

How Do You Like This Article?

Check icon/ Check icon

INTERESTINGDULL

Check icon/ Check icon

SIMPLEDIFFICULT

Thank you! Here' re your choices:

Rate This Article: Excellent

Rating: 4.7 / 5 (based on 61 ratings)

Screen Recorder logo

Screen Recorder

Powerful screen recording software to capture your screen with webcam and audio.

FoneDog uses cookies to ensure you get the best experience on our website. Click here to learn more.