FoneDog Screen Recorder FoneDog Screen Recorder
Special Offer Special Offer
Only Only
$4.49 $4.49
to get a ONE-month license to get a ONE-month license
Sale ends in xx days Sale ends in xx days
Buy Now
sale

The Ulitmate Guide 2024 on How to Screen Record with Audio

By Adela D. Louie, Last updated: December 21, 2023

Ever wondered how to capture your computer screen in action, along with crystal-clear sound? Look no further! This ultimate guide is your ticket to mastering the art of screen recording with audio. Whether you're a professional needing to create captivating tutorials or a gamer aiming to showcase your skills, this guide covers it all.

Dive into step-by-step instructions on how to screen record with audio, explore the best tools and software available, and discover insider tips to ensure your recordings are flawless. Get ready to amplify your presentations, enhance your online courses, and elevate your content creation game!

Part #1: Different Ways on How to Screen Record with Audio on Any DevicesPart #2: Best Way to Screen Record with Audio - FoneDog Screen RecorderConclusion

Part #1: Different Ways on How to Screen Record with Audio on Any Devices

Screen recording with audio can be accomplished on various devices like computers, smartphones, and tablets using different methods and tools. Here are general steps for each on how to screen record with audio:

Computers/Laptops:

Method #1: Using Built-in Features (Windows 10, macOS):

Windows 10:
  1. To initiate the Game Bar on your Windows system, simultaneously press the keys "Windows" and "G".
  2. Once the Game Bar is activated, proceed by selecting the record option by either clicking on the dedicated record button displayed within the Game Bar interface or by utilizing the keyboard shortcut "Windows + Alt + R" to commence the recording process.
  3. It is imperative to confirm that the "Record audio" toggle switch is in the enabled position before proceeding further. This ensures that audio capture is activated along with the video recording.
  4. Upon completion of your recording session, cease the recording process by utilizing the same button within the Game Bar interface or by employing the aforementioned keyboard shortcut.

Screen Record with Audio Using Built-in Features

PS: How to do a screen recording on Windows 11

macOS (QuickTime Player):
  1. Launch the QuickTime Player application on your device.
  2. Navigate to the menu options and select "File", then proceed to choose "New Screen Recording".
  3. Within the screen recording interface, locate and click on the designated record button to initiate the recording process. Prior to commencing the recording, ensure that you have selected the preferred audio source for capturing sound.
  4. When you have completed the recording session, conclude it by clicking on the stop button situated within the menu bar of the application.

Method #2: Using Third-Party Software:

OBS Studio (Windows, macOS, Linux):
  1. Begin by acquiring OBS Studio by downloading it through the designated platform and following the installation process to set it up on your device.
  2. Once installed, proceed to include your screen as a source within the OBS Studio interface. This involves accessing the software's settings or options to designate your screen as the primary source for recording. Additionally, configure the audio input settings to ensure the desired sound source is recognized.
  3. To commence the recording process, locate and click on the "Start Recording" button within OBS Studio. This action initiates the capturing of your screen activity along with the audio input that has been configured.
  4. Upon completion of your recording session, terminate the process by stopping the recording. Look for and select the appropriate function within the OBS Studio interface to conclude the recording activity.
Camtasia (Windows, macOS):
  1. Begin by installing the Camtasia software and launching it on your device.
  2. Upon opening Camtasia, navigate to the interface and locate the "Record" option. Click on it to initiate the recording process.
  3. Select the specific area of your screen that you wish to capture. Camtasia allows you to choose the desired screen region for recording purposes.
  4. Ensure that audio recording is enabled within the software settings before commencing the capture.
  5. Once you've configured the settings and chosen the screen area, start the recording process by activating the capture function.
  6. Throughout the recording session, ensure that the necessary audio is being captured along with the screen activity.
  7. When you have finished recording the intended content, proceed to stop the recording within Camtasia.
  8. Review the captured material to ensure it meets your requirements and specifications before finalizing or sharing the recorded file.

Smartphones/Tablets (iOS and Android):

Method #1: Using Screen Recording Feature:

iPhone:
  1. Access Settings: Begin by locating and opening the "Settings" app on your iPhone's home screen.
  2. Customize Control Center: Within the "Settings", navigate to the section labeled "Control Center".
  3. Add Screen Recording: Scroll through the options and select "Customize Controls". If "Screen Recording" isn't already listed among the included controls, locate it in the available controls section and tap the green plus icon (+) next to it. This action adds "Screen Recording" to your Control Center.
  4. Open Control Center: Exit the Settings app and return to your iPhone's home screen. Depending on your iOS model, you may then swipe down right within the top-right corner (iPhone X as well as for later versions) or even then swipe up right from the very bottom of the screen (iPhone 8 as well as for the earlier) to indeed access the full Control Center.
  5. Activate Screen Recording: In the Control Center, look for the icon that represents "Screen Recording" (it resembles a circle surrounded by a ring). Tap this icon.
  6. Enable Microphone Audio: A pop-up window may appear, asking you to confirm whether you want to enable microphone audio for the screen recording. Tap on the microphone icon to turn on audio recording via the microphone.
  7. Commence Recording: After selecting the microphone audio option, tap the "Start Recording" button. This action initiates the screen recording process.
  8. Finish Recording: Perform the actions or demonstrate what you want to capture on your screen. To conclude the recording, return to the Control Center or access it from within the recording interface and tap the "Stop Recording" button. The screen recording, along with audio, will be saved to your iPhone's Camera Roll or Photos app.

Screen Record with Audio on iPhone

By following these step-by-step instructions, you can successfully perform a screen recording with audio on your iPhone.

Android:

Using Built-in Screen Recording (On newer Android versions):

  1. To gain access to the Quick Settings, perform a downward swipe from the top of your device's screen. Locate the feature labeled "Screen Recorder" or a comparable option within these settings.
  2. Once identified, initiate the recording process by tapping on this option. Upon activation, you'll be prompted to choose the desired audio source. Following the selection of the audio input, proceed with the recording.
  3. To conclude the recording session, simply stop the process when you've finished capturing the content or information required.

Part #2: Best Way to Screen Record with Audio - FoneDog Screen Recorder

FoneDog Screen Recorder stands out as an exceptional tool, offering a seamless and efficient solution for screen recording with audio across various devices. This versatile software provides an intuitive interface, enabling users to effortlessly capture their screens along with high-quality audio, ensuring a hassle-free recording experience.

windows Free Download For Windows mac Free Download For normal Macs mac Free Download For M1, M2, M3

With FoneDog Screen Recorder, users can easily select specific screen areas to record, customize settings for optimal video and audio quality, and simultaneously capture system sound or external microphone input. This tool's versatility extends to multiple platforms, supporting Windows and macOS systems, and even providing solutions for Android and iOS devices.

Whether you're recording gameplay videos, or presentations, or simply need a reliable tool for capturing your screen activities with crystal-clear audio, FoneDog Screen Recorder offers a user-friendly and feature-rich solution to meet your recording needs.

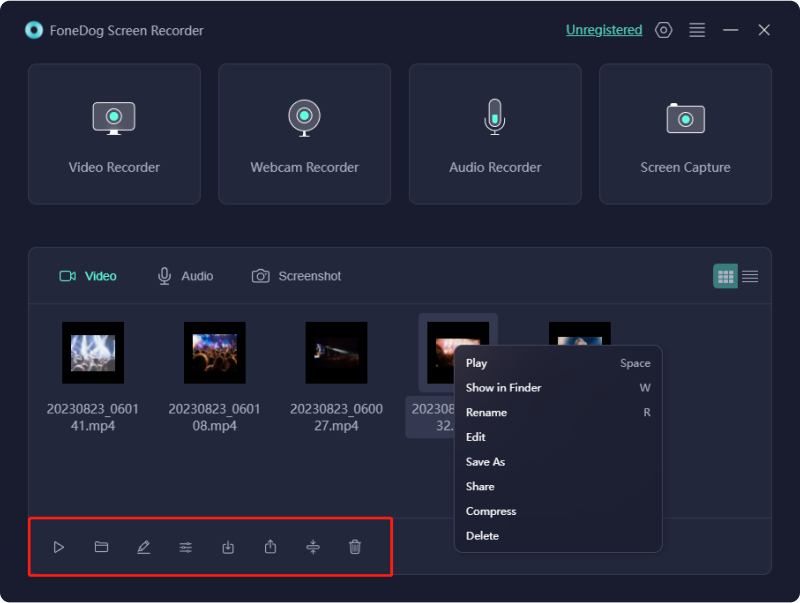
Here's how to screen record with audio using it:

How to Screen Record with Audio:

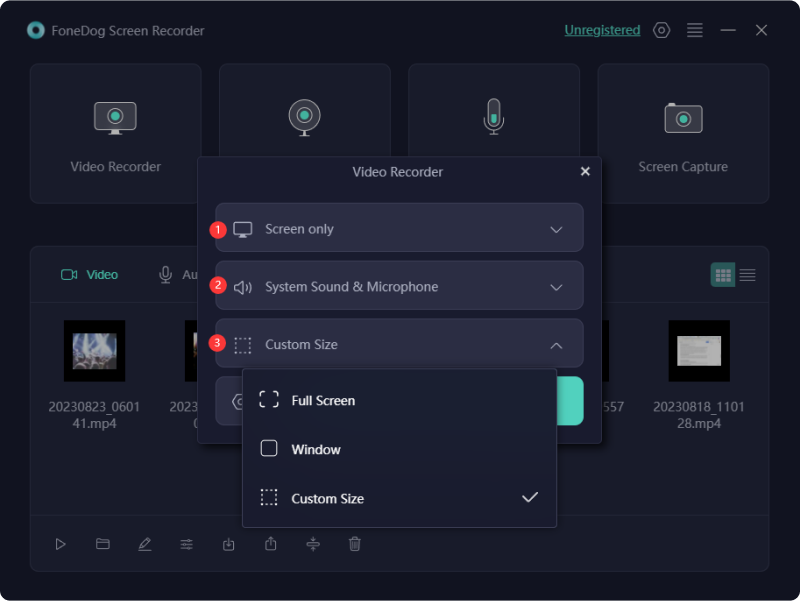
1. To initiate the process, the first step involves obtaining and installing FoneDog Screen Recorder onto your computer system. Once the installation procedure is finalized, proceed by launching the program.

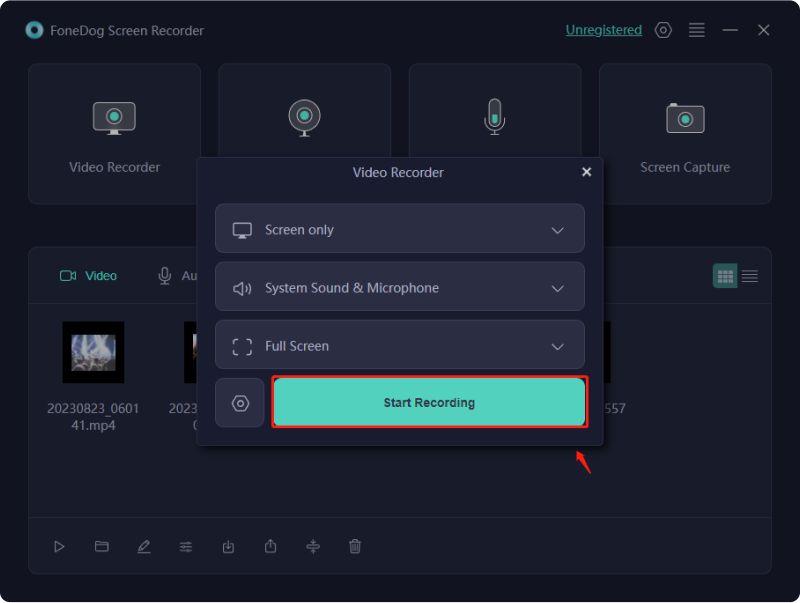
2. Within FoneDog Screen Recorder, a range of recording options awaits your selection. Choose from the available modes such as "Full Screen", "Custom", or "Record Webcam Only", tailoring your choice to match your specific recording necessities.

Screen Record with Audio - FoneDog Screen Recorder: Screen Size

3. To initiate the screen recording task, a simple click on the "REC" button serves as the trigger. For added convenience and ease of use, the software allows the configuration of hotkeys, streamlining the recording process.

Screen Record with Audio - FoneDog Screen Recorder: Initiate Recording

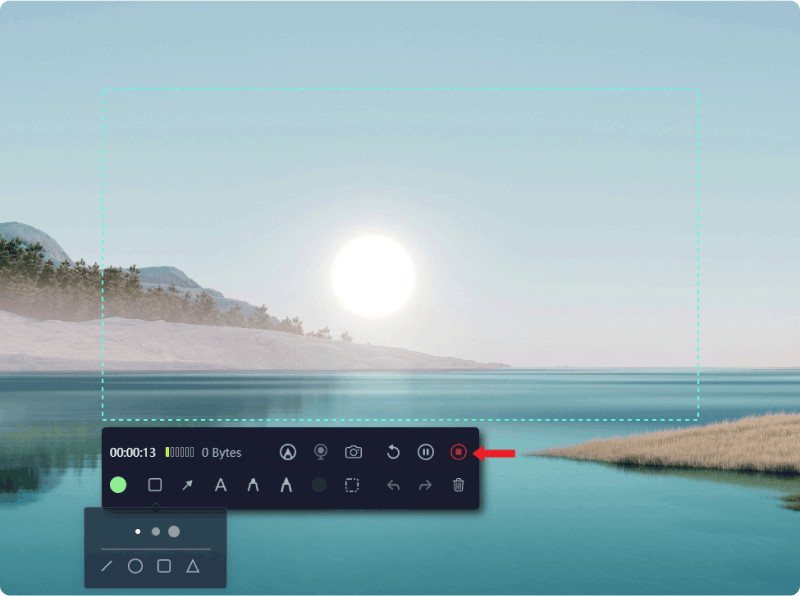
4. Throughout the recording session, you maintain complete control, with the ability to pause or resume the recording at your discretion by simply clicking the designated icons. FoneDog Screen Recorder elevates the experience by offering real-time annotation features, empowering users to include text, lines, and shapes directly in the video.

5. Upon capturing the desired content, bringing the recording to a close is a matter of clicking the "Stop" button. Before finalizing, the software provides an opportunity to review the recording, make necessary edits, or trim unwanted sections.

Screen Record with Audio - FoneDog Screen Recorder: Terminate Recording

6. Post-completion, designate the destination on your computer for storing the video file or opt for direct sharing across various platforms, all tailored to align with your preferences.

Screen Record with Audio - FoneDog Screen Recorder: Post Recording

People Also ReadFrom Basics to Pro: Guide on How to Record Screen Windows 7Recording Made Easy: Top-Tier Video Recording Software Free

Conclusion

Knowing how to screen record with audio is crucial for effective communication, education, and content creation across industries. This skill amplifies presentations, aids troubleshooting, enhances learning, and boosts content quality. Indeed, the article serves as a guide, to empowering users with essential techniques and tools for seamless and impactful recordings. Happy reading!

Leave a Comment

Comment

Comment ()
author image

Adela D. Louie

Tech Website Writing /Content Optimization

Singing, smiling, surprising every day!

So as a technical writer, it is my duty to gather effective and reliable solutions to answer questions on how to deal with the issues they are having with their devices.

Screen Recorder logo

Screen Recorder

Powerful screen recording software to capture your screen with webcam and audio.

How Do You Like This Article?

Check icon/ Check icon

INTERESTINGDULL

Check icon/ Check icon

SIMPLEDIFFICULT

Thank you! Here' re your choices:

Rate This Article: Excellent

Rating: 4.7 / 5 (based on 57 ratings)

Screen Recorder logo

Screen Recorder

Powerful screen recording software to capture your screen with webcam and audio.

FoneDog uses cookies to ensure you get the best experience on our website. Click here to learn more.