By Adela D. Louie, Last updated: December 7, 2023
Are you ready to unlock the power of seamless screen recording? Say hello to Movavi Screen Recorder, your key to capturing, sharing, and preserving everything happening on your computer screen.
In a world where visual content reigns supreme, this tool is your ultimate companion. Whether you're a seasoned pro looking to enhance your recording skills or a beginner taking your first steps into the world of screen capture, we've got you covered.
Dive in, and we'll walk you through the essential features, tips, and tricks, ensuring you'll create captivating videos, engaging tutorials, and crystal-clear screenshots. Get ready to elevate your screen recording game with Movavi.
Part #1: Overview: Movavi Screen Recorder And Its FeaturesPart #2: How to Make Use Of Movavi Screen RecorderPart #3: Tips And Tricks for Effective Screen Recording in MovaviPart #4: Top Alternative to Flawless Screen Recording And Capturing – FoneDog Screen RecorderConclusion
Part #1: Overview: Movavi Screen Recorder And Its Features
Movavi Recorder is a versatile and user-friendly software application designed for capturing and recording your computer screen on either Mac or Windows. It offers a range of features that make it a valuable tool for various purposes, such as creating video tutorials, recording webinars, capturing gameplay, and more. Here are some key features of Movavi Screen Recorder:
- Screen Recording: Movavi Recorder allows you to record your entire screen or specific regions, making it suitable for a wide range of applications.
- Audio Capture: You can record system sounds, microphone input, or both simultaneously, enabling you to narrate your recordings, add commentary, or capture audio from online streaming sources.
- Webcam Recording: The software supports webcam recording, so you can overlay your webcam feed onto your screen recording, ideal for video blogs and video conferencing.
- Scheduled Recording: You can set up a recording schedule, making it convenient for capturing live streams, webinars, or any other time-sensitive content.
- Cursor Effects: Movavi Recorder offers the ability to highlight and customize your cursor to ensure clarity in your recordings.
- Video Editing Tools: It provides basic video editing features, allowing you to trim, cut, and merge video clips, as well as add annotations and text to your recordings.
- Screenshot Capture: You can take high-quality screenshots in various formats, perfect for creating image-based tutorials or saving important information from your screen.
- Save in Multiple Formats: Movavi Recorder supports a wide range of video and audio formats, making it easy to export and share your recordings.
- Hotkeys: Customizable hotkeys enable you to start, stop, and pause recordings quickly, providing a seamless recording experience.
- Mouse Highlighting: The software can highlight your mouse cursor in your recordings, helping viewers follow your actions more easily.
- Auto Stop Feature: You can set the software to stop recording after a specific duration or file size, which is useful for managing large recordings efficiently.
- Built-in Media Player: Movavi Recorder includes a media player for reviewing and editing your recorded content within the application.
These features make Movavi Recorder a valuable tool for content creators, educators, gamers, and anyone who needs to capture and share what's happening on their computer screen. It's known for its user-friendly interface and is suitable for both beginners and more experienced users.
Part #2: How to Make Use Of Movavi Screen Recorder
Using Movavi Recorder is relatively straightforward, and it offers a variety of recording options to suit your needs. Here are the step by step on how to make use of Movavi Screen Recorder:
Step #1: Download and Install
- Head over right to the official Movavi website and after that you must download Movavi Recorder.
- Afterwards you must operate the installation file as well as you must then follow the on-screen instructions to install the software on your computer.
Step #2: Launch the Program
- Once the installation is a success, you may then launch Movavi Recorder from your desktop or perhaps right into the application folder.
Step #3: Configure Recording Settings
- Before you start recording, you must configure your recording settings:
- Choose the Recording Area: First, determine the portion of your screen you wish to capture. You have the flexibility to select between capturing your entire screen or focusing on a particular region. This means you can tailor your recording to capture only the content that's relevant to your project.
- Configure Audio Sources: Next, you have the freedom to customize your audio sources to match your recording requirements. You can opt to record the sounds that play from your computer (system audio), your own voice via a connected microphone, or both simultaneously. This versatility ensures that you can provide detailed commentary or explanations as you record your screen.
- Activate Your Webcam (If needed): If you want to incorporate a personal touch into your recordings, you can enable your computer's webcam. This allows you to overlay a live video feed of yourself onto the screen recording. This feature is especially valuable for creating engaging video content where your audience can see your reactions and expressions.
- Adjust Recording Settings: To fine-tune your recording, take advantage of the settings available within Movavi Screen Recorder. You can make adjustments to factors such as the frame rate and video quality, tailoring the recording to meet your specific needs. These settings ensure that your final video or screenshot maintains the desired level of visual and audio quality. Additionally, you can configure other preferences to optimize the recording experience according to your preferences.
Step #4: Start Recording
- After configuring your settings, you must select the button that fully implies "REC" to start recording. You can also use custom hotkeys to start as well as for the stop recording.
Step #5: Capture and Edit Screenshots (Optional)
- If you want to take screenshots during the recording, you may just simply press the camera icon right within the control panel.
- After recording or even such as capturing your desired screenshots, you can access the editing tools to trim and cut but also to fully annotate your recordings.
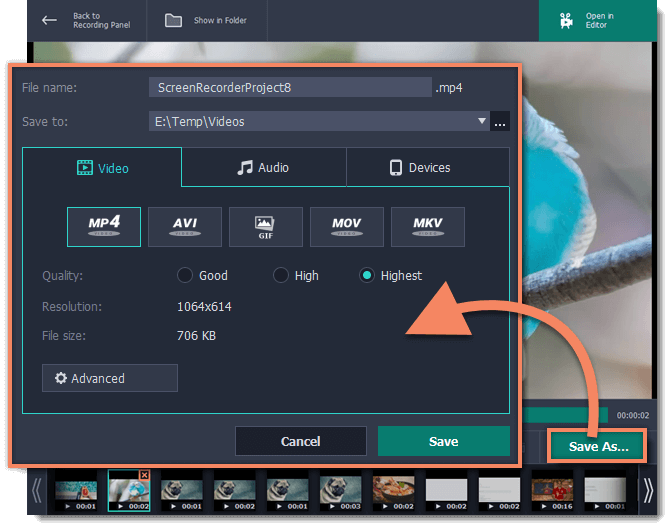
Step #6: Save and Export
- Once you've finished recording, you may just then hit on the "Stop" button. You'll be taken to a preview window where you can review your recording.
- Right within the preview window, you could then cut unnecessary segments again you might then add annotations, or perhaps make any necessary adjustments.
- After editing, you then select and click that option in the menu bar that pertains to "Save As" to choose your preferred format (MP4, AVI, MOV, etc.), location as well and the filename for your recording.
- From that, simply hit the button that clearly indicates "Save" to export your recording.
Step #7: Share or Upload (Optional)
- You can now share your recorded content on social media and may then upload it to video-sharing platforms, or make use of it for your projects.
Step #8: Explore Advanced Features (Optional)
- Movavi Recorder offers advanced features such as scheduled recording, cursor highlighting, and more. Explore these features to enhance your recording capabilities.
Step #9: Troubleshooting and Support
- If you encounter any issues or have questions, refer to the software's help section, or perhaps visit the official Movavi support resources for assistance.
Movavi Recorder is a versatile tool for recording your screen and audio with ease. It's suitable for a wide range of applications, from creating tutorials to capturing online meetings, and these steps will help you get started with its basic functionality.
Part #3: Tips And Tricks for Effective Screen Recording in Movavi
Certainly, there are some or several tips and tricks for effective screen recording in Movavi Screen Recorder:
- Plan Your Recording: Before you start, outline what you want to cover in your recording. A clear plan will help you stay focused and organized.
- Use a Clean Desktop: Clear you’re desktop of any clutter or personal information that you don't want to appear in the recording.
- Optimize Recording Area: Select the recording area carefully. If you're recording a specific application or region, make sure it's clearly visible and clutter-free.
- Test Audio Levels: Prior to recording, check your microphone and system audio levels. Adjust them to ensure clear, balanced audio in your recording.
- Use Keyboard Shortcuts: The Movavi Screen Recording tool offers customizable hotkeys. Set up hotkeys for starting, stopping, and pausing recordings to streamline the process.
- Plan Your Script: If you're narrating your recording, write a script or outline to ensure you convey your points clearly and concisely.
- Record in Short Segments: If your recording is long, consider breaking it into shorter segments. This makes it easier to manage and edit your content.
- Minimize Background Noise: Record in a quiet environment to minimize background noise, and use a quality microphone for clear audio.
- Add Cursor Effects: The Movavi Screen Recording tool allows you to highlight the mouse cursor. Use this feature to make it easier for viewers to follow your actions.
- Enable Webcam Interaction: If you're using the webcam overlay, maintain eye contact with the camera and interact with your viewers to create a more engaging experience.
- Edit Your Recording: After recording, use Movavi's built-in editing tools to trim unnecessary parts, add captions, and enhance your video.
- Consider Frame Rate and Quality: Balance frame rate and video quality. Higher frame rates (e.g., 60fps) are excellent for gaming content, while standard frame rates (e.g., 30fps) work well for tutorials.
- Experiment with Settings: Explore Movavi Recorder's settings to find the configuration that best suits your needs. Try different options for audio, video, and hotkeys to optimize your workflow.
- Save in Optimal Formats: Choose the right file format and resolution for your target platform. MP4 is a widely compatible format for sharing videos online.
- Stay Engaging and Enthusiastic: Keep your audience engaged by maintaining a lively and enthusiastic tone throughout the recording.
- Practice and Review: Practice makes perfect. Review your recordings to identify areas for improvement and refine your skills over time.
These tips and tricks will help you create more professional and engaging screen recordings using the Movavi Screen Recording tool. Remember that practice and experimentation are key to mastering the art of effective screen recording.
Part #4: Top Alternative to Flawless Screen Recording And Capturing – FoneDog Screen Recorder
FoneDog Screen Recorder is a versatile software tool designed to simplify and enhance the process of screen recording and screenshot capturing. It provides a user-friendly interface and a wide range of features that cater to various needs.
 Free Download
For Windows
Free Download
For Windows
 Free Download
For normal Macs
Free Download
For M1, M2, M3
Free Download
For normal Macs
Free Download
For M1, M2, M3
With FoneDog Screen Recorder, you can effortlessly create high-quality video recordings and screenshots for a variety of purposes, from producing instructional content to capturing online Google Meet conversations or gameplay.
How to use this best alternative to Movavi Screen Recorder:
- Download and Install: Visit the official FoneDog website to download the software. Follow the installation instructions to set it up on your computer.
- Launch the Program: Once installed, launch FoneDog Screen Recorder from your desktop or the application folder.
- Configure Recording Settings: Before recording, customize your settings:
- Choose whether to record the entire screen or a specified sector.
- Select audio sources such as system audio, microphone input, or both.
- Enable your webcam for video overlay if necessary.
- Modify options such as frame rate, video quality, and other preferences.
- Start Recording: Click the "Record" button to begin recording. You can also use customizable hotkeys to start and stop recording for greater convenience.
- Capture and Edit Screenshots (Optional): If you need screenshots during the recording, use the camera icon in the control panel. After recording, access the editing tools to refine your content.
- Save and Export: After you finish recording and any necessary editing, click "Save" to export your recording in your preferred format and location.
- Share or Upload (Optional): Share your content on social media, upload it to video-sharing platforms, or use it for your projects.

FoneDog Screen Recorder is a powerful and user-friendly tool that enhances your screen recording and screenshot-capturing experiences. It's suitable for beginners and professionals alike, making it a valuable asset for creating engaging and informative content.
People Also ReadUltimate Guide 101: How to Screen Record on WindowsRecording Made Easy: Top-Tier Video Recording Software Free
Conclusion
Movavi Screen Recorder is a versatile tool for capturing screen activity, offering user-friendly features and editing options. For a superior experience, explore FoneDog Screen Recorder, which boasts an intuitive interface, advanced recording capabilities, and seamless editing tools. Make your screen recording tasks a breeze with FoneDog! Have a nice day.


 /
/
