By Adela D. Louie, Last updated: November 30, 2023
Are you ready to harness the power of your Mac to take your creativity to the next level? Screen recording on a Mac can be a game-changer for content creators, educators, and professionals alike. In this article, we'll guide you through the art of how to record screen Mac, revealing essential tips, tricks, and the best tools to help you capture, edit, and share your content with finesse.
Whether you're a designer looking to showcase your process, a teacher aiming to create engaging educational material, or a marketer striving to craft compelling tutorials, this guide will empower you to create captivating screen recordings and unleash your creative potential.
Part #1: Overview: What’s Record Screen on Mac?Part #2: How to Record Screen on MacPart #3: The Most Convenient Tool to Record Screen on Mac – FoneDog Screen Recorder Conclusion
Part #1: Overview: What’s Record Screen on Mac?
Recording the screen on a Mac refers to the process of capturing a video of everything that's happening on your computer or specific areas of your screen. This feature is often used for various purposes, including creating tutorials, educational content, product demos, gameplay recordings, presentations, troubleshooting guides, and much more.
Record screen Mac allows you to visually demonstrate what you're doing on your computer, making it an incredibly versatile tool for a wide range of users.
The importance of screen recording on Mac lies in its ability to facilitate communication, education, and content creation in a highly visual and engaging manner. Here are some key points highlighting its significance:
- Enhanced Communication: Screen recording is a powerful means of communication. Whether you're explaining a complex concept, providing step-by-step instructions, or reporting a technical issue, it's often more effective to show rather than tell. It bridges the gap between verbal and visual communication.
- Educational Value: Teachers and educators can use screen recordings to create engaging educational content. It enables them to demonstrate lessons, showcase software applications, and create video tutorials, which can be more effective for students of all ages.
- Content Creation: Content creators, including YouTubers, video editors, and social media influencers, rely on screen recording to generate a variety of content. It allows them to create video reviews, gameplay footage, software demonstrations, and more, expanding their creative possibilities.
- Problem Solving: Screen recording is a valuable tool for technical support. Users can record issues they encounter, making it easier to diagnose problems. This is particularly helpful in remote troubleshooting scenarios.
- Documentation and Training: Companies use screen recording to document processes, train employees, and create training modules. It ensures that there's a visual record of important procedures and practices.
- Demonstrations and Presentations: Professionals can use screen recordings for presentations and demonstrations. It helps in visually illustrating data, software functionality, and ideas, making presentations more compelling.
- Archiving and Sharing: Screen recordings can be easily saved and shared, preserving important content and enabling seamless knowledge transfer within organizations and among individuals.
Part #2: How to Record Screen on Mac
The process to record screen Mac with sound is simple. Before you begin recording, here are some typical techniques and crucial preparations to take into consideration:
Using Built-In Screen Recording (macOS 10.14 And Later):
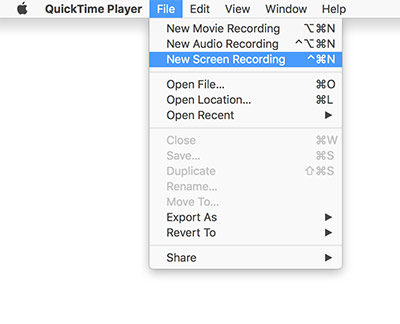
- To commence the process, begin by locating and launching the "QuickTime Player" application. You can easily access it from your computer's Applications folder.
- After successfully opening QuickTime Player, proceed to the next step by navigating to the top menu bar and selecting the "File" option. This action will unveil a dropdown menu.
- Within the dropdown menu, you'll find an essential choice: "New Screen Recording". Click on this option to initiate the screen recording feature.
- With the screen recording tool ready for action, you'll need to designate the specific area of your screen that you wish to capture. This can be easily accomplished by selecting the area using your mouse cursor.
- As you are ready to commence recording, you will notice a conspicuous button that resembles a red dot. This serves as the 'Record' button. Clicking this initiates the screen recording process, and you can now begin capturing the desired content on your screen.
- Once you have successfully recorded the content you intended, you can wrap up the process by returning to the menu bar. There, you'll find the "Stop" option. Selecting "Stop" concludes the recording and saves the captured video for your further use or editing.
Essential Preparations before Screen Recording:
- Plan you’re Content: Make a plan for your content by outlining what it is that you want to record and preparing any scripts or notes that you may require. The process of recording is made easier by having a well-structured strategy to follow.
- Adjusting the Settings on the Mac: Adjust the display settings on your Mac to meet your requirements for recording, including the resolution and the amount of brightness.
- Determine Which Microphone Is Best for You: If you want higher audio quality, you should use an external microphone. In most cases, the sound quality produced by USB or XLR microphones is superior to that produced by built-in microphones.
- Audio Settings: Make sure that the audio input source is set to be your microphone in the settings for the audio. System Preferences is where you'll find the option to change this on your Mac.
- Adjust the settings for the screen recording: Choose the recording options you want to use in the program that you're using to record your screen, including the frame rate and video resolution. Better quality can be achieved at higher resolutions and frame rates, but this comes at the expense of additional storage capacity.
- Free Up Storage Space: Screen recordings can take up a significant amount of storage space. Make sure that the hard disk of your Mac or an external device where you intend to keep the recordings has adequate free space before you begin.
- Put an End to Any Applications That Aren't Necessary: Put an end to any running programs in the background that could provide alerts, noises, or pop-up windows that could interfere with your recording.
- Perform a Test Run before Beginning Your Recording: Before you begin recording, perform a test run to evaluate the video and audio quality. Check to see that everything is functioning as it should.
- Please clean up your desktop: The visual quality of your recordings may be improved if your desktop is organized and clear of clutter.
- Prepare Annotations and Graphics (if needed): If you intend to add text, remarks, or visuals to your recording, be sure you have them prepared in a format that your recording program can readily import before you begin recording.
Once you've prepared your content, optimized your settings, and tested your setup, you're ready to start recording your screen on your Mac. These preparations will help ensure a smoother and more professional recording experience.
Part #3: The Most Convenient Tool to Record Screen on Mac – FoneDog Screen Recorder
FoneDog Screen Recorder is a versatile and user-friendly screen recording software designed for both Windows and Mac users. This powerful tool allows you to capture your screen, record audio, and create high-quality videos for a wide range of purposes, such as tutorials, gameplay recordings, presentations, and more. With FoneDog Screen Recorder, you can easily share your knowledge, creativity, and experiences with the world.
 Free Download
For Windows
Free Download
For Windows
 Free Download
For normal Macs
Free Download
For M1, M2, M3
Free Download
For normal Macs
Free Download
For M1, M2, M3
Here are the steps to make use of this free-trial screen recorder to record screen Mac:
- Download and Install: Visit the official FoneDog Screen Recorder website and from that you may then download as well as install the software on your Windows or even into a Mac computer.
- Launch the Application: After installation, you may then launch the FoneDog Screen Recorder right into your computer.
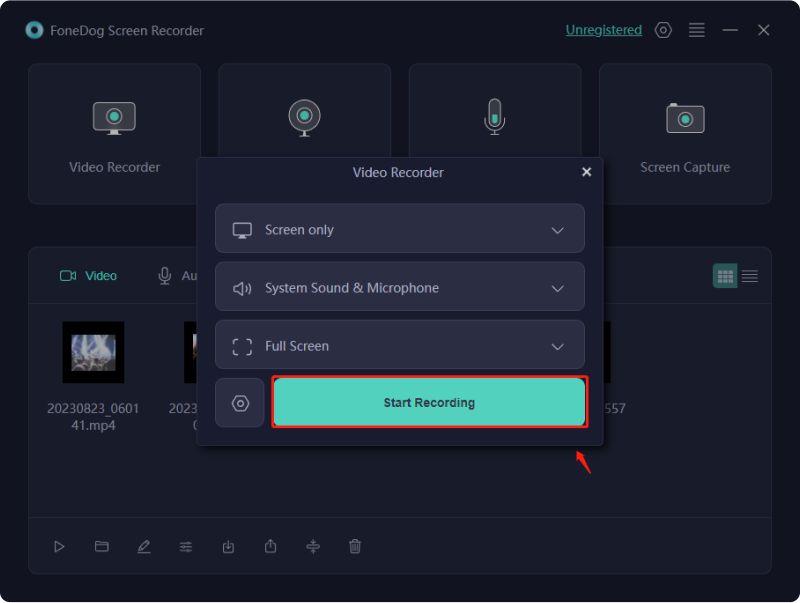
- Select Recording Mode: The software offers various recording modes. You may then choose the variety in which the one that suits your needs: the Full Screen, Custom, or perhaps the Webcam.
- Configure Settings: After that, you may just click the gear icon to configure settings, such as video format, audio source, and quality, as well as those hotkeys for easier control.
- Begin Recording: Afterwards, you may also click the "REC" button to start recording. You can select the area you want to record, whether it's the full screen, a specific application, or perhaps a custom area.
- Add Annotations (Optional): During the recording, you can add text, arrows, shapes, and other annotations to highlight or even may indeed explain specific elements on your screen.
- Edit Your Recording (Optional): After recording, you can use the built-in video editor to trim, cut as well and fully add background music to your video.
- Save and Share: Once you're satisfied with your recording, you might then save the video to your preferred location. You can then easily share it with your audience or perhaps colleagues.
People Also ReadUltimate Guide 101: How to Screen Record on WindowsGet to Basics: How to Screen Record on Windows with Audio
Conclusion
In conclusion, knowing how to record screen Mac is a dynamic tool for communication, education, and content creation. It allows you to visually share ideas and knowledge effectively. For those seeking a user-friendly and versatile solution, FoneDog Screen Recorder offers a seamless experience.
With its powerful features and ease of use, it empowers you to unlock your creativity and make engaging high-quality screen recordings. Explore your potential today with FoneDog Screen Recorder and bring your ideas to life.


 /
/
