By Adela D. Louie, Last updated: December 8, 2023
Are you ready to unlock the power of visual storytelling? In the digital age, screen recording has become a vital tool, allowing you to share your knowledge, create engaging tutorials, or capture memorable moments on your Windows computer. But what's a captivating video without sound? That's where we come in.
The article is your guide to how to screen record on Windows with audio. We'll walk you through the process step by step, ensuring you can effortlessly record your screen and add that perfect soundtrack. Whether you're a seasoned content creator or a newbie looking to enhance your presentations, we've got you covered.
Part #1: Benefits of Screen Recording with An AudioPart #2: How to Screen Record on Windows with Audio Part #3: Free Tool to Record your Windows Screen – FoneDog Screen RecorderConclusion
Part #1: Benefits of Screen Recording with An Audio
How to screen record on Windows with audio and why? Screen recording with audio offers numerous benefits, making it a valuable tool for a wide range of purposes. Here are some of the key advantages of screen recording with audio:
- Effective Communication: Screen recordings with audio enable clear and concise communication, making it easier to convey complex ideas or instructions. You can explain concepts visually and verbally, ensuring better comprehension.
- Visual Demonstrations: Screen recordings with audio are perfect for demonstrating how to use software, perform tasks, or navigate websites. Users can follow along with step-by-step instructions.
- Problem-Solving and Troubleshooting: Recording your screen with audio is a valuable tool for technical support and troubleshooting. Users can document issues they encounter and share them with experts for assistance.
- Content Creation: Content creators, such as YouTubers and video bloggers, use screen recording with audio to make video content. It's an excellent way to produce reviews, tutorials, gameplay videos, and more.
- Remote Collaboration: When working in a remote or distributed team, screen recording with audio can help team members provide visual feedback, share project updates, and collaborate effectively.
- Documentation: Create comprehensive documentation for software, applications, or websites. Screen recordings with audio provide a visual and auditory reference for users and developers.
- Personal Records: For personal use, you can capture and save memorable moments from video calls, online interviews, or online chats. It's a great way to preserve conversations and interactions.
- Legal Documentation: In legal matters, screen recordings with audio can serve as evidence in court cases or disputes, especially in situations where written records may be insufficient.
- Accessibility: Screen recordings with audio can enhance accessibility for individuals with visual or cognitive impairments. The combination of visual and audio elements makes content more inclusive.
- Remote Work: In the context of remote work, screen recordings with audio help in documenting and sharing virtual meetings, discussions, and project updates, making remote collaboration more efficient.
Part #2: How to Screen Record on Windows with Audio
Screen recording on Windows with audio can be done using various methods, each with its own set of steps. Here are common methods on how to screen record on Windows with audio and how to execute them:
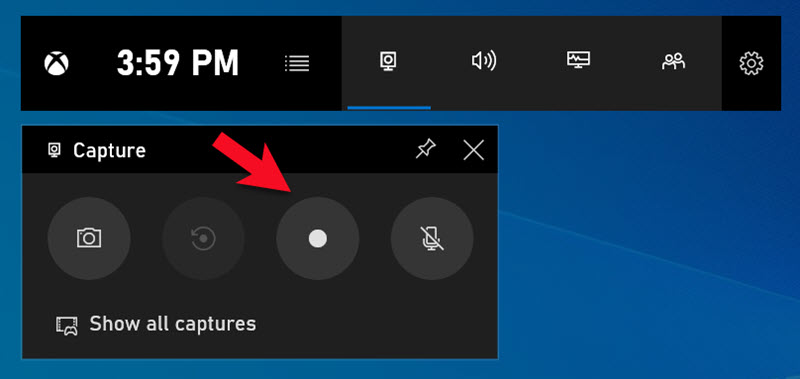
Method #1: Using Built-in Game Bar (Windows 10 and 11)
Both screen record on Windows 10 and 11 can rely on this built-in Game Bar. Follow these steps:
- To initiate the process, you'll need to access the Game Bar. You can do this by pressing the "Windows" key and "G" simultaneously. This action will bring up the Game Bar interface.
- Within the Game Bar interface, you'll notice a prominent "Record" button. This is your starting point for screen recording. By clicking on this button, you'll kick off the recording process, capturing both your on-screen activities and audio.
- For those who seek more customization, there's an option to fine-tune your recording settings. This involves adjusting parameters like recording quality and specifying the audio sources you wish to include. To access these settings, simply click on the gear-shaped icon, which represents the settings menu.
- When you've recorded the content you intended or want to conclude the recording session, you have two options. You can either press the "Windows" key (Win) and "Alt" keys along with "R" (Win + Alt + R) together, or you can click the "Stop" button located within the Game Bar interface. Either action will cease the recording.
- Once your recording is complete, you might be wondering where to find your saved files. These recordings are conveniently stored in a designated folder known as "Captures". You can typically locate this folder under the "Videos" section within your user directory. This is where you'll find your screen recordings, ready for your review or sharing.

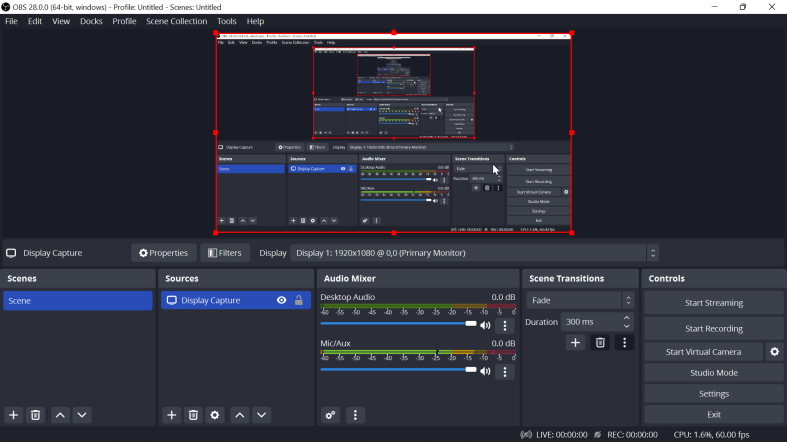
Method #2: Using OBS Studio (Open Broadcaster Software)
OBS Studio is a free and open-source software that provides advanced screen recording capabilities. Here's how to use it:
- Get OBS Studio from the official page and set it up.
- Start up OBS Studio.
- Select "Display Capture" from the "+" icon under "Sources" to pick out the screen you want to record.
- Inside the Audio Mixer, click on the gear-shaped settings button to pick out the sound sources you want to record.
- From the Controls menu, click the "Start Recording" button to start recording.
- When you're done, click the "Stop Recording" button.
- When you record something, it automatically saves to the "Videos" folder in your user area.
Method #3: Using the Xbox App
If you have a Windows computer with the Xbox app loaded, you can use the computer's built-in screen video features. Here is a step-by-step guide on how to use this feature to its fullest:
- You'll need to launch the Xbox app to get started. If it isn't already on your PC, you may quickly get it by visiting the Microsoft Store.
- Once you've downloaded the Xbox app, the next step is to log in using your Microsoft account.
- Direct your attention to the left sidebar of the Xbox app, where you'll see a cogwheel-shaped symbol. This symbol is the entry point to your settings.
- Among the settings options is one titled "Game DVR". This is your entry point for fine-tuning your recording choices, allowing you to change characteristics such as video quality and audio sources.
- When you're ready, hit the Win + G key combination to start a screen recording. This step will launch the Game Bar, and within its interface, you'll see a prominent "Record" button. Simply click it to begin your recording session.
- You have two options for stopping the recording process at any time. You may either click the "Stop" button in the Game Bar interface or use the keyboard shortcut Win + Alt + R to accomplish the same result.
- All of your completed recordings will be kept in a special folder called "Captures", which is tastefully placed within your Video collection.
Part #3: Free Tool to Record your Windows Screen – FoneDog Screen Recorder
FoneDog Screen Recorder is a powerful and user-friendly tool designed to empower you to capture your Windows screen effortlessly. This versatile software provides you with the ability to record your screen activities, whether it's for work, education, gaming, or personal use.
 Free Download
For Windows
Free Download
For Windows
 Free Download
For normal Macs
Free Download
For M1, M2, M3
Free Download
For normal Macs
Free Download
For M1, M2, M3
With FoneDog Screen Recorder, you can seamlessly create screen recordings with audio, making it an invaluable tool for tutorials, presentations, gaming sessions, vlogs, and a wide range of other applications.
Whether you're a seasoned professional or a beginner looking to explore how to screen record on Windows with audio, FoneDog Screen Recorder offers an intuitive and accessible solution, making it an ideal choice for anyone looking to capture, document, and share their Windows screen experiences.
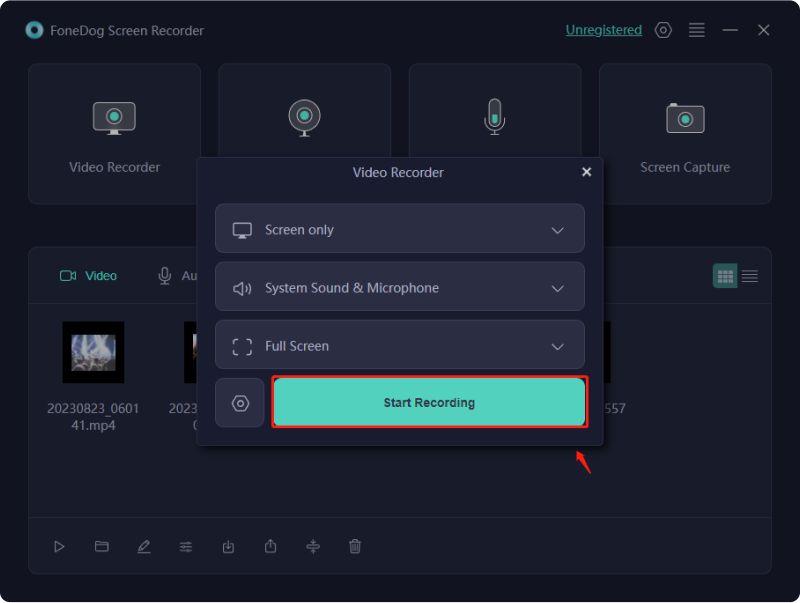
How to Screen Record:
- To get started, first, acquire and install FoneDog Screen Recorder on your computer. After the installation is complete, launch the program.
- FoneDog Screen Recorder offers multiple recording options. You can choose from "Full Screen", "Custom", or "Record Webcam Only", depending on your specific requirements.
- To commence the screen recording process, simply click the "REC" button. For added convenience, you can also configure hotkeys for ease of use.
- During the recording session, you have the flexibility to pause and resume as needed by clicking the respective icons. FoneDog Screen Recorder enables real-time annotation, allowing you to add text, lines, and shapes to your video.
- To conclude the recording, click the "Stop" button when you have captured the desired content. Before downloading, you have the opportunity to review the recording, make edits, or trim unwanted sections.
- You can select the destination for saving the video on your computer or directly share it on various platforms as per your preferences.
How to Record Audio:
- The software records in many ways. After that, select "Audio Recorder" to record sound.
- Select the input source (microphone or system sound) and sound volume before recording.
- You may then click "REC" to capture sound fully. Program records selected sound source.
- Stop and resume recording using the buttons adjacent to the audio. You may cut and modify the audio clip in FoneDog Screen Recorder to remove unwanted sections.
- Click "Stop" to stop recording after selecting the sounds. You may store the clip anywhere on your computer or share it on many sites.

People Also ReadTop Free Screen Recorder: Capturing Your Screen for Free2023 Beginner's Guide: How to Record Video on Mac
Conclusion
Now that you're equipped with the knowledge of how to screen record on Windows with audio, it's time to unleash your creativity and productivity. Whether for education, work, or personal projects, take that first step, and start creating compelling screen recordings. Your ideas and stories are waiting to be shared. Get recording and make an impact today!


 /
/
