FoneDog Screen Recorder FoneDog Screen Recorder
Special Offer Special Offer
Only Only
$4.49 $4.49
to get a ONE-month license to get a ONE-month license
Sale ends in xx days Sale ends in xx days
Buy Now
sale

User-Friendly Guide 2023: How to Screen Record on Windows 10

By Adela D. Louie, Last updated: December 9, 2023

Are you ready to unlock the full potential of your Windows 10 computer? Screen recording is a powerful tool that can help you capture and share everything from gaming triumphs to educational tutorials, and even work presentations. This guide is here to make you a screen recording pro by knowing how to screen record on Windows 10.

Whether you're a tech novice or a seasoned user looking for some expert tips. In this article, we'll walk you through the ins and outs of screen recording on Windows 10, from built-in options to third-party software solutions. Get ready to turn your screen into a canvas of endless possibilities!

Part #1: Rundown: Windows 10 Screen RecordPart #2: Options on How to Screen Record on Windows 10Part #3: Best Alternative to Screen Record on Windows 10 – FoneDog Screen RecorderConclusion

Part #1: Rundown: Windows 10 Screen Record

Screen recording on Windows 10 is a versatile and invaluable tool that has the power to revolutionize the way you interact with your computer. Whether you're a gamer, educator, content creator, or business professional, the ability to capture and share what's happening on your screen opens up a world of possibilities. Here's why screen recording is so valuable on Windows 10:

  1. Educational Excellence: For educators and students, screen recording is a game-changer. It enables the creation of engaging tutorials, online classes, and instructional videos. Complex concepts become simpler to grasp when you can visually demonstrate them.
  2. Gaming Glory: Gamers can record their epic victories, jaw-dropping gameplay, and in-game strategies. Share your gaming experiences, create walkthroughs, or even start a gaming channel on YouTube.
  3. Effective Communication: Businesses and professionals can use screen recording for remote meetings, presentations, and tutorials. It's a dynamic way to convey information, collaborate with colleagues, or provide customer support.
  4. Creative Content: Content creators and YouTubers can bring their visions to life through screen recording. Whether it's creating software tutorials, crafting engaging product reviews, or producing entertaining Let's Play videos, screen recording is the key to success.
  5. Bug Reporting and Troubleshooting: Tech enthusiasts can use screen recording to capture software glitches, errors, or issues, making it easier to troubleshoot and report problems to developers.
  6. Archiving Memories: Preserve digital memories by capturing video chats, video calls, or live streams. Relive those precious moments later or share them with loved ones.

The versatility of screen recording is unmatched. It empowers you to document, communicate, educate, and entertain. So, whether you're aiming to level up your gaming experience, enhance your professional presentations, or simply have a more effective way to convey your thoughts, you need to learn how to screen record on Windows 10. It's time to unlock the full potential of your computer and explore the endless opportunities that screen recording offers.

Part #2: Options on How to Screen Record on Windows 10

Recording what's on your screen using Windows 10 gives you a number of alternatives and approaches to choose from, based on your particular tastes and requirements. The most important approaches, together with explanations of how to use them, are detailed below:

Method #1: Using the Built-in Xbox Game Bar

The Xbox Game Bar is a free built-in screen recording tool that is included with Windows 10, and while it is primarily intended for gamers, it can be used for a variety of other things as well.

How to screen record on Windows 10 using built-in Xbox Game Bar:

  1. To initiate the Xbox Game Bar, you can activate it by simultaneously pressing the Windows key along with the letter G on your keyboard.
  2. When you're ready to commence the recording process, navigate to the toolbar within the Xbox Game Bar and click on the "Capture" button.
  3. When you wish to conclude your recording session, you have two options: you can either click the "Stop" button found on the Xbox Game Bar's interface or use a keyboard shortcut by pressing the Windows key, the Alt key, and the letter R simultaneously.
  4. To access and review your recorded content, you can easily find it within the designated "Captures" folder on your system.

Screen Record on Windows 10 Using the Built-in Xbox Game Bar

Method #2: Using the Snipping Tool

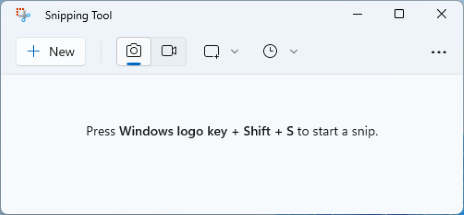
Although the Snipping Tool is most commonly used for taking screenshots, it also has the ability to be used for very basic recording of the Windows screen with audio.

How to Do It:

  1. Begin by conducting a search to locate the Snipping Tool application, and once you've found it, proceed to open it.
  2. Within the Snipping Tool interface, your next step is to indicate the specific portion of your screen that you intend to record. To accomplish this, you should simply initiate the selection process by clicking on the "New" button.
  3. Once your desired area is selected, you're now prepared to commence the recording process. This can be initiated by clicking the "Record" button within the Snipping Tool.
  4. When you've concluded the recording and are ready to terminate it, you can conveniently do so by utilizing the "Stop" button, which can typically be found on your keyboard.

Screen Record on Windows 10 Using the Snipping Tool

Method #3: Using PowerPoint

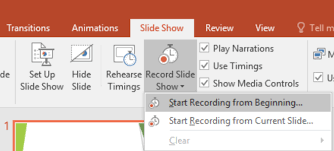
Microsoft PowerPoint is a program that may be used to record screen actions as well as presentations.

How to screen record on Windows 10 using PowerPoint:

  1. Launch Microsoft PowerPoint and create a fresh presentation.
  2. Move to the "Slide Show" tab within the program's interface.
  3. Then, you will find the "Record Slide Show" option. Select this option.
  4. A choice will be presented to you at this point: decide whether you want to record the current slide exclusively or the entire presentation.
  5. To commence the recording process, click on the "Record" button located within the menu.
  6. Begin navigating through your presentation as you would during a regular presentation. PowerPoint will diligently record both your screen activities and any accompanying voice narration.
  7. When you have completed your presentation or the segment you intended to record, you can cease the recording process by using the provided controls or commands.

Screen Record on Windows 10 Using PowerPoint

Method #4: Windows 10 Game Capture for DirectX Games

Windows 10 incorporates a game capture functionality that is specifically designed for DirectX games, providing users with a straightforward and hassle-free method to effortlessly record their in-game activities and gameplay.

To initiate and conclude the recording of gameplay while engaged in a DirectX game that is running in full-screen mode, follow these steps:

  1. Begin by ensuring that you are actively playing a DirectX game in full-screen mode.
  2. To commence the recording process, simultaneously press the Windows key and Alt key along with the R key (i.e., Windows key + Alt + R).
  3. To cease the recording of gameplay, again press the Windows key and Alt key alongside the R key (Windows key + Alt + R).

Remember to adjust settings, such as video quality and audio sources, to suit your needs in each of these methods. The choice of method depends on your specific use case and the features you require.

Part #3: Best Alternative to Screen Record on Windows 10 – FoneDog Screen Recorder

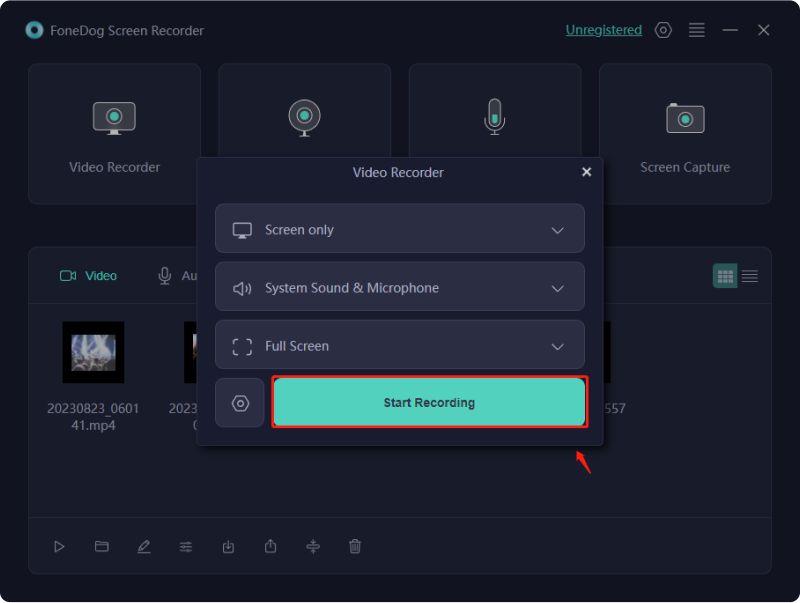
FoneDog Screen Recorder is a powerful and versatile screen recording tool designed to capture your screen activities, whether it's for creating tutorials, recording gameplay, or preserving important moments. With FoneDog Screen Recorder, you can easily and efficiently record your Windows 10 screen, ensuring the utmost quality and control over your recordings.

windows Free Download For Windows mac Free Download For normal Macs mac Free Download For M1, M2, M3

Below is a step-by-step guide on how to screen record on Windows 10 using FoneDog Screen Recorder.

Step #1: Download and Install FoneDog Screen Recorder

  • Start by visiting the official FoneDog website or the provided link above.
  • Download the FoneDog Screen Recorder and follow the on-screen instructions to install it on your Windows 10 computer.

Step #2: Launch FoneDog Screen Recorder

  • After installation, launch the program from your computer's desktop or start menu.

Step #3: Configure Recording Settings

  • Before you begin recording, configure the recording settings to your preferences. You can choose the recording area, audio sources, and more. FoneDog Screen Recorder offers flexible options to cater to various recording needs.

Step #4: Start Recording

  • Click on the "REC" button to begin recording your screen. You can also press the hotkeys specified within the FoneDog Screen Recorder interface to start and stop recording.

Screen Record on Windows 10 – FoneDog Screen Recorder: Start

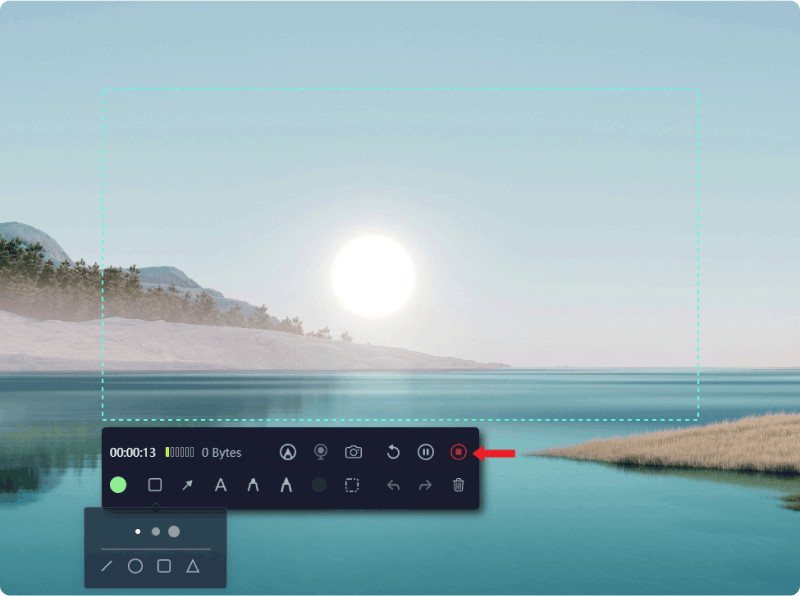
Step #5: Pause and Resume Recording (Optional)

  • If needed, you can pause the recording by clicking on the "Pause" button. To resume, click "Resume".

Step #6: Finish Recording

  • When you have captured the content you desire, click on the "Stop" button to end the recording session.

Screen Record on Windows 10 – FoneDog Screen Recorder: Stop

Step #7: Preview and Save Your Recording

  • FoneDog Screen Recorder allows you to preview your recording before saving it. Review your video to ensure it meets your expectations.
  • After previewing, you can save the recording to your preferred location on your computer.

Step #8: Edit and Share (Optional)

  • If necessary, you can use FoneDog Screen Recorder's editing features to enhance your recording. You can trim, cut, and edit your video.
  • Finally, share your recorded content with others or keep it for future reference.

FoneDog Screen Recorder provides an accessible and efficient way to record your Windows 10 screen, making it an excellent choice for a wide range of recording needs.

People Also Read2023 Beginner's Guide: How to Record Video on MacComplete Guide: How to Screen Record on Mac with Audio

Conclusion

To conclude, knowing how to screen record on Windows 10 is a valuable tool for a multitude of purposes, from gaming to educational content and professional presentations. FoneDog Screen Recorder offers an easy and versatile solution. With this user-friendly software, you can effortlessly capture and share your screen's activities.

It's time to unleash your creativity and make the most of your Windows 10 experience. Start exploring the world of screen recording with FoneDog Screen Recorder today and bring your ideas to life!

Leave a Comment

Comment

Comment ()
author image

Adela D. Louie

Tech Website Writing /Content Optimization

Singing, smiling, surprising every day!

So as a technical writer, it is my duty to gather effective and reliable solutions to answer questions on how to deal with the issues they are having with their devices.

Screen Recorder logo

Screen Recorder

Powerful screen recording software to capture your screen with webcam and audio.

How Do You Like This Article?

Check icon/ Check icon

INTERESTINGDULL

Check icon/ Check icon

SIMPLEDIFFICULT

Thank you! Here' re your choices:

Rate This Article: Excellent

Rating: 4.8 / 5 (based on 82 ratings)

Screen Recorder logo

Screen Recorder

Powerful screen recording software to capture your screen with webcam and audio.

FoneDog uses cookies to ensure you get the best experience on our website. Click here to learn more.