FoneDog Screen Recorder
FoneDog Screen Recorder
Special Offer
Special Offer


By Adela D. Louie, Last updated: June 23, 2025
In order to improve your sharing experience when it comes to audio, MP3 format is one of the few formats that are available for sharing audio files. As it is universally being used, most people have used it as their audio format.
How to record MP3 on Mac? In line with this, people were actually struggling with which one to use to do this. If you have little to no idea on how to do this, worry no more. This article talks about it, as well as what the viable applications are: either built-in or third-party.
Part 1. Record MP3 on Mac with Simple Clicks Using FoneDog Screen RecorderPart 2. Record MP3 on Mac Using QuickTime PlayerPart 3. Record MP3 on Mac using Voice Memo Using Voice MemoPart 4. Record MP3 on Mac Using AudacityConclusion:
How to record MP3 on Mac quickly? If you are not that tech-savvy and prefer to have an application that can do all the tasks in just a few clicks while producing excellent output, FoneDog Screen Recorder is right for you.
FoneDog Screen Recorder is a versatile and free screen recorder for Mac and Windows, which can capture screen activities, audio, and webcam footage. It allows users to record high-quality videos of their screen, making it ideal for tutorials, gameplay, video calls, and presentations. The software supports full-screen, custom-region, and webcam recording, with options to include system sound, microphone audio, or both.
Without further ado, here is the comprehensive guide on how to record MP3 on Mac using FoneDog Screen Recorder.
![]() Free Download
For Windows
Free Download
For Windows
![]() Free Download
For normal Macs
Free Download
For normal Macs
![]() Free Download
For M1, M2, M3
Free Download
For M1, M2, M3
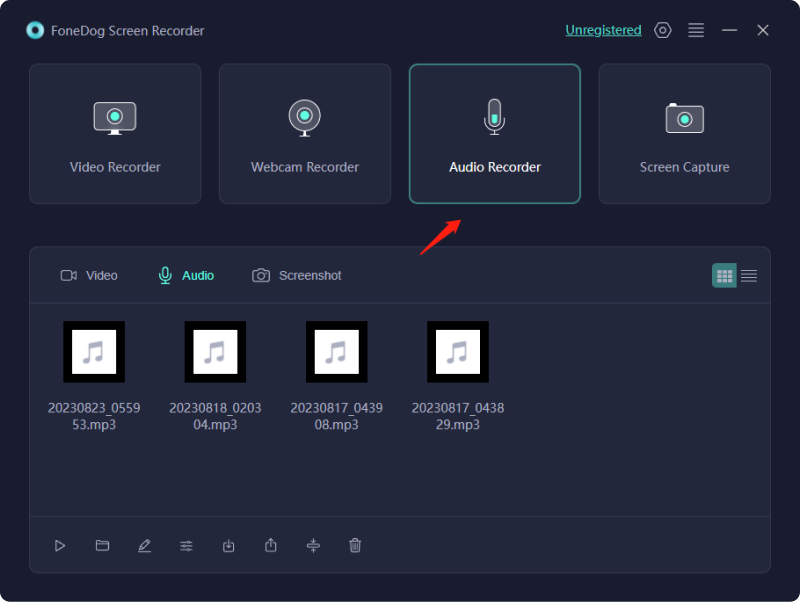
Download first the FoneDog Screen Recorder in your Mac, available on the official website. After running, open it and click the “Audio Recorder” in the main interface.
Go to General Settings before you record the audio > check or uncheck whatever applies to you. In this case, click in audio format, the “MP3”
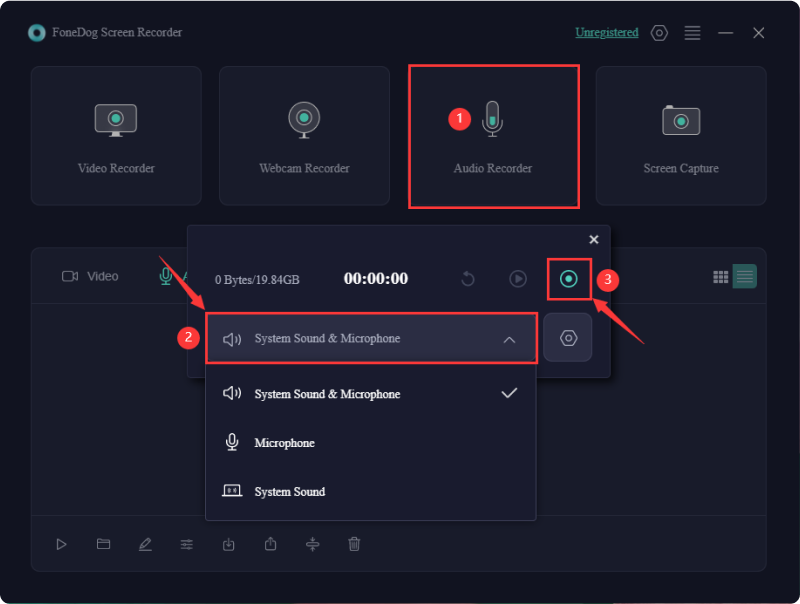
In order to record audio, there are 2 ways: record together the microphone and system sound, or record one of them. Just pick “System Sound & Microphone”, “Microphone” and/or “System Sound”.
To start recording, click the record button (green recording icon). Just make sure that you do it once you already play the audio you aim to record.
Once finished, click the stop button (red recording icon). There are also “Pause” and “Restart” buttons if you want to pause or retake the recording. The MP3 recording will be automatically saved in your Mac. It also allows you to edit, trim, or cut anything in your audio; just click the “Audio” tab below.
If you don’t want to download external software in your Mac, then use QuickTime Player—a built-in Mac software that can record MP3 to, aside from its main function of playing video files. The interface is also user friendly, convenient for those who struggle with multiple and complex instructions.
With regards on how to record MP3 on Mac, here is how.
Search or launch QuickTime Player. Here you have two options to use in order to record MP3: either audio from an internal source or from a microphone.
In recording internal audio, go to “File” > “New Movie Recording”, found in the top bar menu.
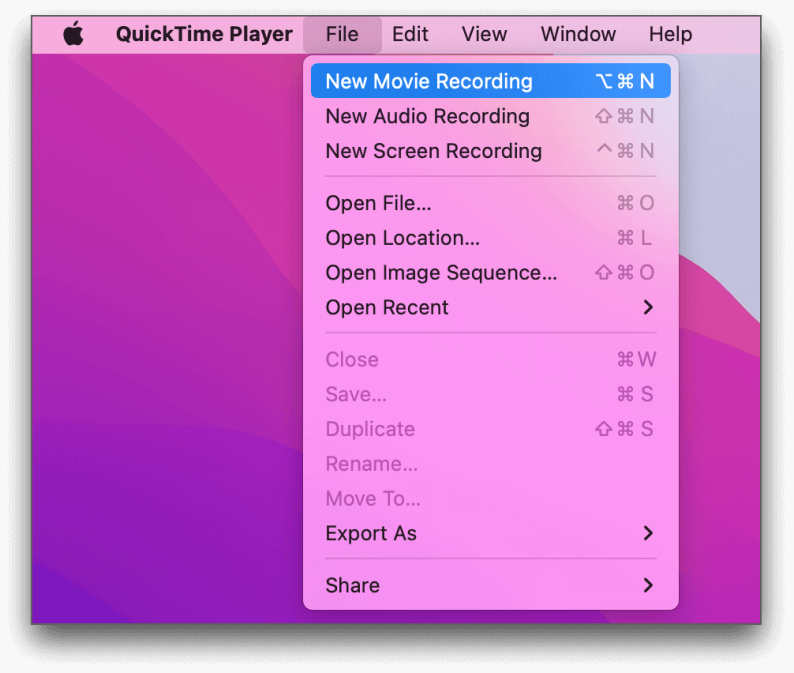
In recording from an external source such as a microphone, go to “File” > “New Audio Recording”, also found in the top bar menu.
Then, click the red recording button to begin your recording process.
To stop, click that again. Then it will be saved by navigating “File” > “Save”
However, if that does not satisfy your recording of MP3 on Mac, continue reading for more methods to be presented.
Voice Memo has become a very handy tool that helps (mostly) the Apple Community when it comes to sharing on whatever Apple powered devices you have. Since being brought to macOS 10.14, it has paved the way to record audio via MP3 format.
Though it is a great application, the fact that it can only record audio via MP3 is its main downside. Regardless, you can then play files with it.
To know the step-by-step procedure how to record MP3 on Mac using Voice Memo, here is how.
If you do not have the Voice Memo, just download it. After that, open, and you can now proceed to recording.
To begin the recording process, click the big red recording button. To stop, click the “Pause” button.
To save your recording, just click “Done”. You can also rename the file on to whatever you want, and it will be automatically saved on your Mac.
Down to our last method on how to record MP3 on Mac, introducing Audacity. It is suitable for Mac, Linux, and PC computers. It is popular with musicians, recording artists, and podcasters due to its advanced options and multi-track audio feature—allowing you to edit and merge multiple recorded audios to produce one single output.
This is also free and good for professionals due to its multi-functional features. The only downside of it is its main interface, which takes time to be learned. If that is not the issue, then here is how to record MP3 on Mac.
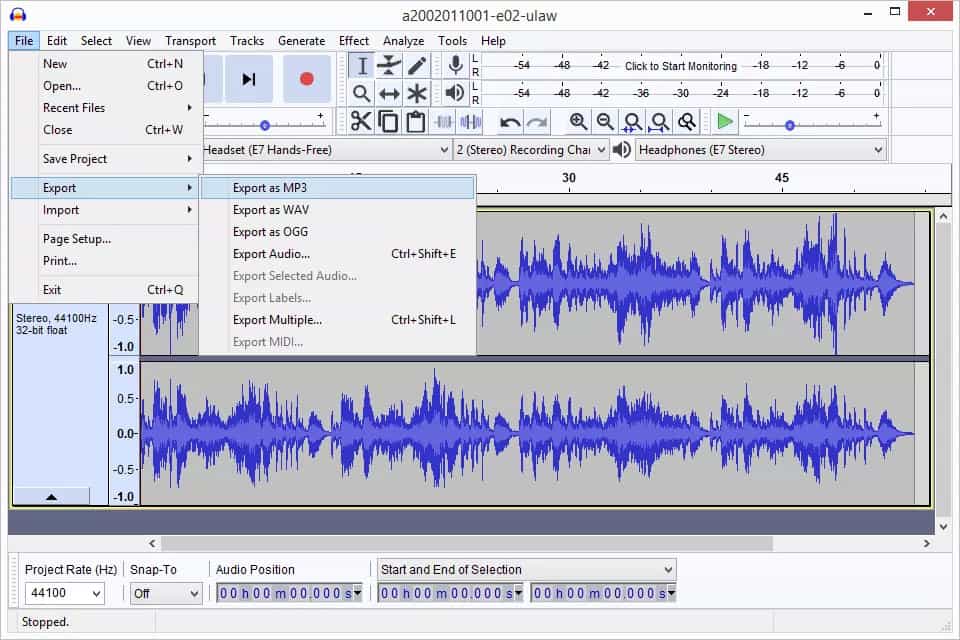
Install and open Audacity, and go to the “Recording Tab”. After, go to “Tracks” in the menu > “Add New” > then choose “Stereo Track” or “Mono Track”.
Now, you can record audio via microphone, click the “Record” button at the top bar. It indicates that it is recording once you see the audio graph recording.
Click the “Stop” button at the top bar. When done, go to the “File” menu > “Export” > then choose “Export to MP3”. Name your file, adjust the output settings, then select the destination to which you want to save the file > “Save”.
This article encapsulates the 4 most common and convenient way how to record MP3 on Mac. With regards to its feasibility and convenience, yet it can produce multiple formats aside from MP3, FoneDog Screen Recorder is our top choice. However, you can also download the other program to check if it fits your needs.
![]() Free Download
For Windows
Free Download
For Windows
![]() Free Download
For normal Macs
Free Download
For normal Macs
![]() Free Download
For M1, M2, M3
Free Download
For M1, M2, M3
Leave a Comment
Comment

Tech Website Writing /Content Optimization
Singing, smiling, surprising every day!
So as a technical writer, it is my duty to gather effective and reliable solutions to answer questions on how to deal with the issues they are having with their devices.
Screen Recorder
Powerful screen recording software to capture your screen with webcam and audio.
Hot Articles
 /
/
INTERESTINGDULL
/
SIMPLEDIFFICULT
Thank you! Here' re your choices:
Excellent
Rating: 4.8 / 5 (based on 76 ratings)
