FoneDog Screen Recorder FoneDog Screen Recorder
Special Offer Special Offer
Only Only
$4.49 $4.49
to get a ONE-month license to get a ONE-month license
Sale ends in xx days Sale ends in xx days
Buy Now
sale

How to Record Desktop Audio with Audacity on Windows/Mac

By Adela D. Louie, Last updated: February 23, 2024

Do you find yourself frustrated with subpar recordings or facing difficulties in achieving optimal sound quality through your computer? There is no need to search any longer! This article provides indeed a full guide on how to record desktop audio with Audacity, a well-known program for editing audio, in order to easily record high-quality desktop audio.

Irrespective of whether you are a podcaster, who plays games, an instructor, or a content producer, it is crucial to acquire expertise in desktop audio recording to captivate your audience. Read below to enhance your audio experience and impress your audience!

Part #1: General Method: How to Record Audio with AudacityPart #2: Advanced Tips on Enhancing Recording Audio Using AudacityPart #3: Best Ideal Alternative on Recording Desktop Audio – FoneDog Screen RecorderConclusion

Part #1: General Method: How to Record Audio with Audacity

When individuals seek to capture and refine top-notch audio on their PCs, Audacity often springs to mind. This freely available computer audio recording software is a favored choice for many due to its cost-free nature. However, navigating its interface proves daunting for most, characterized by its cumbersome design and lack of intuitiveness.

Here, we'll elucidate the steps on how to record desktop audio with Audacity in a straightforward manner. The outlined procedures will enable you to effortlessly record audio of any duration, even if you're unfamiliar with Audacity.

Method #1: How to Record Desktop Audio with Audacity (Microphone)

To capture audio on your computer with Audacity, ensure the built-in microphone is operational. Once Audacity has been installed on your system, proceed with the following instructions:

  1. To get started with this, you may first initiate Audacity and then proceed onto selecting the tab labeled "Recording Devices" situated in the upper-right corner of your screen interface, which was identifiable by a microphone symbol.
  2. Upon selection, such of drop-down menu will emerge, displaying all available recording devices connected to your computer. From there you may then choose for the microphone intended for your recording. If the desired microphone is not visible, you may then ensure its proper connection as well as activation.
  3. After that, you could then navigate to the top of the screen and choose on option that states "Tracksat", thus from that opt for "Add New" to specify the desired track type. Typically, for straightforward projects, you can opt between "Mono" or perhaps the button "Stereo".
  4. Afterwards, you may then click the "Record" button to commence recording. Upon initiation, an audio waveform will manifest, indicating the commencement of the recording process. Optionally, you can initiate a new recording using the keyboard shortcut "Shift + R".

Method #2: How to Record Desktop Audio with Audacity (System)

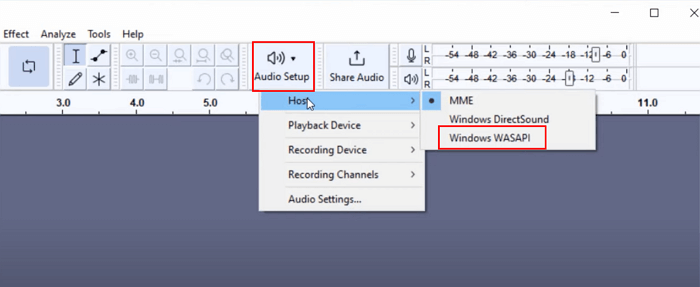
To capture audio on your computer with Audacity, specifically for recording system audio, adhere to these instructions:

  1. To begin with this, launch upon the Audacity and after which you may then select "Windows WASAPI" right within the dropdown menu which then labeled "Audio Host".
  2. After there, you may choose for the system's default audio output device for both speakers as well as headphones under "Recording Device". You might also need to toggle the button "Loopback" feature. The availability of this option may differ based on your PC's sound card.
  3. Upon that, you may thus generate a new track, then initiate recording by simply clicking the "Record" button. Proceed with launching the game, video, or perhaps any other content you intend to capture.

Record Desktop Audio with Audacity (System)

Bonus Method. How to Record Audio with Audacity (Mac)

Here, let's explore the detailed process of capturing desktop audio on Mac using Audacity.

  1. Initially, you must acquire and install Audacity. Navigate to the “Apple” icon on the menu bar and opt for “System Preferences”. Locate the “Sound” option and peruse through the available selections, opting for “microphone”.
  2. Assuming you have configured your Mac accordingly, launch Audacity. From the main menu, select “Audacity” followed by “Preferences” from the dropdown menu. Note: You can confirm this by accessing “Devices” on the left and selecting your desired microphone.
  3. With these configurations in place, you can now commence recording audio on your Mac. Upon initiating playback of the audio, press the “record” button to initiate the recording process. The recording can be halted by pressing the “stop” button on the device.
  4. Utilize the “Effect” tool to incorporate sound enhancements to the recorded audio. This Mac audio recording software provides a diverse array of effects. Upon selecting the “Effect” option, you can choose a specific effect from the dropdown menu.
  5. Audacity offers numerous standard editing features. Access the editing functions by clicking on Edit if adjustments to the audio are necessary. It's advisable to duplicate the audio file before implementing edits or applying effects in Audacity, as modifications made are irreversible.
  6. Navigate to “File” and select either “Export Audio” or “Export Selected Audio” to save the recorded audio onto your Mac. You can opt to export it as an MP3 file from this point onward.

Part #2: Advanced Tips on Enhancing Recording Audio Using Audacity

Upon mastering the general steps on how to record desktop audio with Audacity and other methods as well, delve into Audacity's advanced functionalities to elevate your audio further. These pointers will assist you in achieving a heightened level of professional audio quality.

  • Frequency Balancing (EQ): Utilize the EQ feature to fine-tune the distribution of frequencies. Adjust targeted frequency bands to optimize vocal intelligibility or perhaps reduce undesirable ambient sounds like buzzing or such of sibilance.
  • Noise Reduction: When confronted with ambient noise in your recordings, such as hums or hisses, employ the Noise Reduction function. Identify a segment where solely the noise is audible, establish it as the noise profile, and then apply the effect across the entire track to diminish undesirable noise.
  • Audio Segmentation: Utilize the selection tool to segment and rearrange segments of your audio. This is particularly advantageous for podcast refinement or creating seamless audio transitions.
  • Track Mixing: Import multiple audio tracks into Audacity and merge them together. Adjust the volume levels of each track using the envelope tool or gain sliders to achieve a harmonious blend.
  • Exporting Multiple Tracks: For multi-track projects, Audacity enables the exportation of individual tracks or their consolidation into a single stereo file.

Part #3: Best Ideal Alternative on Recording Desktop Audio – FoneDog Screen Recorder

We have learned how to record desktop audio with Audacity, but what if your Audacity not working? FoneDog Screen Recorder has emerged as the finest choice for recording desktop audio because of its smooth performance and extensive capabilities. Users may easily capture system audio and screen activity using the easy interface.

windows Free Download For Windows mac Free Download For normal Macs mac Free Download For M1, M2, M3

FoneDog Screen Recorder provides exceptional audio output, configurable configurations, and flexible interoperability across several systems. The software's stability, straightforward screen interface, and powerful features make it the ideal option for anyone in need of a dependable solution for successfully capturing desktop audio.

Key Features:

  • No Watermarks: Safeguard your recordings devoid of any watermarks or time limitations.
  • Capture Exceptional Computer Audio Efficiently: You can record system sounds and microphone input simultaneously or separately. Enhanced with built-in noise suppression and advanced sound enhancement technology, this tool ensures top-notch audio quality.
  • File Compression for Recordings: Easily shrink recording file sizes with a single click using the included compression feature.

How to Use:

1. To get started, download and set up FoneDog Screen Recorder on Windows or Mac computer.

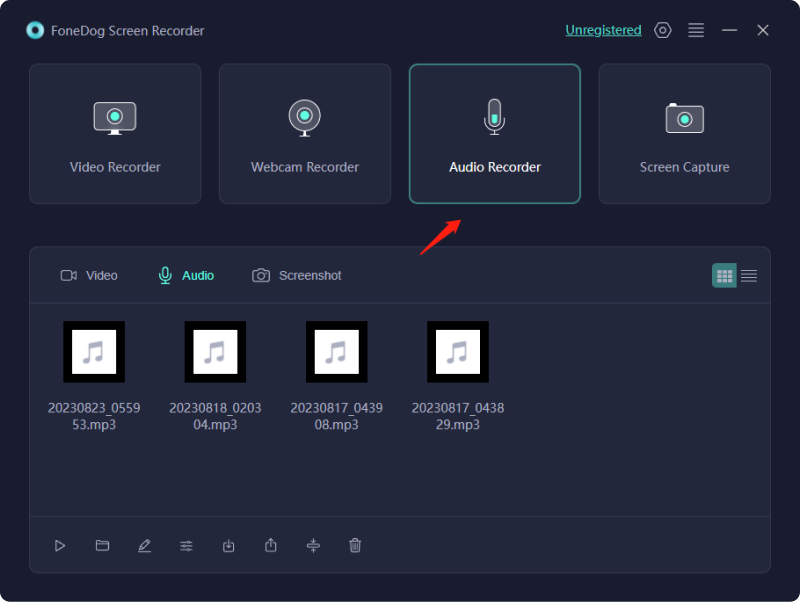
2. Once you have completed the aforementioned steps, go to the main interface of the FoneDog Screen Recorder, select the option that is labeled "Audio Recorder".

Recording Desktop Audio – FoneDog Screen Recorder: Choose Mode

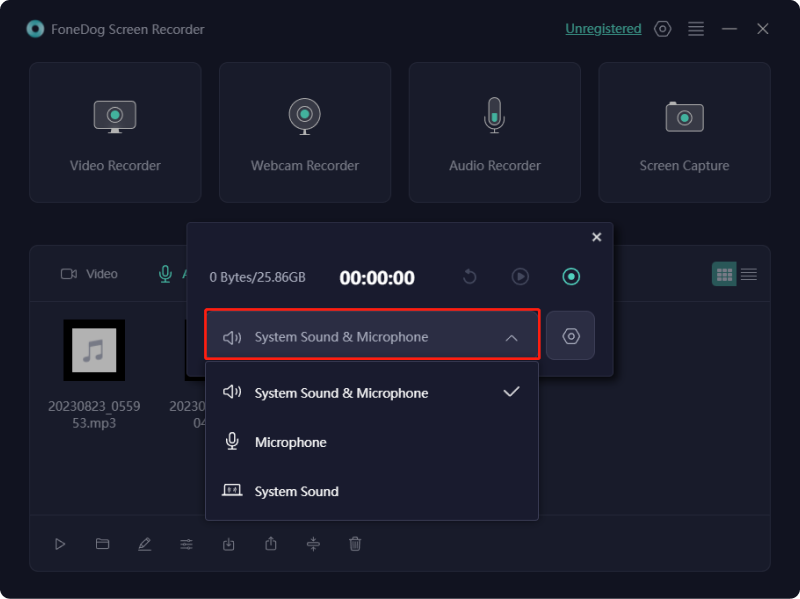
3. After that, select option that indicates "System Sound & Microphone" to record sounds from the microphone and the system. A single source can be recorded by selecting either "Microphone" or perhaps the option "System Sound" as an alternative. Both of these options are available to you.

Recording Desktop Audio – FoneDog Screen Recorder: Sound Settings

4. After that, you will be able to begin the process of recording by simply pressing the "Green" button that is located directly on the right-hand corner of the display screen.

Recording Desktop Audio – FoneDog Screen Recorder: Start

5. Upon that, you may now press the red stop button to bring the recording session to a quick as well as comfortable close. You also have the option to use on that "Pause" button, and when you are ready, you may begin recording by pressing it once again. After that you may press upon that "Restart" option will result in the previous recording being deleted and the beginning of a fresh session.

People Also Read11 Best Webcam Recording Software for Windows/Mac [2024]5 Best iPhone Audio Recorders in 2024

Conclusion

In conclusion, knowing how to record desktop audio with Audacity is a user-friendly process, offering robust features for capturing high-quality sound. However, for those seeking a watermark-free solution with advanced noise suppression and intuitive controls, FoneDog Screen Recorder emerges as an ideal alternative. Its efficiency in preserving audio integrity and simplicity in use make it a standout choice for diverse recording needs. Happy Recording!

Leave a Comment

Comment

Comment ()
author image

Adela D. Louie

Tech Website Writing /Content Optimization

Singing, smiling, surprising every day!

So as a technical writer, it is my duty to gather effective and reliable solutions to answer questions on how to deal with the issues they are having with their devices.

Screen Recorder logo

Screen Recorder

Powerful screen recording software to capture your screen with webcam and audio.

How Do You Like This Article?

Check icon/ Check icon

INTERESTINGDULL

Check icon/ Check icon

SIMPLEDIFFICULT

Thank you! Here' re your choices:

Rate This Article: Excellent

Rating: 4.7 / 5 (based on 64 ratings)

Screen Recorder logo

Screen Recorder

Powerful screen recording software to capture your screen with webcam and audio.

FoneDog uses cookies to ensure you get the best experience on our website. Click here to learn more.