By Adela D. Louie, Last updated: January 26, 2024
Ever wished to effortlessly record captivating videos straight from your favorite websites? Brace yourself for a game-changing revelation! This article serves as your ultimate roadmap, unlocking the secrets to seamlessly capturing online videos with finesse.
Whether it's preserving a tutorial, archiving a live stream, or saving that must-watch content for later, our guide empowers you to wield the tools and techniques needed for you to know how to record video from website. Dive in and discover the step-by-step methods, handy tips, and expert strategies tailored to make video recordings from websites a breeze.
Part #1: Best App to Record Video from Website (Windows or Mac) – FoneDog Screen RecorderPart #2: How to Record Video from Website (Apps on iOS)Part #3: How to Record Video from Website (Apps on Android)Part #4: How to Record Video from Website on Windows Or MacConclusion
Part #1: Best App to Record Video from Website (Windows or Mac) – FoneDog Screen Recorder
FoneDog Screen Recorder stands out as an exceptional application for both Windows and Mac users seeking a seamless and feature-rich solution to capture videos from websites. This versatile software offers an intuitive interface coupled with powerful functionalities, making it a standout choice among screen recording tools.
 Free Download
For Windows
Free Download
For Windows
 Free Download
For normal Macs
Free Download
For M1, M2, M3
Free Download
For normal Macs
Free Download
For M1, M2, M3
FoneDog Screen Recorder empowers users to effortlessly capture high-quality videos directly from websites, providing an array of features tailored to enhance the recording experience. With its user-friendly design and comprehensive capabilities, it stands as a top-tier option for anyone looking to record website content on their Windows or Mac systems. Here’s how you can use it to record video from website:
1. Download and install FoneDog Screen Recorder onto your PC. Following this setup, lanuch the application.
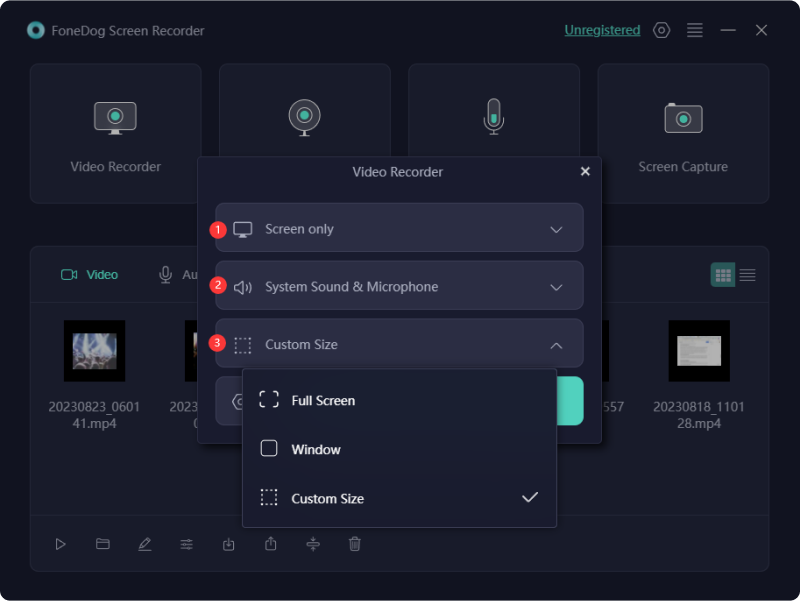
2. The program provides various recording modes. Opt between "Full Screen", "Custom", or "Record Webcam Only" modes based on your specific needs.
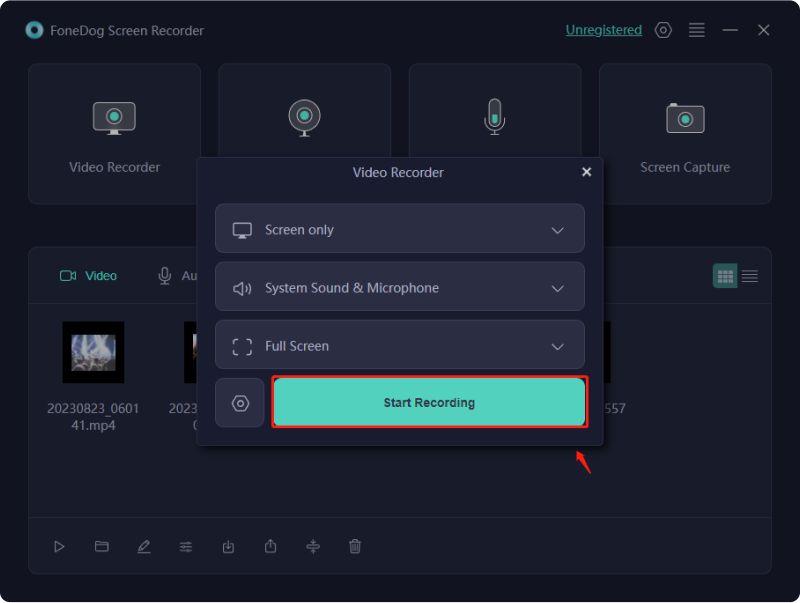
3. Subsequently, activate the screen recording by clicking the "REC" button. For added convenience, configure hotkeys as per your preference.
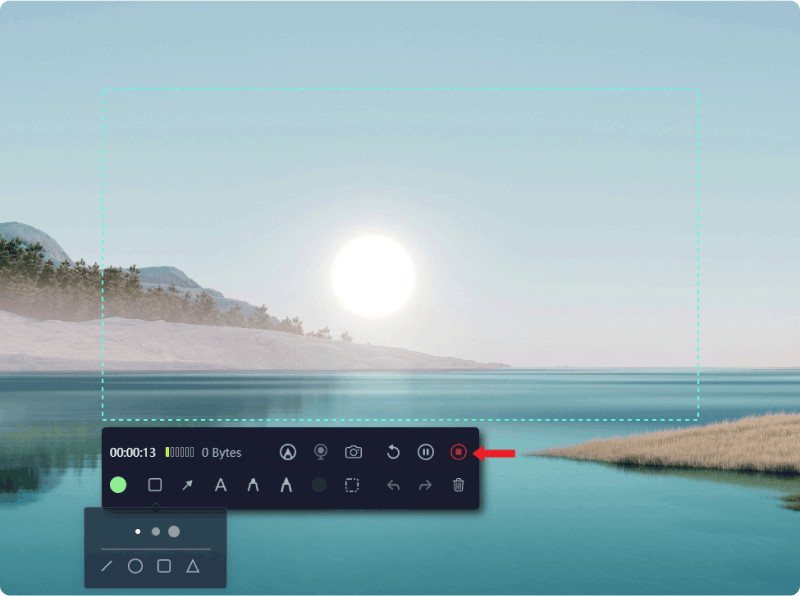
4. While recording, utilize the pause feature and resume seamlessly by engaging the respective icons as necessary. FoneDog Screen Recorder permits the addition of real-time annotations, encompassing text, arrows, and shapes to your video.
5. To wrap up the recording, click the "Stop" button once you've acquired the desired content.
6. Preview the recording for any adjustments needed, such as removing unwanted segments. Save the video to your preferred location on your device or instantly share it across various platforms.
Part #2: How to Record Video from Website (Apps on iOS)
On iOS, there are several apps that can help you record videos from websites. Here are a few popular ones you can make use of to record video from website:
ReplayKit:
ReplayKit is a framework provided by Apple for iOS devices that allows users to record their screens along with audio, making it possible to capture activities happening within apps, including web browsers, games, and more. It's an integrated feature available on iOS devices that simplifies the process of recording your screen. To use ReplayKit for recording video from a website on an iOS device, follow these steps:
- You must ensure your iOS device supports ReplayKit. Generally, devices running iOS 9 or perhaps the later versions have this feature.
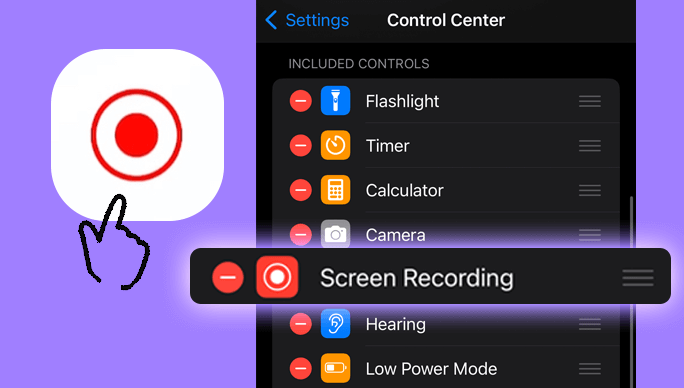
- To enable ReplayKit, head to your device's Settings > Control Center > Customize Controls. From there, you must indeed look for "Screen Recording" as well as you must simply add it to the Control Center if it's not already included.
- You may swipe down or even up (depending on your device model) right within the top right corner of the screen to open up the Control Center.
- In the Control Center, just then simply head and press the "Screen Recording" button. This will fully display a countdown, indicating the start of recording.
- Whenever the recording begins, you have to open up your preferred web browser and also navigate to the website or even the video you want to capture.
- To stop recording, you may then return to the Control Center also you have to tap the red recording icon or even simply tap the status bar at the top of the screen and select "Stop".
- The recorded video will be saved in your Photos app under "Videos" or perhaps "Recently Added", depending on your device settings.
TechSmith Capture:
TechSmith Capture allows users to capture images and record videos of their computer screen, enabling them to create tutorials, presentations, or capture online content, including videos from websites. Here are the steps to use TechSmith Capture to record a video from a website:
- To begin with this, you have to simply head over to the TechSmith website or perhaps the app store on your device (depending on the platform you're using) to download as well install TechSmith Capture.
- Open up the software or app on your device. You just then simply adjust these settings according to your preferences.
- After doing such, you have to click the portion of the screen you want to record. For recording a video from a website, you might want to set the capture area to encompass the web browser window where the video will be playing.
- Whenever your settings are adjusted and the area is selected, you may then start the recording by clicking on the record button within the TechSmith Capture interface.
- From that, you have to go over to the website containing the video you want to record as well as you have to start playing it.
- If you've then captured the necessary content, you have to stop the recording within TechSmith Capture.
- Review your recorded video within the app and save it to your device. TechSmith Capture might also offer basic editing features for trimming or adding annotations to the video.
- After saving and editing, you can share the recorded video or use it for your intended purpose.
Part #3: How to Record Video from Website (Apps on Android)
On Android devices, there are several apps that facilitate video recording from websites. Here are some popular ones you can make use of to record video from website:
AZ Screen Recorder:
AZ Screen Recorder is an Android app that allows users to capture and record their device's screen activities. To use AZ Screen Recorder for recording videos from a website, follow these steps:
- Head over to the Google Play Store on your Android device, then you have to search for "AZ Screen Recorder", and install the app. Open then the app by hitting on its icon right within your app menu.
- Right within the start of the recording, you can adjust various settings by tapping on the app's settings icon. Here, you can modify video resolution, frame rates, audio settings, etc., based on your preferences.
- To begin recording the screen, open the website containing the video you want to capture. From that, you must go back to AZ Screen Recorder and hit the record button.
- Return to the website and also you have to start playing the video content you want to record. AZ Screen Recorder will certainly capture everything displayed on your screen.
- Upon into you've recorded the video, you may then stop the recording by pulling down the notification shade as well as tapping upon that stop button within AZ Screen Recorder.
- The recorded video will be saved in your device's gallery or even into the folder specified by the AZ Screen Recorder.
Mobizen:
Mobizen is a popular screen recording and mirroring app primarily used on Android devices. Here are the steps to use Mobizen for recording videos from a website:
- Make sure you go into the Play Store on your device, download "Mobizen Screen Recorder", and obtain the app. Now you have to open up the Mobizen app on your device.
- You might then be prompted to create an account or even simply by just logging in using your Google or other credentials. From that, you have to make sure to do all the on-screen instructions to proceed.
- Whenever you're in the Mobizen app, you have to look at the settings. You can usually access settings by tapping on the app's menu or options icon.
- Navigate to the website or content you want to record. Ensure that you're ready to start recording before proceeding.
- In Mobizen, you'll often see a floating icon or a toolbar with a record button. Tap on the record button to start the recording process. Follow any on-screen prompts that might appear to confirm permissions or settings.
- When the recording starts, you have to head towards the webpage or video you want to capture. Play the video or content you wish to record.
- When you're done capturing the video from the website, stop the recording through the Mobizen interface. Look for a stop button on the recording toolbar or within the app itself.
- After stopping the recording, you can usually find the recorded video in your phone's gallery or within the Mobizen app's interface, depending on your settings.
Part #4: How to Record Video from Website on Windows Or Mac
Xbox Game Bar (Windows 10):
The Xbox Game Bar is a feature included in Windows 10 that's primarily designed for gamers, allowing them to access various gaming-related features like screen recording, capturing screenshots, streaming, and more. Here are the steps to use this one of the best gaming recording software to record video from website:
- To start with the Xbox Game Bar, you must first head and press the Windows key + G on your keyboard. This key combination was indeed the default shortcut to open up the Game Bar.
- Whenever it's your first time opening the Game Bar or even if it asks for confirmation, just simply follow up those on-screen instructions to confirm that you are using the feature for non-gaming purposes.
- If the Game Bar was indeed open, you may then have various widgets as well as those options.
- After doing such, you must simply hit on the "Record" button or even press the "Start Recording" shortcut (Windows key + Alt + R) to start recording your screen.
- Head over to your preferred web browser and from there you may have then access to the website or video you want to capture.
- When you've finished recording the website video, simply return to the Xbox Game Bar and click on the "Stop Recording" button or make use of such a shortcut (Windows key + Alt + R) again to stop the recording.
- After which, that recorded video would then typically be saved in your "Videos" folder in a subfolder named "Captures" or perhaps the similar.

QuickTime Player (Mac):
QuickTime Player is a multimedia player and framework developed by Apple for macOS. To use QuickTime Player for recording video from a website on your Mac, follow these steps:
- You can usually find it in the "Applications" folder or use Spotlight (Cmd + Space, then type "QuickTime Player")
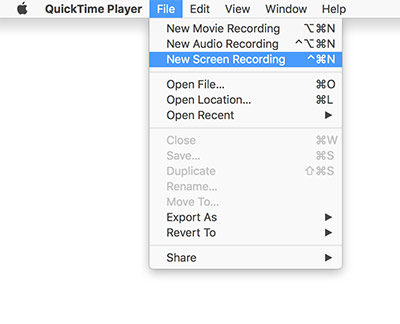
- From that you have to press "File" right within the menu bar at the top of the screen. Afterward, you have to hit on the option that implies "New Screen Recording" from the dropdown menu.
- Right before starting with the recording, you can select audio sources by clicking the arrow next to the record button. You can also choose to show mouse clicks or not by clicking the Options menu.
- After doing so, you have to press the red record button to really begin recording. A message might then appear asking you to select the area of the screen you desire to record. Thereafter you have to choose and drag to select the specific portion of the screen containing the website content you want to capture.
- Once-over you've selected the area, you must click to start recording the website video.
- To halt upon the recording, either click on the stop button in the menu bar at the top of the screen or perhaps use the shortcut which is “Command + Control + Esc”.
- After stopping the recording, QuickTime Player will open the recorded video in a new window.
- Click on "File" in the menu bar and select "Save" to save the recorded video to your desired location on your Mac.
People Also Read4 Ways to Record Screen Windows 10 with AudioComprehensive Guide: How to Stop QuickTime Screen Recording
Conclusion
In essence, mastering the skills to record video from website unlocks a world of possibilities. With intuitive tools like FoneDog Screen Recorder, capturing online content becomes effortless. Embrace the power to preserve tutorials, live streams, and more. Elevate your browsing experience and harness the full potential of digital content with ease. Happy Reading!


 /
/
