FoneDog Screen Recorder FoneDog Screen Recorder
Special Offer Special Offer
Only Only
$4.49 $4.49
to get a ONE-month license to get a ONE-month license
Sale ends in xx days Sale ends in xx days
Buy Now
sale

4 Easy Ways: How to Record Audio from Computer (Mac)

By Adela D. Louie, Last updated: January 25, 2024

Are you prepared to transform your Mac into a masterpiece of sound? This effortless guide is your go-to onstage ticket to maximizing your Mac's audio recording capabilities. We've got you covered if you're a prospective musician, podcaster, or deliberately simply want to record crystal-clear audio.

In this post, we'll lead you by carrying out gradual lessons, offer a guide that you will know how to record audio from computer Mac, and expose you to numerous Mac voice recording tools that could assist you improve your recording skills. Prepare to convert your Mac becoming a recording studio, whereby each keystroke and click brings you a single step further toward audio perfection!

Part #1: How to Record Audio from Computer Mac Using QuickTime Player (External & Internal)Part #2: How to Record Audio from Computer Mac Using Voice Memo (Externally)Part #3: Must-Have Alternative for Recording Audio from Computer Mac – FoneDog Screen RecorderPart #4: Advanced Tip to Fully Improved Recording Audio within Mac SystemConclusion

Part #1: How to Record Audio from Computer Mac Using QuickTime Player (External & Internal)

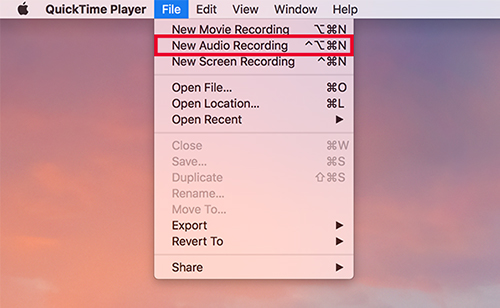
Mac's native multimedia utility, QuickTime Player, boasts convenient functionalities such as screen and audio recording. However, its default setting limits audio recording to external sources like your microphone.

Should you desire to harness QuickTime for simultaneous internal audio and external microphone recording, the solution lies in installing the Soundflower plug-in which is an aspect we will delve into in the subsequent section. Discover the intricacies of using QuickTime to record audio from computer Mac.

External:

To record your voice on Mac using QuickTime Player, adhere to the following steps guide:

  1. You must first open up Finder, after that you may then head over to Applications, as well as indeed locate on QuickTime Player. After doing such, you have to access "File”, then you may now press on “New Audio Recording" from the menu bar.
  2. Customize your recording settings by selecting the preferred microphone device and choosing the desired audio quality for output. Note that the output format varies based on the chosen audio quality, such as .m4a for high quality as well as .aifc for maximum quality.
  3. Initiate recording by clicking the red button encircled in a circle from there you may use the same button to cease recording. Be mindful that the volume bar at the interface's bottom is not for adjusting your microphone's sound volume but for controlling the echo volume. To eliminate echoes, you must then keep this function turned off.
  4. After that, you may now save your audio recording by simply selecting "File", after which press on the option that implies "Save" along with simply specifying the file name alongside the location.
  5. For lengthier recordings or to remove specific segments, you may then employ the "Edit”, then press on option “Trim" option to trim the audio as needed.

Record Audio from Computer Mac Using QuickTime Player

Internal:

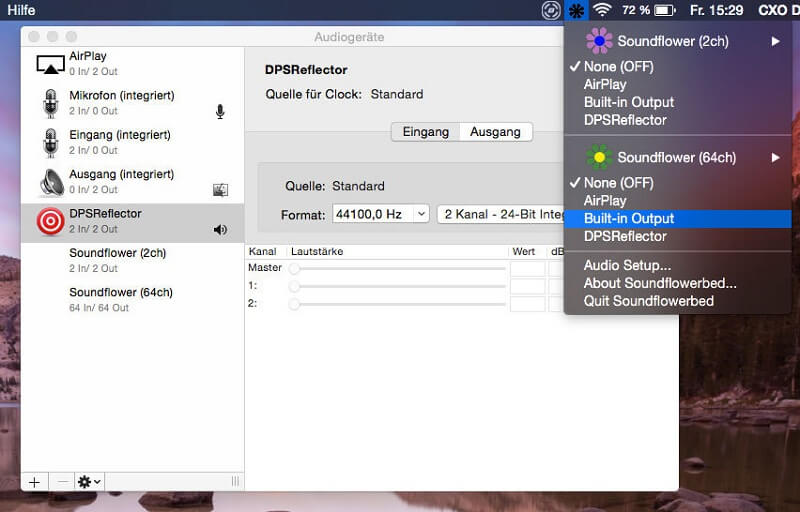
Having grasped the technique for capturing microphone audio using QuickTime Player, let's delve into the process of recording system audio on your Mac. Introduce yourself to the functionality of Soundflower, a complimentary Mac plug-in designed to channel system sound seamlessly to the recording interface.

This enables the recording of internal audio on your Mac through QuickTime. While the configuration settings may appear intricate, following the instructions meticulously ensures a straightforward setup.

  1. Acquire Soundflower from the web – it is advisable to obtain it directly from the official site. Unpack the file and initiate the installer to obtain the plug-in. If you encounter difficulty accessing the package due to a security warning, navigate to the Apple menu then press on the option “System Preferences” Then you must click upon “Security & Privacy” to grant access.
  2. Proceed to install Soundflower on your Mac. Upon completion, locate both Soundflower (2ch) and Soundflower (64ch) in your audio devices, facilitating the recording of internal audio on your Mac.
  3. Navigate to the audio device configuration. Discover Audio MIDI Setup at Finder, then over the “Applications” and after which into the “Utilities”. Your task is to establish an Aggregate Device and Multi-Output Device incorporating Soundflower. Select the "+" symbol at the lower-left corner to append the devices.
  4. Formulate and configure the Multi-Output Device by selecting Built-in Output and Soundflower (2ch) as the devices. Optionally, rename it for convenience, perhaps as "Screen Recorder w/ Audio".
  5. For the Aggregate Device, construct and designate a Built-in Microphone and Soundflower (2ch) as the devices. Optionally, rename it, such as "QuickTime Player input" for easier identification.
  6. Navigate towards onto Apple menu from there you have to press on option “System Preferences” and thereafter click on “Sound” for the final configuration before recording. Modify the sound output device to the Multi-Output Device created earlier, leaving other settings unchanged.
  7. Record both internal and external audio simultaneously. Initiate QuickTime Player, opt for New Audio Recording, access the drop-down menu next to the red button, and choose Aggregate Device in the microphone device section. This method is also effective for Mac screen recording with audio.
  8. To exclusively record internal audio, designate Soundflower (2ch) as the microphone device (note: may not be compatible with certain Mac models).
  9. Initiate recording as usual and review the audio recordings. After configuring the Multi-Output Device as the default audio output, note that the computer's audio remains unchanged. Therefore, remember to revert to your Built-in Output as the audio output device post-recording.

Record Audio from Computer Mac Using Soundflower

Part #2: How to Record Audio from Computer Mac Using Voice Memo (Externally)

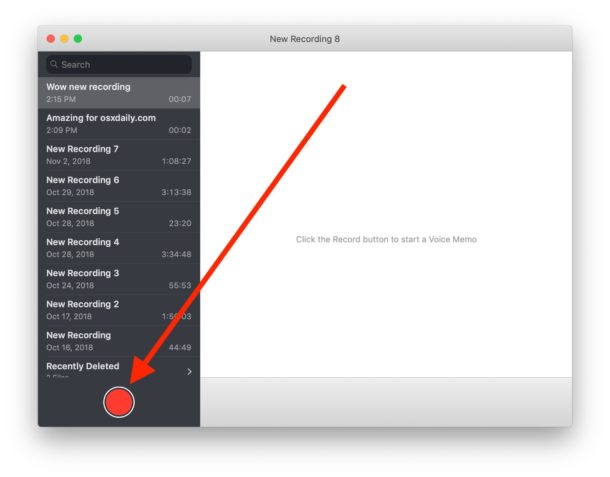
Voice Memo serves as the default voice recording application in macOS 14 or any subsequent versions. Its functionality extends beyond mere voice capture, allowing seamless synchronization across all your Apple devices. For individuals utilizing macOS 13 or an earlier iteration, exploring alternative avenues for voice memos becomes imperative. Options include leveraging your iPhone and utilizing QuickTime to record audio from computer Mac.

Initiating audio recordings with Voice Memo involves a straightforward process:

  1. Launch the Voice Memo application on your Mac and initiate recording by clicking the prominent red circle.
  2. Utilize the pause button for temporary halts and the "Resume" function to seamlessly continue recording.
  3. Upon completion, click "Done" to preserve the file. The Voice Memo app facilitates easy access for reviewing, editing, and sharing your audio recordings.

Record Audio from Computer Mac Using Voice Memo

Part #3: Must-Have Alternative for Recording Audio from Computer Mac – FoneDog Screen Recorder

FoneDog Screen Recorder appears as a must-have option for recording sounds through your PC. This is a flexible program that extends beyond typical screen recording, effortlessly adding outstanding audio records. Accessible with both Windows and Mac computers, this program delivers an intuitive user experience and a range of functions for audio recording.

windows Free Download For Windows mac Free Download For normal Macs mac Free Download For M1, M2, M3

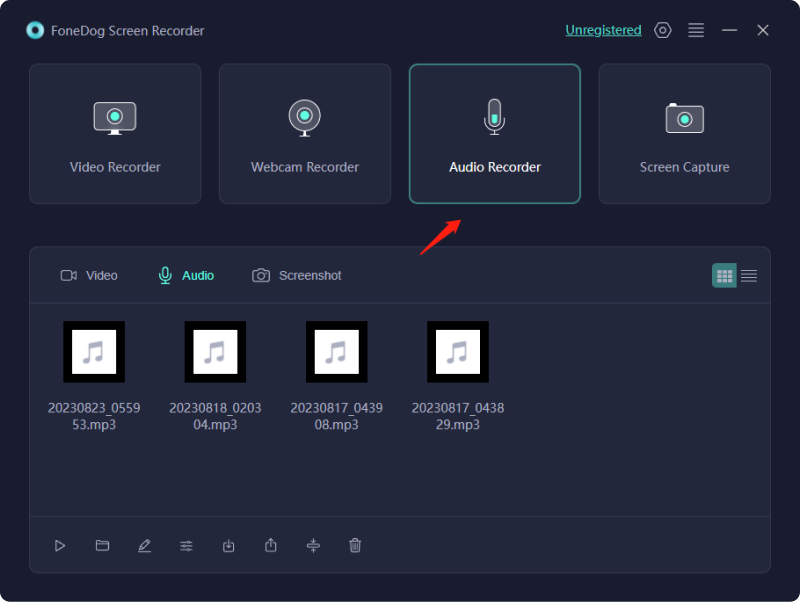
Users may simply record system noises, microphone data, or even a mix of the two, providing greater versatility in collecting diverse audio sources. FoneDog Screen Recorder constitutes a dependable and effective solution to record audio from computer Mac while also retaining the surrounding audio with precision and convenience.

1. Start by simply downloading and setting up FoneDog Screen Recorder on the device you're using. After the installation has been finished, launch the program.

2. The program offers a variety of recording options. You may then select within the wide array of options of "Full Screen", the option "Custom", or respectively "Record Webcam Only" in accordance with your screen recorder choices. Additionally, the application offers a variety of audio recording options. After that, you have to select the "Audio Recorder" tool to focus only on an audio recorder.

Record Audio from Computer Mac – FoneDog Screen Recorder: Choose Mode

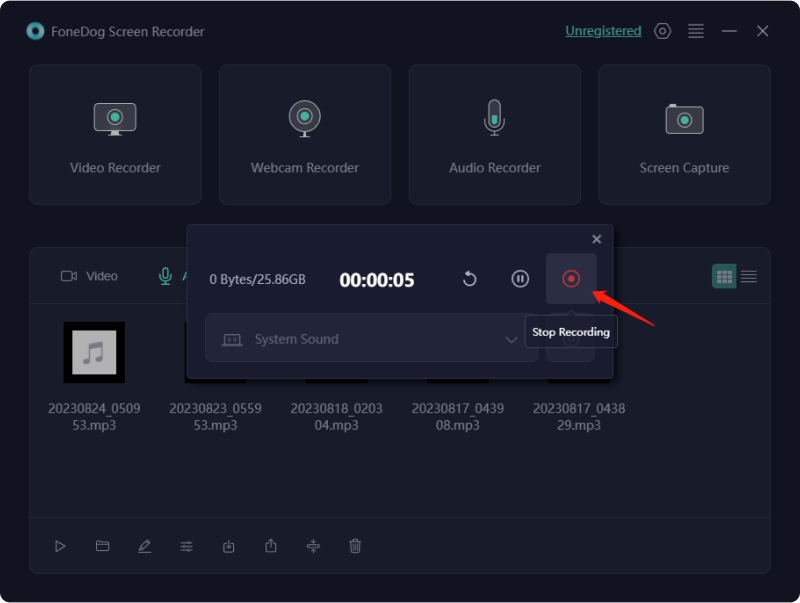
3. From there, you must hit the "REC" button to start the screen as well as indeed audio recording technique. Keyboard shortcuts may additionally be customized for increased convenience.

Record Audio from Computer Mac – FoneDog Screen Recorder: Start

4. As soon as within the recording, you have to activate the icons that appear to pause or resume as needed.

5. After capturing the relevant content, you must then tap the "Stop" button to end the recording. FoneDog Screen Recorder allows you to edit along with trimming your audio recordings to remove unneeded bits.

Record Audio from Computer Mac – FoneDog Screen Recorder: Stop

Part #4: Advanced Tip to Fully Improved Recording Audio within Mac System

  • Top-notch Microphone: A microphone of exceptional quality is crucial, especially for podcasting, music production, or lectures. Complete noise elimination and the addition of missing sounds are beyond the capabilities of audio editing software.
  • Configure the microphone correctly: When record audio from computer Mac, position the microphone directly in front of you. For Mac-based sound recording, it's advisable to place the microphone next to the computer. In the case of interviews or multiple speakers, consider situating it at the group's center.
  • Select a tranquil recording environment: Regardless of the microphone's quality, achieving pristine sound is challenging in a noisy setting. Ideally, opt for a serene, compact room with thick walls. Large spaces tend to bounce sound back into the microphone, while smaller rooms absorb sound, delivering a more authentic recording.

People Also ReadHow to Use QuickTime Screen Recording with Audio in 2024?Complete Guide: Capturing with Movavi Screen Recorder

Conclusion

In conclusion, mastering how to record audio from computer Mac is now within reach. Whether utilizing the default Voice Memo app or simply even exploring alternatives like FoneDog Screen Recorder, the possibilities are endless. With this guide's insights into techniques, tools as well as the instructions provided, transforming your Mac into an audio recording powerhouse becomes a seamless endeavor. Embrace the possibilities at your fingertips and let your creativity soar. Happy recording!

Leave a Comment

Comment

Comment ()
author image

Adela D. Louie

Tech Website Writing /Content Optimization

Singing, smiling, surprising every day!

So as a technical writer, it is my duty to gather effective and reliable solutions to answer questions on how to deal with the issues they are having with their devices.

Screen Recorder logo

Screen Recorder

Powerful screen recording software to capture your screen with webcam and audio.

How Do You Like This Article?

Check icon/ Check icon

INTERESTINGDULL

Check icon/ Check icon

SIMPLEDIFFICULT

Thank you! Here' re your choices:

Rate This Article: Excellent

Rating: 4.7 / 5 (based on 101 ratings)

Screen Recorder logo

Screen Recorder

Powerful screen recording software to capture your screen with webcam and audio.

FoneDog uses cookies to ensure you get the best experience on our website. Click here to learn more.