By Adela D. Louie, Last updated: December 4, 2023
Capturing moments on your screen has never been easier, but what about stopping the show when you're done? In this quick and snappy guide, we're about to unveil the secrets to halting your QuickTime screen recordings like a pro. Whether you're recording for work, capturing your gaming triumphs, or creating tutorial videos, knowing how to stop QuickTime screen recording is the key to making your content shine.
Get ready to master the art of the stop button and take control of your digital storytelling. By the end of this article, you'll be equipped with the knowledge to end your recordings smoothly and effortlessly. Let's dive in!
Part #1: Overview: What’s QuickTime Screen Recording?Part #2: How to Stop QuickTime Screen RecordingPart #3: Best Way to Screen Recording – FoneDog Screen RecorderConclusion
Part #1: Overview: What’s QuickTime Screen Recording?
Before we jump into how to stop QuickTime screen recording, we need to know what it is. QuickTime Screen Recording is a feature provided by Apple's QuickTime Player software, primarily available on macOS. It allows users to capture the contents of their computer screen, including video and audio, creating a digital recording of on-screen activities. Here are some important aspects of QuickTime Screen Recording:
Importance of QuickTime Screen Recording:
- Educational Use: QuickTime Screen Recording is valuable for educators and trainers to create tutorial videos, online courses, and instructional content. It helps in explaining complex concepts with visual aids.
- Professional Demonstrations: Professionals use it to record software demos, presentations, and product walkthroughs, which can be shared with colleagues or clients.
- Gaming: Gamers often use it to capture their gameplay to create Let's Play videos, reviews, and tutorials for fellow gamers.
- Bug Reporting: QuickTime Screen recording can be instrumental in recording and documenting software bugs or issues for troubleshooting and reporting to developers.
- Content Creation: It's a crucial tool for content creators who produce video content for platforms like YouTube and social media. It enables the creation of video reviews, vlogs, and more.
Part #2: How to Stop QuickTime Screen Recording
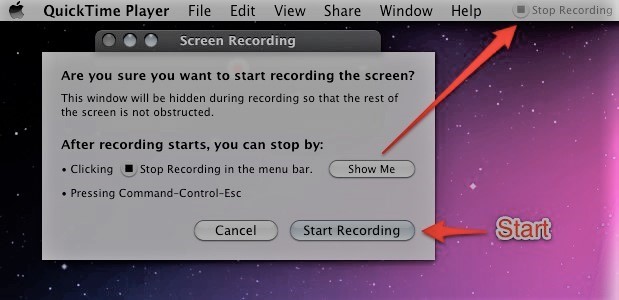
Stopping a QuickTime screen recording is a simple process. Here are the steps on how to stop QuickTime screen recording:
- While the recording is taking place, you should move the mouse pointer to the very top of the screen so which then you can access the recording control panel.
- Keep an eye out for the menu bar for the QuickTime Player, which will then emerge.
- You should notice an icon for QuickTime Player in the top menu bar simply selecting it will bring up the control panel for the program.
- You'll discover a button for recording in the control panel that's colored red. Simply clicking on it will bring up a menu with further options.
- To stop recording, you must then select an option that clearly implies “Stop Recording" from the menu that drops down. Your recording will be processed but also saved by QuickTime after that.
- If you'd rather use shortcuts on the keyboard, you may end the recording by pressing on the keys which then implies "Control + Command + Esc" all at once. The recording will be stopped as well as saved automatically by QuickTime when you use this key combination.
Tips for A Smooth Ending:
- Saving and exporting the recording:
- When the recording is finished, QuickTime will normally open the video file that was saved for you automatically.
- If it doesn't open by itself, you may find your recording in the folder that you chose before you started the recording, and this is the case even if it doesn't open automatically. To open and see the file, you need only to double-click on it.
- To share your recording, utilize the export option of QuickTime to choose the recording format and quality that you really want to use, and then save the video to the place of your choosing.
- Confirming the completion:
- Before you close QuickTime Player, it is recommended that you check to make sure that your recording has been successfully terminated and stored in the right format.
- Play back some of the footage you made to check if it captured all of the stuff you intended to see.
Troubleshooting Common Issues:
If you encounter any issues while stopping QuickTime Screen Recording, here are some common troubleshooting tips:
- Recording Not Stopping: If you are unable to stop the recording by using the stop button or the keyboard shortcut, you might try clicking the QuickTime Player icon in the Dock. If you are successful, you will see an option to "Stop Recording" there.
- No Audio: In the event that you are having problems with the audio, check that the options for QuickTime are set to use the appropriate microphone and system audio sources.
- Large File Sizes: If your recording ends up producing files with a huge size, you may want to consider lowering the recording quality and resolution settings in the preferences menu of QuickTime in order to decrease the file size.
- Crashes or Errors: If QuickTime crashes or displays error messages during or after recording, ensure you have the latest version of QuickTime Player installed and check for updates. Restarting your computer may also help.
You will be able to terminate QuickTime Screen Recording with confidence and successfully handle your recorded material if you follow these step-by-step instructions, and ideas for a seamless finish, and help for problems.
Part #3: Best Way to Screen Recording – FoneDog Screen Recorder
We finished talking about how to stop QuickTime screen recording, now we have a bonus. FoneDog Screen Recorder is indeed a well-versatile screen recording software designed to capture on-screen activities on both Windows and Mac operating systems. It offers a range of features that make it a valuable tool for various purposes, from creating video tutorials and gaming content to capturing important work-related tasks.
 Free Download
For Windows
Free Download
For Windows
 Free Download
For normal Macs
Free Download
For M1, M2, M3
Free Download
For normal Macs
Free Download
For M1, M2, M3
Here are some key features of this limited-free video recording software:
- Screen Recording: FoneDog Screen Recorder allows users to capture the entire screen, specific application windows, or custom-selected regions, giving them full control over what is recorded.
- Audio Recording: Users can record system audio, microphone input, or both, providing flexibility for narrating and adding commentary to their recordings.
- High-Quality Output: It supports high-definition recording, ensuring that the captured video is crisp and clear.
- Scheduled Recording: Users can set a timer for the automated start and stop of recordings, allowing for unattended captures.
- Export Options: Recordings can be exported in various formats, making them compatible with different devices and platforms.
- No Watermark: It ensures that there is no watermark on the recorded videos, maintaining a professional and clean appearance.
- User-Friendly Interface: The intuitive user interface makes it easy for both beginners and experienced users to navigate and utilize the software effectively.
Step-by-Step on How to Use FoneDog Screen Recorder:
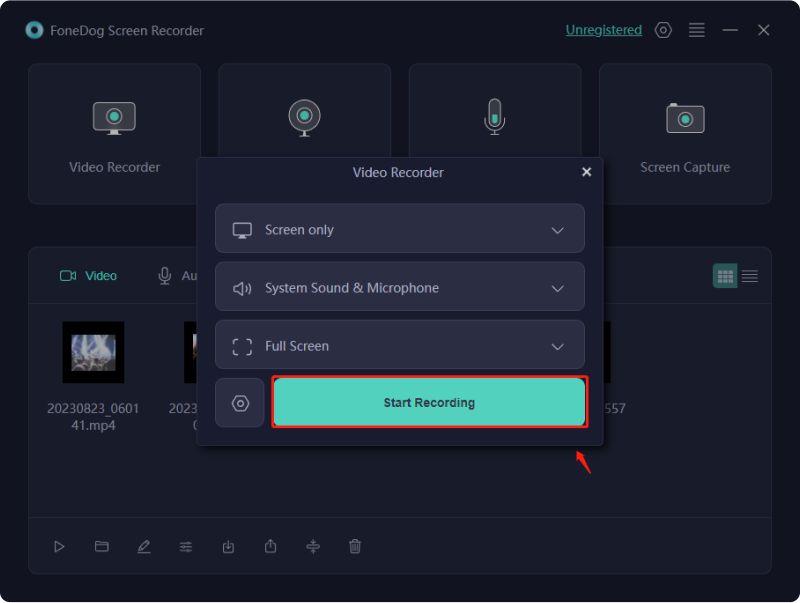
- Get FoneDog Screen Recorder and run it on your machine. Once the app is open, go to the main screen and click on "Video Recorder".
- Choose the "Screen only" option to record the whole screen, or choose the "Screen & Camera" option to record both the screen and the camera at the same time. Note: If you choose "Screen & Camera", the program will find your webcam on its own. You can click "Recheck" to try the recognition again if it wasn't found the first time.
- Pick the exact area you want to record: Full Screen, a certain window, or a Custom Size.
- Customize your sound by picking whether to record sound or not. To record both the system sound and the microphone, select "System Sound & Microphone". Choose "Microphone" or "System Sound" instead if you only want to record from one sound source. Whenever you wish to record nothing, pick "None".
- To start recording your screen, click the button that says "Start Recording". Note: If you choose a certain window as the recording area, a window with different program screens will show up. You only need to choose which time you want to record, and the app will start recording right away.
- You can get to a live menu with marking tools and other features while you're recording. You can choose the color you want for lines, circles, squares, triangles, signs, writing, brushes, and erasers by pressing the "Edit" button. Giving you more choices, like “Undo”, “Redo” and “Clear”, makes adding notes easier. You can also add your live feed or take still pictures while the recording is going on.
- Press the red "Stop" button to end the recording. After that, the file will be saved on your machine.
- If you need to, you can press the "Pause" button to temporarily stop the recording and click it again to start it again. On the other hand, you can click "Restart" to erase the last section and start recording again.
People Also ReadUltimate Guide 101: How to Screen Record on Windows2023 Beginner's Guide: How to Record Video on Mac
Conclusion
In conclusion, learning how to stop QuickTime screen recording is essential for efficiently managing your recorded content. By following the simple steps and tips outlined in this guide, you can ensure a smooth and effective ending to your screen captures.
However, if you're looking for a versatile screen recording solution with additional features, we encourage you to explore FoneDog Screen Recorder. It offers a user-friendly interface, a range of recording options, and powerful editing tools. Apply this knowledge and discover the capabilities of FoneDog Screen Recorder to enhance your screen recording experience.


 /
/
