By Adela D. Louie, Last updated: November 21, 2023
Screen recording is a valuable skill, empowering you to capture on-screen activities for various purposes. Whether you aim to create tutorials, demonstrate software functionality, capture gameplay, or simply share your desktop actions, understanding how to efficiently record your screen is essential.
In this article, we'll walk you through the ultimate instructions and essential information on how to screen record on Windows seamlessly and effectively. We've indeed got you covered. Let's dive into the world of Windows screen recording!
Part #1: Overview: Screen Recording on WindowsPart #2: How to Screen Record on WindowsPart #3: Best Way to Screen Record on Windows - FoneDog Screen RecorderConclusion
Part #1: Overview: Screen Recording on Windows
Before proceeding to how to screen record on Windows, let’s learn what it is. Screen recording on Windows is a feature or capability that allows users to capture and record everything that is happening on their computer screen. This includes not only the desktop and open applications but also any movements of the mouse cursor and any audio being played or recorded on the computer.
Screen recording can be a valuable tool for a variety of purposes and has several important impacts on users:
- Content Creation: Screen recording is commonly used for creating tutorial videos, software demonstrations, gaming content, and presentations. It enables users to capture their on-screen activities and create informative or entertaining videos to share online or with a specific audience.
- Training and Education: For educators and trainers, screen recording is an essential tool. They can record lessons, lectures, or software demonstrations to share with students or trainees, making it a useful resource for remote learning and e-learning environments.
- Troubleshooting and Support: When encountering technical issues or errors on their computer, users can record their screen to demonstrate the problem to technical support or to seek assistance from online forums. This visual representation often makes it easier to diagnose and fix issues.
- Content Preservation: Screen recording can be used to preserve online content that may be temporary or subject to removal, such as live streams, webinars, or social media stories. Users can record these events for future reference.
- Meeting and Webinar Recordings: Screen recording is a valuable feature for business professionals who want to record online meetings, webinars, and presentations for reference or for participants who couldn't attend in real time.
- Compliance and Documentation: In certain industries and professions, screen recording is used to comply with regulatory requirements. For example, financial institutions may use screen recording to document and monitor financial transactions.
- Product Testing and Development: Developers and quality assurance professionals use screen recording to capture and document software issues and glitches during testing phases. It helps in the development and improvement of software products.
- Security and Surveillance: Some users employ screen recording for security and monitoring purposes. It can be used to track computer activities, especially in cases where unauthorized access is suspected.
Part #2: How to Screen Record on Windows
Screen recording on Windows can be accomplished using various methods, each with its own advantages and use cases. Here are some common methods to screen record on Windows, along with explanations of how to use each method:
Windows Built-in Screen Recording (Xbox Game Bar, Windows 10 and later):
Screen recording capabilities are built into Windows 10 and later editions, thanks to the inclusion of the Xbox Game Bar. Gamers are the primary target audience for this strategy; nonetheless, it is adaptable for usage in a variety of applications.
How to screen record on Windows using the built-in recorder:
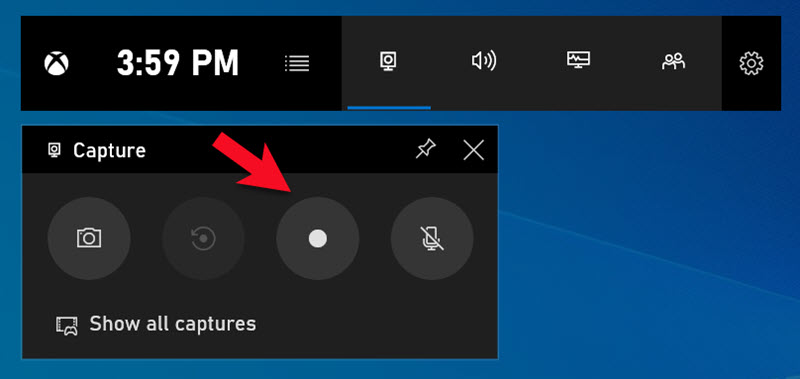
- While you are in the application or on the screen you wish to record, access the Xbox Game Bar by pressing the Win key and the G button simultaneously.
- To begin recording, either click the "Record" button or press the Windows key plus Alt on your keyboard simultaneously.
- To halt the recording process, use the same keyboard shortcut as before, which is "Win + Alt + R".
- The interface of the Xbox Game Bar allows you to access and manage your previously recorded footage.

Pros:
- Included by default in Windows.
- It is easy to use.
- The microphone and audio input are both recorded.
Cons:
- Limited functionality as compared to other applications available on the market.
- It's possible that previous versions of Windows won't support this feature.
Windows 10 Game DVR (for Gaming):
The Game DVR in Windows 10 was created primarily for the purpose of recording gaming, but it is also compatible with a variety of other programs.
How to do it:
- While the application that you wish to record is active, open the Game Bar by pressing the Win key and the G key simultaneously.
- Either use the button labeled "Record" or the keyboard shortcut "Win + Alt + R" to begin recording.
- You may put an end to the recording using the same shortcut.
Pros:
- Included with Windows 10 by default.
- Designed with gameplay capture in mind.
Cons:
- You'll only be able to capture Windows Store apps and game saves.
- It's possible that it won't function with older games.
Web-Based Screen Recorders (e.g., Screencast-O-Matic, Apowersoft Online Screen Recorder):
These screen recorders are available online and do not require any downloads or installs. A web browser gives you the option to capture what's on your screen.
How to screen record on Windows using a web-based recorder:
- Navigate to the website of the screen recorder that you intend to use when working online.
- Select the region you want to record in and adjust the audio settings by following the directions that appear on the screen.
- Utilize the web interface to begin and stop the recording process.
- Save the video you just recorded to your personal computer.
Pros:
- There is no requirement to install any program.
- Compatible with any Windows-based personal computer that has an active internet connection.
Cons:
- There is a possibility that recording time and quality will be restricted.
- A connection to the internet is required.
Select the screen recording method that aligns with your needs and skill level. Built-in options like the Xbox Game Bar are convenient for basic recording, while third-party software provides advanced features and customization. Web-based recorders are suitable for users who want a quick and simple recording solution without installing software.
Part #3: Best Way to Screen Record on Windows - FoneDog Screen Recorder
FoneDog Screen Recorder is a third-party screen recording software designed for Windows and Mac systems. It provides a simple and user-friendly way to capture and record activities on your computer screen.
 Free Download
For Windows
 Free Download
For normal Macs
 Free Download
For M1, M2, M3
Here's an introduction to how to screen record on Windows using this free-to-use screen recorder:
Key Features of FoneDog Screen Recorder:
- Screen Recording: FoneDog Screen Recorder allows you to record your computer screen, including the entire desktop or specific application windows.
- Audio Recording: You can capture system sound and microphone audio simultaneously, making it suitable for various recording scenarios, such as tutorials and gaming.
- Customizable Recording Area: You can select a specific region of the screen to record, allowing for precise and efficient recording.
- Scheduled Recording: FoneDog Screen Recorder offers a scheduling feature, enabling you to set start and stop times for your recordings. This is useful for automated recording of live streams, webinars, and meetings.
- Annotation and Editing Tools: The software provides tools to add annotations, text, and shapes to your recordings. You can also edit and trim recorded videos.
- Exporting Options: You can save your recordings in various video formats, making it easy to share or edit the captured content.
How to make use of it:
- Visit the FoneDog Screen Recorder website and download the software for your Windows or Mac computer. Follow the installation instructions to install the program.
- After installation, launch FoneDog Screen Recorder.
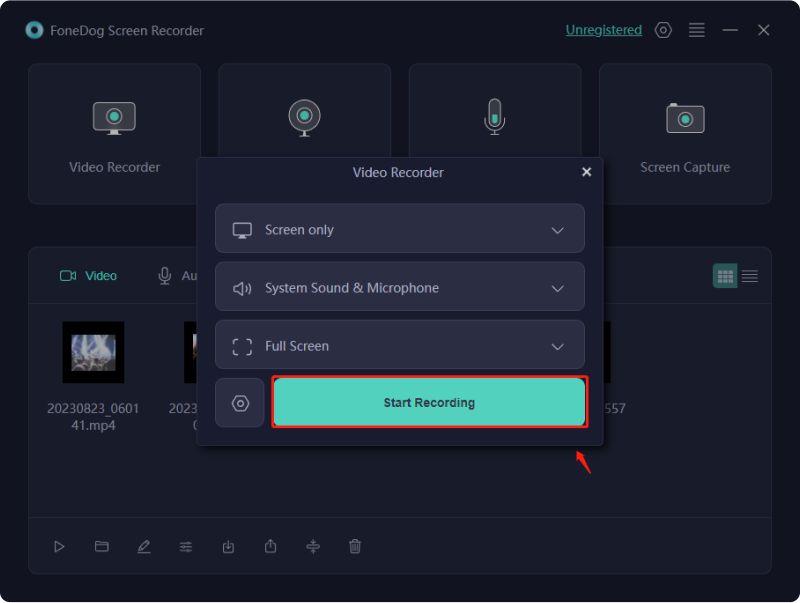
- Set your preferences for recording, including the recording area, audio sources (system sound and microphone), and video format.
- Click the "Start Recording" button to begin recording your screen. You can pause or stop the recording at any time by clicking the corresponding buttons.
- After recording, you can use the built-in editing tools to add annotations, text, and shapes to your video. You can also trim and cut unwanted parts of the recording.
- Once you are satisfied with the recording and any edits, save the video to your computer in the desired format. You can also share the recording directly to platforms like YouTube, Vimeo, or Google Drive if supported.
- To set up scheduled recordings, use the scheduling feature in FoneDog Screen Recorder. Define the start and stop times for your recording sessions, and the software will automatically record during those periods.

FoneDog Screen Recorder is a versatile tool for capturing screen activities, making it useful for a wide range of purposes, such as creating tutorials, recording webinars, documenting software issues, and more. Its user-friendly interface and feature set make it a convenient choice for both novice and experienced users.
People Also Read2023 Beginner's Guide: How to Record Video on MacFull Guide 2023: How to Record Screen on Windows 11
Conclusion
Knowing how to screen record on Windows is an invaluable skill with countless applications. It empowers you to create tutorials, document issues, or capture memorable moments. For a user-friendly, feature-rich experience, we encourage you to try FoneDog Screen Recorder. Its ease of use and versatile features make it an excellent choice for all your screen recording needs. Give it a try and unlock your screen recording potential.


Free Download
For Windows
Free Download
For normal Macs
Free Download
For M1, M2, M3

/
/