By Adela D. Louie, Last updated: November 28, 2023
Are you ready to turn your Mac into a multimedia powerhouse? Imagine capturing not just what's happening on your screen, but the rich, immersive audio that accompanies it. Whether you're a content creator, or educator, or simply want to create engaging presentations, our guide is your gateway to screen recording on Mac with high-quality audio.
Unleash your storytelling potential and breathe life into your visuals. This article is your expert companion, meticulously crafted to guide you through the process of how to screen record on Mac with audio. By the end, you'll have the skills to make your screen recordings more captivating and communicative than ever before!
Part #1: Basic Overview: Importance of Screen Recording on Mac with AudioPart #2: Ways on How to Screen Record on Mac with AudioPart #3: How to Screen Record on Mac with Audio for Free – FoneDog Screen RecorderConclusion
Part #1: Basic Overview: Importance of Screen Recording on Mac with Audio
Screen recording is essential for its diverse applications, enabling effective communication, educational content creation, troubleshooting, sales presentations, and more. It visually captures dynamic processes, making complex information accessible. Its versatility is vital in the digital age, enhancing training, marketing, and tech support while providing clear, engaging, and immersive content. Now, the importance of screen record on Mac with audio is even more pronounced:
- Enhanced Explanation: The inclusion of audio in screen recording significantly improves the quality of your content. You can provide voiceovers, and narrations, or even capture the natural sounds of the process you're demonstrating, resulting in a more immersive and informative experience for your audience.
- Increased Engagement: The amalgamation of audio with visual components serves as a powerful tool for heightening viewer engagement. This effect is particularly pronounced in online learning environments, where the fusion of both visual and auditory elements facilitates a more comprehensive and interactive presentation, catering to a wide spectrum of learning styles.
- Professionalism: Screen recording with audio infusion imparts a sense of professionalism to your videos and presentations. The addition of high-quality audio introduces a refined and polished dimension to your content, rendering it more visually and aurally appealing to your intended audience, thereby leaving a lasting impression.
- Versatility: The integration of audio enhances the versatility of your screen recordings. Beyond the mere demonstration of processes, it enables you to convey your thoughts, provide context, and establish deeper connections with your audience. This newfound versatility paves the way for an array of creative possibilities, allowing you to craft more engaging and informative content.
Part #2: Ways on How to Screen Record on Mac with Audio
How to Screen Record on Mac with Audio Utilizing QuickTime Player:
There are multiple methods available for screen recording on a Mac with audio. One of the simplest approaches is to utilize QuickTime Player, a native macOS application. But that doesn't mean you can only use it on Mac, you can also use it to record screen on Windows. Here's a step-by-step guide to screen record on Mac with audio:
- Access QuickTime Player: Start by going to your computer's "Applications" folder, where you may find as well as you indeed launch the "QuickTime Player".
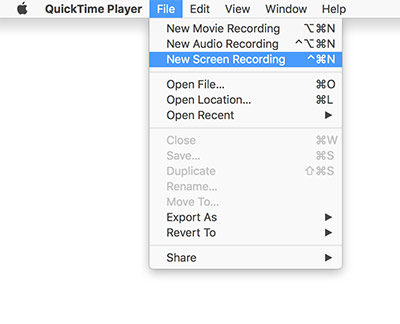
- Commence a New Screen Recording: Simply go to the "File" drop-down option in the top menu bar, and then you have to pick the option "New Screen Recording".
- Select the Audio Input: To start recording, you'll need to hit the arrow button that's next to the record button. Choose the audio input source that you desire, which is most often the microphone that is built into your device.
- Initiate the Screen Recording: To start recording, you have then select the large record button in red. After that, you may use the drag tool to draw a frame around the portion of the screen that you want to record as well and you can start the recording process by clicking.
- Cease and Store the Recording: You can end the recording by clicking the "Stop" option in the top menu bar, and then you should save the recording.
Troubleshooting Common Issues:
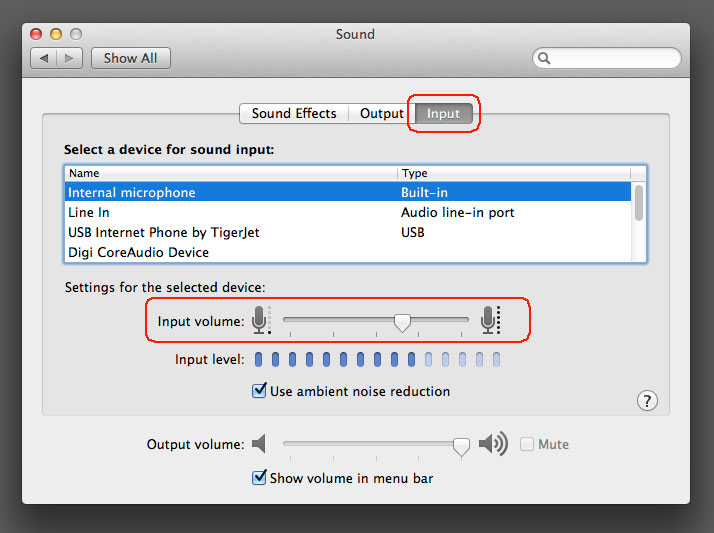
- No Audio: If you find that there is no sound in your screen recording, it's crucial to verify that you have chosen the correct audio input source. Navigate to your Mac's "System Preferences", then select "Sound" and go to the "Input" tab. Ensure that you've correctly selected the microphone you intend to use for recording.
- Poor Audio Quality: In the event that your Mac's built-in microphone is not delivering the audio quality you desire, you may want to consider upgrading to an external USB microphone. This can significantly improve the clarity and fidelity of your audio recordings.
- No Sound during Playback: After recording, you might encounter situations where there's no sound during playback. First, make sure that your computer's volume is turned up. Additionally, double-check that the video player or software you are using has its volume settings properly enabled to ensure audio output.
- Screen Recording Not Working: If your screen recording fails to start or encounters issues, it may be due to other applications conflicting with the screen recording process. Close any unnecessary apps and try recording again. Additionally, it's a good practice to check for macOS updates, as these updates often include fixes for various issues and may resolve your screen recording problems.
- Choppy or Laggy Recording: In case your computer struggles to keep up with the screen recording, leading to a choppy or laggy result, consider reducing the recording quality settings or lowering the resolution of the screen recording. This can alleviate the strain on your system's resources and lead to smoother recordings.
- System Sound Recording Issues: QuickTime Player might not capture system audio by default. To record system audio, you may need to explore third-party software solutions like Soundflower or Loopback, which can help facilitate the recording of all system audio, providing a more comprehensive recording experience.
Part #3: How to Screen Record on Mac with Audio for Free – FoneDog Screen Recorder
FoneDog Screen Recorder is a versatile software solution designed to capture your screen activity on both Windows and Mac computers. With FoneDog Screen Recorder, you can easily record your screen along with audio to create high-quality video tutorials, gaming sessions, webinars, or any other visual content.
 Free Download
For Windows
Free Download
For Windows
 Free Download
For normal Macs
Free Download
For M1, M2, M3
Free Download
For normal Macs
Free Download
For M1, M2, M3
Here are the steps to screen record on Mac with audio with this free video recorder:
How to Screen Record:
- Installation and Launch: Start by downloading and installing FoneDog Screen Recorder on your computer. After installation, you have then launch the program.
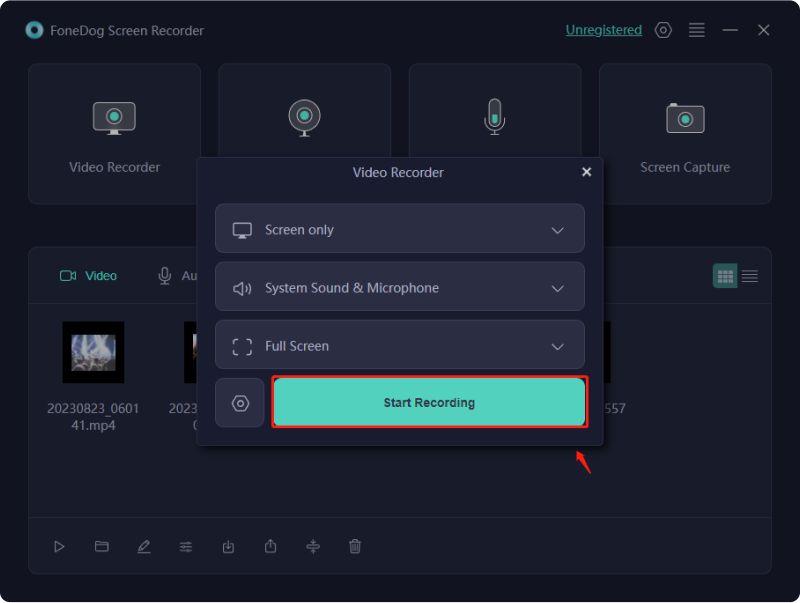
- Select Screen Recording Mode: The software offers multiple recording modes. From that, you can choose from "Full Screen", "Custom", or "Record Webcam Only" options based on your requirements.
- Begin Recording: After which you must then click the "REC" button to initiate the screen recording. You can also set hotkeys for more convenience.
- Pause and Resume: During recording, you can pause as well as you may resume as needed by clicking the corresponding icons.
- Add Annotations (Optional): FoneDog Screen Recorder allows you to add annotations, text, arrows as well and some shapes to your video in real-time.
- End the Recording: To complete the recording, you must first click the "Stop" button after you have obtained the information that you require.
- Preview and Edit: You are able to preview the recording and make modifications, such as removing portions of the recording that are not wanted. You can save the video you shot to the location of your choosing on your computer, or you can instantly share it on a variety of sites.
How to Record Audio:
- Select Audio Recording Mode: The software offers multiple recording modes. After that, you may then choose the "Audio Recorder" option to focus specifically on audio capture.
- Adjust Audio Settings: Before recording, you might then customize audio settings such as selecting the input source (microphone or system sound) as well as the audio quality.
- Begin Audio Recording: From here, you can then click the "REC" button to fully start recording audio. The software will capture the selected audio source.
- Pause and Resume: During recording, you can pause as well as resume the audio capture as needed using the corresponding buttons.
- Edit and Trim (Optional): FoneDog Screen Recorder enables you to edit as well as trim the audio recording to remove any unwanted sections.
- End the Audio Recording: When you've captured the desired audio content, after which you must click the "Stop" button to finish the recording.
- Save or Share: Save the audio recording to your preferred location on your computer or perhaps share it directly to various platforms.

People Also ReadUser-Friendly Guide 2023: How to Screen Record on Windows 10Full Guide 2023: How to Record Screen on Windows 11
Conclusion
To conclude the highlights the importance and versatility of knowing to screen record on Mac with audio, explaining its value in diverse applications. It emphasizes the effectiveness of combining visuals and audio for engaging and informative content. To explore creative possibilities, readers can utilize built-in Mac tools like QuickTime Player or opt for a user-friendly solution like FoneDog Screen Recorder.
With these tools, they can unleash their storytelling potential and produce professional, immersive content. So, whether you're an educator, YouTube content creator, or professional, don't hesitate to dive into the world of Mac screen recording with audio and make your content stand out. Wish you all the luck!


 /
/
