By Adela D. Louie, Last updated: January 3, 2024
Ever wished you could hit ‘pause’ during a lightning-fast brainstorm or relive that ‘aha’ moment from yesterday's meeting? Enter the game-changer: recording Zoom sessions. In this guide, we unravel the art of capturing these virtual moments empowering you to revisit, review, and retain critical discussions effortlessly.
Whether it's for note-taking, sharing insights, or simply cherishing those ‘aha’ sparks, this article is your go-to resource for mastering how to record Zoom meeting. Dive in to discover seamless strategies, step-by-step tutorials, and savvy tips that transform your Zoom sessions into invaluable, timeless resources!
Part #1: Best Option to Record Zoom Meetings – FoneDog Screen RecorderPart #2: Options on How to Record Zoom MeetingsPart #3: FAQsConclusion
Part #1: Best Option to Record Zoom Meetings – FoneDog Screen Recorder
FoneDog Screen Recorder stands out as an optimal solution for capturing Zoom meetings, offering seamless recording capabilities, whether with or without explicit permissions. This versatile tool empowers users to capture essential moments from Zoom sessions effortlessly, ensuring a comprehensive recording experience.
 Free DownloadFor Windows
 Free DownloadFor normal MacsFree DownloadFor M1, M2, M3
To utilize this access-free video recording software for Zoom meetings, follow these steps:
1. Download and Install: Begin by downloading and installing the FoneDog Screen Recorder on your device.
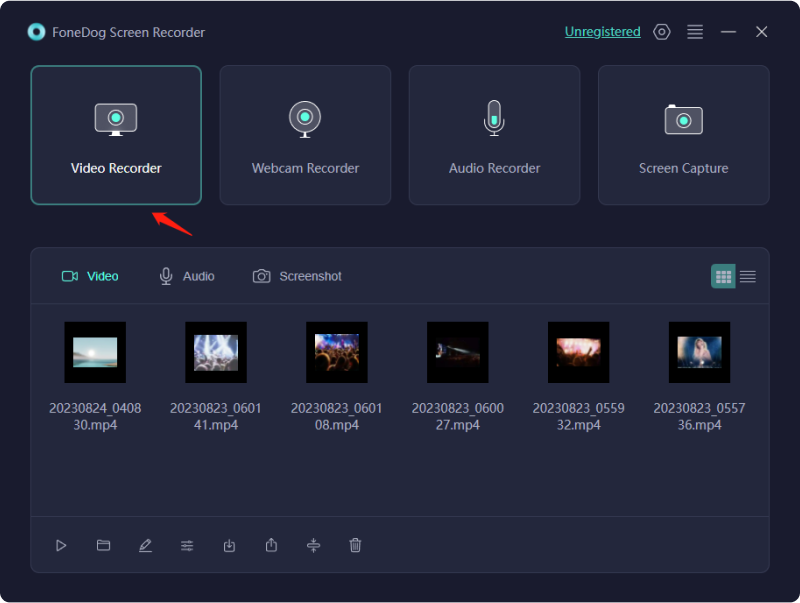
2. Launch the Application: Open the FoneDog Screen Recorder after installation. Ensure your device settings permit screen recording functionality.
3. Select Recording Mode: Choose the recording mode that suits your requirements. FoneDog Screen Recorder offers various recording options tailored to different needs.
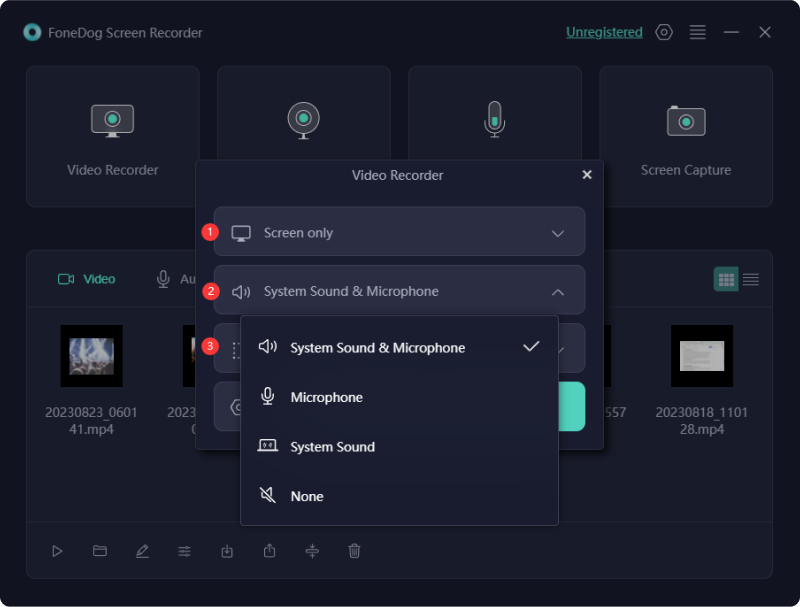
4. Adjust Settings: Configure the recording settings, including audio sources, resolution, and other preferences, ensuring optimal recording quality.
5. Initiate Zoom Meeting Recording: Launch the Zoom app and start your meeting. Activate the FoneDog Screen Recorder by tapping the appropriate controls within the app interface.
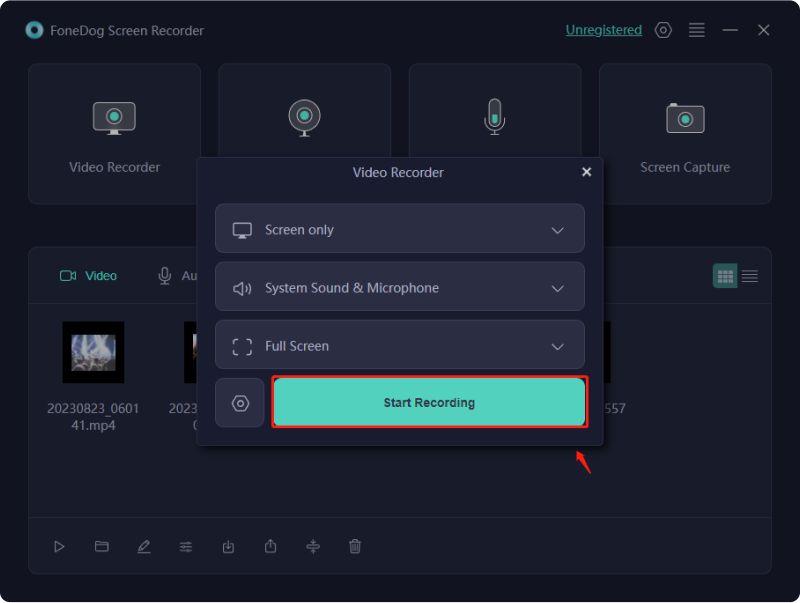
6. Record Zoom meeting: With the FoneDog Screen Recorder in operation, seamlessly record your entire Zoom meeting, capturing both audio and video.
7. End Recording and Access Files: Once the meeting concludes, stop the recording within the FoneDog Screen Recorder. Access and review you’re recorded Zoom meeting directly within the app or in the designated storage location on your device.
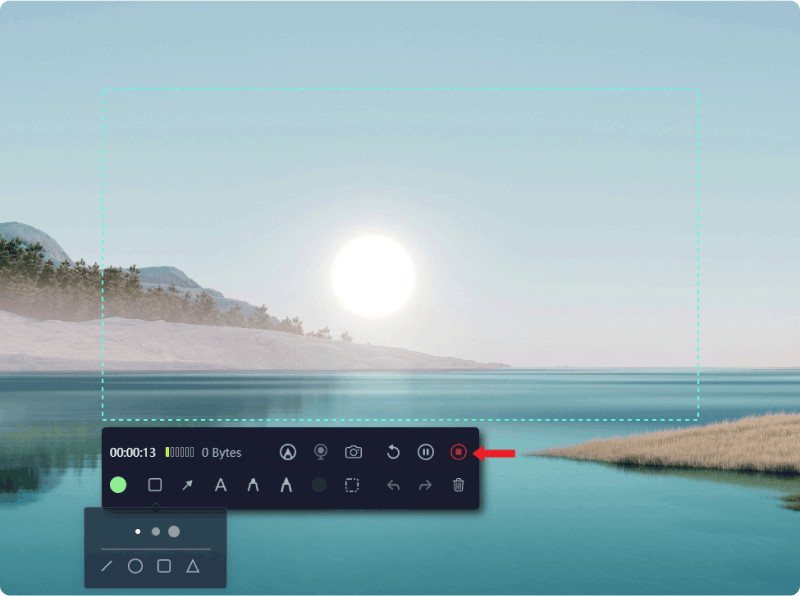
FoneDog Screen Recorder serves as a reliable ally, facilitating hassle-free Zoom meeting recordings, regardless of permissions, while maintaining superior recording quality and user-friendly functionality.
Part #2: Options on How to Record Zoom Meetings
Zoom simplifies online video recording for meetings, webinars, and events. For event hosts or granted attendees. Free users store recordings locally; paid subscribers enjoy cloud storage. Anyone, regardless of role or permissions, can record Zoom sessions using built-in screen recording on most devices. Below are the different options you may then use in order to record Zoom meetings:
Option #1: Recording Zoom Meeting from the Desktop App as the Host
The process of recording a Zoom meeting differs depending on your role be it as the host or a participant granted recording privileges. Here's a comprehensive breakdown of the steps for hosts or authorized participants:
- Launch the Zoom desktop app and sign in to your account.
- Access the Settings Gear from the Home tab, situated at the top right below your profile avatar.
- Navigate to the Recording tab and designate the preferred storage location for your recordings.
- Initiate your Zoom meeting as usual. Once ready, click the Record button on the control bar at the screen's bottom. A Recording message will appear in the upper left corner. You can manage the recording by pausing or stopping it using the corresponding icons.
- Upon completion, locate your recorded files in the designated location. Past recordings can be accessed through the Meetings tab on the homepage.
By following these steps, you've successfully recorded your Zoom session.
Option #2: Recording Zoom Meeting as A Participant
Recording a Zoom meeting as a participant varies based on your device and the permissions granted by the host. If the host authorizes your recording capabilities, you can directly record through Zoom. However, even in the absence of such permissions, alternative methods exist using external software for screen recording during Zoom sessions.
Option #3: Recording Zoom Meeting as A Participant without Recording Authorization on Laptop or PC:
While it's possible to record Zoom meeting using PowerPoint's screen recorder, a more efficient approach involves utilizing your device's native recording software to capture the entirety of your Zoom session.
How to Record Zoom meeting on Windows 10
The Xbox Game Bar, initially designed as a Windows 10 feature, primarily caters to gamers, providing an intuitive platform to effortlessly record and share gaming endeavors online. Interestingly, this versatile application extends its utility beyond gaming, offering an avenue to record Zoom events in scenarios where recording permissions are not granted. Here’s how:
- Prepare Your Screen: Close all active windows except the Zoom meeting you intend to record. This ensures a focused recording of your targeted Zoom session without any distractions.
- Accessing the Xbox Game Bar: To launch the Xbox Game Bar, you have two options. Either navigate through the Start menu or make use of the convenient shortcut “Windows key+G” to access the recording tool swiftly.
- Initiating Recording: Once you've opened the Xbox Game Bar app, kick start the recording process. You can do this by clicking the 'Start Record' button within the app or using the convenient shortcut “Windows key+Alt+R” to begin capturing your Zoom meeting.
- Starting Your Zoom Meeting: Begin your Zoom meeting as you usually would while the Xbox Game Bar discreetly operates in the background, silently capturing every aspect of your desktop activity during the session.
- Ending the Recording: At the conclusion of your Zoom meeting, terminate the recording process. Look out for a pop-up notification signaling the completion of the recording. Click on this prompt, which will direct you to the precise folder where your recorded Zoom session is saved for easy access.
(PS: Mastering some Windows screen record shortcut hotkeys would boost your efficiency.)

How to Record Zoom meeting on MacOS
MacOS computers, tailored for creative endeavors such as video production and editing, boast a seamless screen-capturing capability. Utilizing a Mac to capture your screen during a Zoom meeting requires just a few keystrokes. Follow these straightforward steps to initiate recording from your MacOS:
- Launch your Zoom meeting and ensure all necessary settings are in place for a smooth recording experience.
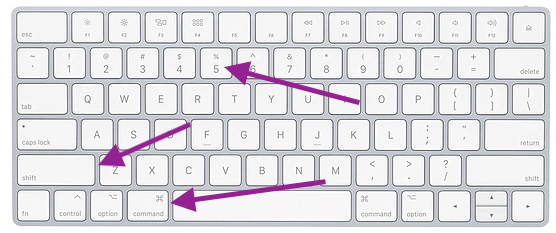
- Access the screen recording feature by simultaneously pressing and holding Command + Shift + 5 on your keyboard.
- Upon activation, a menu will appear, allowing you to specify the area you wish to record whether it's a window, a portion, or the entirety of your screen. Given that you're recording a Zoom meeting, selecting the specific window hosting the meeting is recommended.
- Once you've made your selection, the recording commences automatically. To conclude the recording, simply click on the 'Stop' button.
- Upon completion of your recording session, a thumbnail preview will materialize in the lower corner of your screen. Click on the thumbnail to access options for saving your recording and designate the desired location for storage.
Option #4: How to Record Zoom Meeting on Your Smartphone as A Participant
Using your phone as a webcam for Zoom meetings proves handy during travel or when a desktop isn't accessible. Whether you're the host or have recording permissions, initiating Zoom recording on your phone is a breeze. We'll explore both recording methods within the Zoom app and the process of recording without explicit permission.
Recording Zoom meeting (Android):
- Initiate the Zoom application and begin your meeting session within the platform.
- While actively engaged in the meeting, navigate to the options labeled "More".
- Within this menu, locate and choose the "Record" option, which prompts the appearance of a notification confirming the commencement of the recording process at the upper part of your screen.
- Utilize the functionalities provided in the “More” menu to control and oversee the ongoing recording, including the ability to pause or halt the recording as needed.
Recording Zoom meeting (iPhone):
- Begin by launching the Zoom application on your device and initializing your meeting session within the platform.
- Once you are actively engaged in your Zoom Meeting, direct your attention to the interface and locate the option labeled "More (...)". Give this option a tap to reveal further functionalities and settings available within the meeting environment.
- From the expanded menu that appears, select the specific feature titled "Record to the Cloud". Upon choosing this option, the system will trigger a message confirming the commencement of the recording process. This notification, denoted as a Recording message, will promptly surface on your screen, indicating that the session is being recorded and stored in the cloud.
- To access all recordings made through mobile devices, including this cloud-recorded session, navigate to the designated section within the Zoom Web Portal. This specific area is identified and labeled as "Recordings", providing a centralized repository for all your captured sessions originating from mobile devices.
Recording Zoom meeting on Android without Permission:
Follow these steps to record without permission on Android 11:
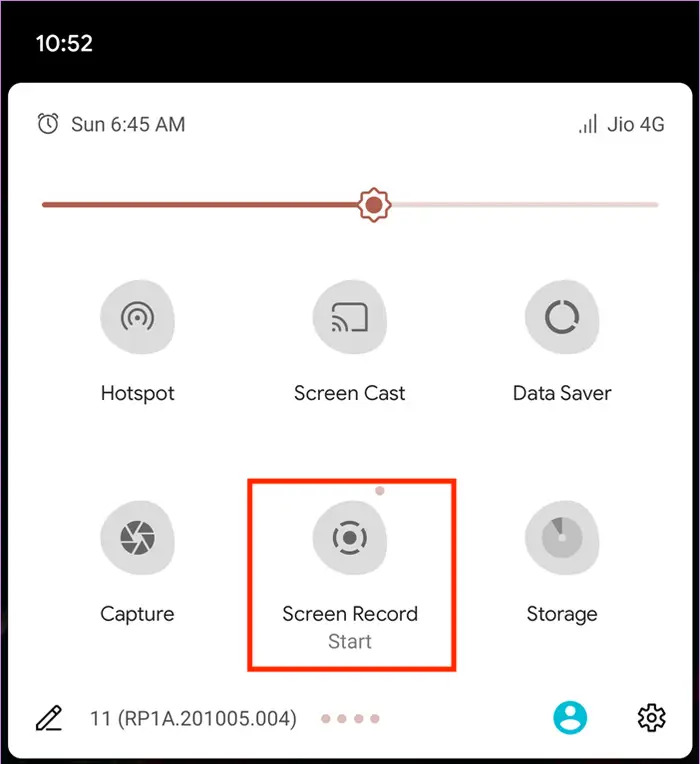
- Swipe down twice on your device to access the Quick Settings menu. Once there, locate and tap on the “Screen Recorder” option.
- Upon launching the Screen Recorder, you'll have the opportunity to configure various video and audio settings to ensure your recording meets your preferences and requirements.
- Once settings are adjusted, initiate the recording by selecting the 'Start Recording' option. A countdown timer will appear before the recording commences, ensuring you're ready to capture your screen activity.
- During the recording, a recording toolbar will be available, offering features like annotations and additional functionalities to enhance your recording experience.
- Commence your Zoom Meeting in the usual manner while the screen recording remains active in the background, capturing all the content displayed on your screen.
- When your Zoom Meeting concludes, navigate to the recording toolbar and select the 'Stop' button to end the screen recording process. Your recorded Zoom session will be saved and stored in the dedicated 'Screen Recordings' album within your device's gallery for easy access and viewing.
Recording a Zoom meeting on iPhone with Audio without Permission:
Use this guide to record from Zoom on an iPhone without permission:
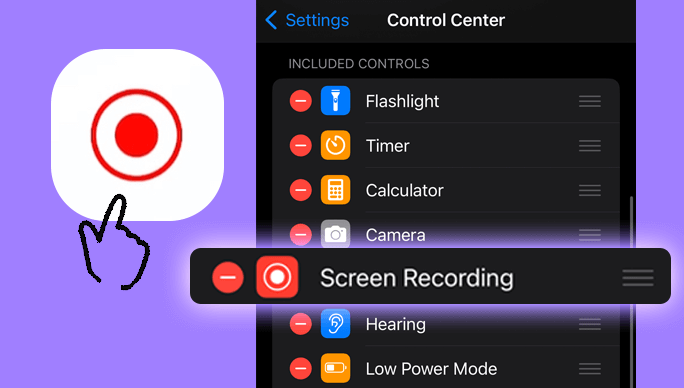
- Open your iPhone's “Settings”. Navigate to the “Control Center” settings. Add the “Screen Recording” feature to Control Center options for quick access.
- Return to your iPhone's Home screen. Open up Control Center; this can be done by simply swiping down right from the very top right corner onto the newer iPhone models or perhaps swiping up right into the bottom into older models.
- Locate and press hold the 'Record' button (usually represented by a circle with a dot inside).
- Within onto Control Center, identify the 'Microphone' icon. Tap this icon to activate audio recording alongside your screen capture.
- Before commencing the recording, select your preferred storage location. Press the “Start Recording” option to initiate the screen and audio capture process.
- After setting up your recording parameters, launch the Zoom application. Begin your Zoom Meeting as usual, ensuring that the screen recording is actively capturing your session.
- When ready to terminate the recording, access up Control Center again.
- Tap the clock icon or similar representation indicating the recording's ongoing status. Choose “Stop Recording” from the options provided to halt the screen and audio capture process.
- Your completed Zoom Meeting recording will be stored in the location you previously selected. Navigate to the designated storage folder to find and access your recorded Zoom session effortlessly.
Part #3: FAQs
Is it Possible to Capture a Zoom Session as a Meeting Participant?
- Should the host grant you the privilege to record, seizing a Zoom meeting as a participant becomes feasible within the Zoom application. If recording consent is absent, strategic alternatives exist to circumvent Zoom's recording constraints.
Can You Capture a Zoom Session Excluding Participants?
- Effortlessly, you can record Zoom meeting without including participants by adjusting the Zoom screen layout. To document an event sans participant visibility, opt for specific layouts within the Zoom configurations, such as the Active Speaker (Desktop and Mobile) also the Shared Screen with Active Speaker (Desktop and Mobile), and the Shared Screen with Large Active Speaker Thumbnail (Desktop).
People Also Read2024 Complete Guide on How to Record Google MeetFrom Basics to Pro: Guide on How to Record Screen Windows 7
Conclusion
In conclusion, leveraging tools like FoneDog Screen Recorder allows you to seamlessly record Zoom meeting. Explore its capabilities to capture valuable discussions effortlessly. Embrace the efficiency of recorded meetings; they serve as timeless resources, fostering deeper insights, better collaboration, and enhanced productivity.


 /
/
