FoneDog Screen Recorder
FoneDog Screen Recorder
Special Offer
Special Offer


By Adela D. Louie, Last updated: July 9, 2025
Creating a presentation with the use of Microsoft PowerPoint can sometimes be boring and bland, and could lead to loss of interest with your target audience, especially if it is just pure text. Also, the emergence of recorded video together with PowerPoint presentations helps you to engage with your audience, especially if they are watching a recorded presentation.
If you are curious on how to video record yourself presenting a PowerPoint, here are the best ways on how to elevate your style—producing an interactive, and engaging PowerPoint presentation.
Part 1. Video Record Yourself Presenting a PowerPoint via FoneDog Screen RecorderPart 2. Video Record Yourself Presenting a PowerPoint via Microsoft PowerPointPart 3. Video Record Yourself Presenting a PowerPoint via CamtasiaConclusion
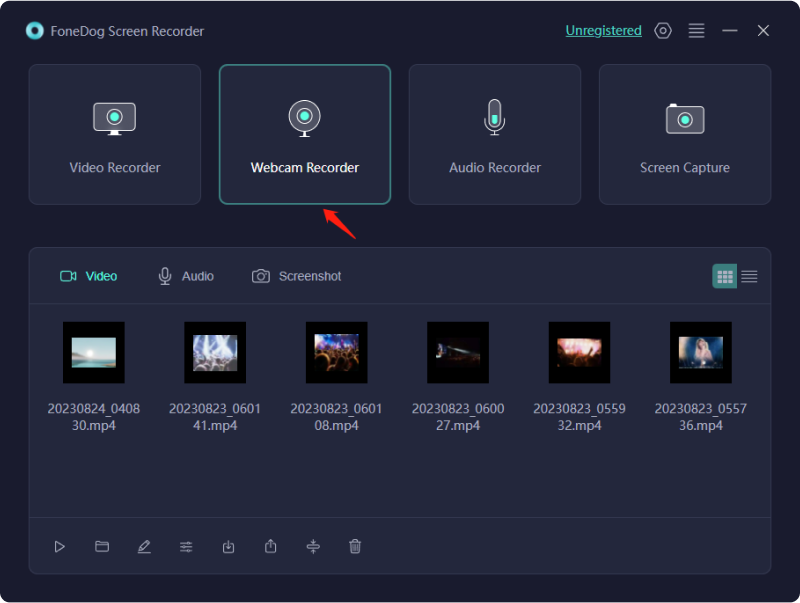
Make your presentation an outstanding one by leveling up how you present it to your target audience by using FoneDog Screen Recorder as a web camera recorder. It is an easy, and user-friendly recorder that enables you to record your webcam in a high-quality, lag-free, and no-watermark way. Using this, you can effortlessly record yourself and add that video to your PowerPoint slide without the need of opening another browser.
In addition, FoneDog Screen Recorder not only offers a web camera recorder only, but rather a bunch of functions that you can maximize in your job or school work, such as “Video Recorder” to screen record your classes or meetings or “Audio Recorder” if you need to record MP3 audio via system sound or record your voice using an external microphone. Also, in “Video Recorder”, you can simultaneously record your microphone, webcam, and screen—making it a “recorded video PowerPoint presentation.”.
Now, let us dive into how to record video record yourself while presenting a PowerPoint presentation using FoneDog Screen Recorder.
First of all, you must download the software of FoneDog Screen Recorder on your computer (either Mac or Windows) found on the official website. Then install, then launch the program.
![]() Free Download
For Windows
Free Download
For Windows
![]() Free Download
For normal Macs
Free Download
For normal Macs
![]() Free Download
For M1, M2, M3
Free Download
For M1, M2, M3
In order to record yourself while presenting a PowerPoint, you must first prepare the slides that you want to present. This would serve as a visual aid, aside from you talking in the video.
Go back to the FoneDog Screen Recorder and click “Video Recorder” right beside the “Webcam Recorder” > choose “Screen & Camera” > allow the program to detect your webcamera > select the preferred recording area (we recommend “Windows” for your PowerPoint presentation) > select “Microphone”.
Once ready, click the “Start Recording” button > select the window where your PowerPoint presentation is presented. You are also having the freedom to make real-time annotations with the help of the floating toolbar available or pause/ restart the recording.
If you are done presenting, click the red button available in the floating toolbar. The recording will automatically be saved on your computer.
However, if you are not fond of installing software, you could opt to choose the default webcam recorder available in Microsoft PowerPoint.
Luckily, the new update of Microsoft PowerPoint allows its users to record themselves and add the recording file in the PowerPoint itself. Using this, it would create a PowerPoint presentation with a video in the corner.
However, the file size of that certain Microsoft PowerPoint file may become large as it contains MP4 video recordings and would not be readily available if your audience is not a user of Microsoft PowerPoint.
If that is not a problem, then here is how to record video record yourself while presenting a PowerPoint presentation by default.
Open your Microsoft PowerPoint first > go to “Record Tab” > choose the “Cameo” button.
After clicking the “Cameo”, there is a blue placeholder circle that will appear as an overlay in the presentation. This can be customized in size and shape depending on your preferences. Just make sure that you have a webcam to be detected and microphone permission is granted.
Then click the “Record” button at the top right corner to start the recording. Once done, you can click on the stop button, preview the video before saving it.
Before saving, you can watch it to check for errors and click the export button > export video.
Note: There is no editing feature provided in the cameo mode of the PowerPoint presentation. If you want to incorporate editing in your presentation, we highly suggest using FoneDog Screen Recorder.
Another alternative other than what is aforementioned is importing your Microsoft PowerPoint presentation slides into Camtasia. By doing this, you can individually add your microphone voiceovers or video record yourself separately and add it to Camtasia. However, this method is not ideal for those who do not want to complicate things because it is the same as editing a video. What is good with Camtasia is that it has the power to make your presentation more unique and creative.
If you want that with your slide, here is a quick tutorial to follow.
Import the file > drag the slide into the Editing Toolbar. You can explore the various features of Camtasia towards editing the presentation in video mode.
Add visual effects like behaviors or annotations and separately add a video record of yourself as a video overlay. Once done, save it in to your computer.
In this article, we discuss the 3 methods of how to video record yourself, together with their advantages and disadvantages, following their step-by-step procedure. Make your presentation more engaging and interactive by adding a video record of yourself in the PowerPoint presentation. If you are not decided yet on what to use, we highly suggest the FoneDog Screen Recorder for less complex, user-friendly yet yielding excellent quality in your recording.
Leave a Comment
Comment

Tech Website Writing /Content Optimization
Singing, smiling, surprising every day!
So as a technical writer, it is my duty to gather effective and reliable solutions to answer questions on how to deal with the issues they are having with their devices.
Screen Recorder
Powerful screen recording software to capture your screen with webcam and audio.
Hot Articles
 /
/
INTERESTINGDULL
/
SIMPLEDIFFICULT
Thank you! Here' re your choices:
Excellent
Rating: 4.7 / 5 (based on 100 ratings)
