FoneDog Screen Recorder FoneDog Screen Recorder
Special Offer Special Offer
Only Only
$4.49 $4.49
to get a ONE-month license to get a ONE-month license
Sale ends in xx days Sale ends in xx days
Buy Now
sale

5 Ways! How to Record Screen on Windows 10 without Xbox

By Adela D. Louie, Last updated: March 29, 2024

Are you interested in capturing significant moments while gaming, creating captivating tutorials, or just even preserving crucial lectures on your Windows 10 computer? There is no need to search any longer! This guide will provide the easily techniques how to record screen on Windows 10 without Xbox capabilities. If you are an experienced gamer or even a professional requiring dynamic demos, we have everything you need.

Eliminate limitations as well as indeed immerse yourself in a realm of limitless screen recording capabilities on Windows 10. Let us combine and enhance your creativity with productivity.

Part 1. Best Alternative for Screen Recording on Windows 10 – FoneDog Screen RecorderPart 2. Various Ways on How to Record Screen on Windows 10 without XboxPart 3. Bonus: How to Record Screen on Windows 10 Using XboxPart 4. FAQs of Recording Screen on Windows 10 without XboxConclusion

Part 1. Best Alternative for Screen Recording on Windows 10 – FoneDog Screen Recorder

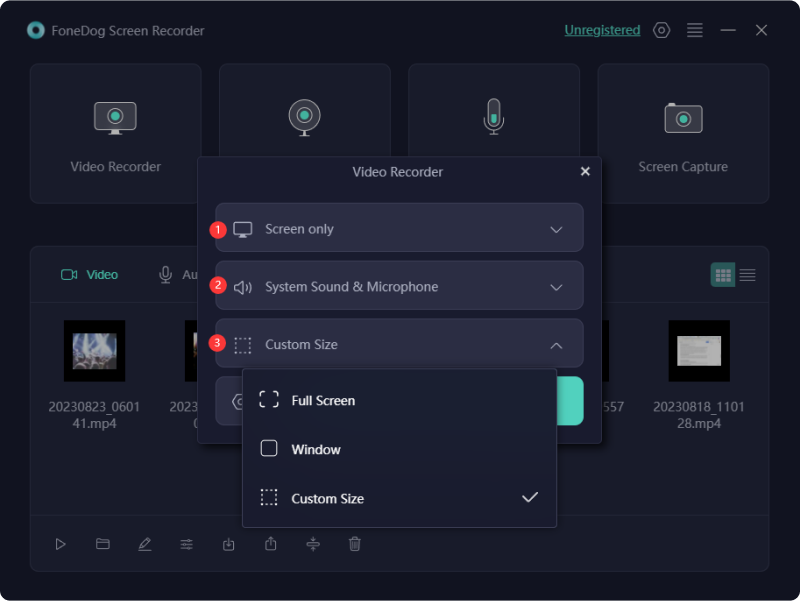
FoneDog Screen Recorder has been the top choice for screen recording on Windows 10, providing smooth performance and powerful capabilities. Users may easily record their screen actions for learning, games, or presentations using the intuitive layout. FoneDog Screen Recorder offers configurable audio settings plus annotation capabilities, guaranteeing a versatile recording experience.

windows Free Download For Windows mac Free Download For normal Macs mac Free Download For M1, M2, M3

Record Screen on Windows 10 without Xbox Using FoneDog:

  1. To commence the screen recording procedure, set up and make sure to launch the FoneDog Screen Recorder from the chosen device OS.
  2. After launching, navigate towards the primary screen and choose the labeled option "Video Recorder".
  3. Subsequently, determine whether to integrate audio across the recording. Select between "System Sound & Microphone", r perhaps option "Microphone", or even the option "System Sound", based on the desired preference. Otherwise, pick "None" to refuse to capture audio.
  4. Once the settings are adjusted, start off the process of capturing the screen by clicking through the "Start Recording" tab.
  5. During the recording process, users will have the ability to personalize the colors of annotations by utilizing the "Edit" function found across the floating panel displayed within the screen. Just press the red stop icon to cease the capturing.
  6. To momentarily pause the video recording at any time, merely click the "Pause" tab. Along with that, use the "Restart" button to erase all records and start over if needed.

Record Screen on Windows 10 without Xbox Using FoneDog

Part 2. Various Ways on How to Record Screen on Windows 10 without Xbox

If you're seeking screen recording capabilities without such a Xbox Game Bar, fear not! We've compiled a list of applications that not only facilitate recording but also offer extensive editing tools to elevate your videos, ensuring that you can know how to record screen on Windows 10 without Xbox and indeed harmonize seamlessly with your aesthetic preferences. Dive into the selection below and unlock these applications.

2.1 Clipchamp

Commencing with inherent tools, you can employ the Clipchamp video editor enabling screen recording on your Windows 11 device. Diverging from the Xbox Game Bar, it's not confined to capturing gameplay or system applications.

However, be mindful that default settings restrict recording to 30 minutes. To bypass this, upgrading to the Essentials plan in Clipchamp eliminates such limits. Now, let's delve into the process of screen recording on Windows 11 using Clipchamp.

  1. Initiate by clicking the Start symbol right from the Windows 11 device, then type “Clipchamp” and hit the “Enter” button. Upon Clipchamp's appearance, click “Record Something”.
  2. From the top left corner of the screen, opt for “Screen Recording”. From there, simply tap the “Record” icon situated right within the bottom left corner to commence screen capture.
  3. Following that, select the desired screen area for recording. Optionally, enable “Share System Audio”. Note that Free version inserts a “Trial Version” voice prompt every 5 seconds when capturing the System Audio.
  4. Right within the post-selection, click “Share” to initiate recording. Once the screen recording concludes, click on option that implies to “Stop Sharing”.
  5. Proceed by simply clicking “Save and Edit” below. Clipchamp's video editor interface will display then the recording, ready for customization.
  6. Upon editing, select “Export” located towards top-right of screen. After which, choose the preferred video resolution.
  7. Upon exporting the screen recording in the selected resolution, a confirmation will appear within the display screen.

2.2 PowerPoint

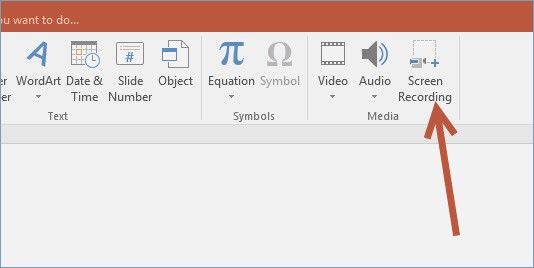
The subsequent method for capturing screens on your Windows 11 PC involves utilizing Microsoft PowerPoint. Suppose you're crafting a presentation showcasing an application demo, completing an assignment, or executing commands in Command Prompt. In that case, PowerPoint enables you to record these activities and embed them seamlessly into your slides. Here's a steps to guide on leveraging this functionality:

  1. Initiate by clicking on the Start symbol located on the Windows PC, then type "PowerPoint", nd hit “Enter” option.
  2. From there, opt the desired slide or perhaps select on option "Blank Presentation." Proceed by clicking on option "Insert" positioned within upper left corner.
  3. Within the "Insert" tab, navigate to "Screen Recording" situated right from the top right side.
  4. After which, such recording window will emerge and from that make sure to click on "Select Area" from the options provided.
  5. Use the mouse to drag and select the desired screen area.
  6. Upon selecting the area, initiate the recording process by simply clicking on option "Record."
  7. Once the recording concludes, click on "Stop" within the recording window's interface right from the top. That screen recording clip will then seamlessly integrate into the designated slide within PowerPoint.

How to Record Screen on Windows 10 via PowerPoint

2.3 VLC

The VLC Media Player emerges as your secondary avenue for screen recording on Windows 10, liberating you from the Xbox tether. However, delving into this recorder's realm reveals its intricacies. VLC's drawback lies in its absence of plug-and-play solutions, requiring users to navigate a labyrinth of options.

Thus, if VLC isn't your forte, this method may not align with your recording needs. Nevertheless, here's how to harness its potential:

  1. To get started, first launch VLC Media Player on the device.
  2. From there, navigate right within the top left corner locate the "Capture Device" option and give it a click.
  3. After that, opt for the "Capture" mode, followed by clicking the small arrow beneath the “Play” button, unveiling additional options.
  4. From that, make sure to select on option "Convert".
  5. Specify a destination folder for the Output Video, assign a file name as well as indeed save it for future reference.
  6. Commence recording by clicking "Start". fter which, conclude the recording session by simply clicking "Stop Playback" right within the bottom left display screen when ready.

Record Screen on Windows 10 Using VLC Media Player

2.4 Snagit

Similar to the Snipping Tool, there exist alternative third-party applications designed for capturing screenshots and recording screen activity. Among these options lies Snagit, which offers a complimentary 15-day trial period. To initiate screen recording on your Windows 11 device, simply download and install Snagit and follow on the preceding steps below:

  1. Commence by clicking the “Start” icon located on Windows system, after which proceed within typing “Snagit” into the search bar and hit on option “Enter”.
  2. If there instances to purchase a subscription, opt for “Buy Now” or otherwise select on option “Give Me More Time”.
  3. Within the application interface, navigate towards into the “All-in-One” section found within left hand menu, and then select “Capture” icon.
  4. Subsequently, click on the “Record” icon situated in the lower left corner of the screen.
  5. Upon completion of the recording, hover the cursor over “Pause” icon and click on it to halt the process.
  6. To conclude the recording session entirely, click on the 'Stop' icon found in the display screen.
  7. Lastly, designate a storage location for the screen recording and finalize the process by clicking “Save” option displayed in the screen.

Part 3. Bonus: How to Record Screen on Windows 10 Using Xbox

Whether you are one of the fortunate users who have the privilege of accessing the Xbox Game Bar upon your Windows 10 framework, you definitely are in a favorable position. Windows 10 features an already installed Xbox Game Bar that facilitates the screen recording procedure with minimal effort. Users can easily record their screen with this tool, which has a lot of useful features.

  1. Initiate the Xbox Game Bar right within the computer by simultaneously pressing “Win + G” on the keyboard.
  2. Following that, once the Game Bar is activated, initiate recording by simply clicking on the designated button or perhaps utilizing the shortcut “Win + Alt + R” keys.
  3. After that, cease recording by simply clicking on the designated stop button, thus preserving the captured footage onto PC.

Record Screen on Windows 10 Using Xbox

Part 4. FAQs of Recording Screen on Windows 10 without Xbox

Did Windows 10 incorporate an inherent screen recording feature?

The functionality of Xbox Game Bar features an integrated screen capture function that is accessible across Windows 10 and Windows 11.

Can screen recording with audio be done on Windows 11?

Windows 11 includes built-in screen recording utilities such as GameBar and Snipping Tool, which prove immensely useful, particularly for fundamental tasks.

People Also ReadHow to Screen Record on Windows [Easy Methods]2023 Beginner's Guide: How to Record Video on Mac

Conclusion

In conclusion, mastering how to record screen on Windows 10 without Xbox opens up a world of possibilities for users across various domains. By harnessing accessible tools like FoneDog Screen Recorder, individuals can effortlessly capture and share their digital experiences, from gaming triumphs to professional presentations. Embracing this capability enhances productivity and creativity, empowering users to showcase their skills with ease. Happy screen recording!

Leave a Comment

Comment

Comment ()
author image

Adela D. Louie

Tech Website Writing /Content Optimization

Singing, smiling, surprising every day!

So as a technical writer, it is my duty to gather effective and reliable solutions to answer questions on how to deal with the issues they are having with their devices.

Screen Recorder logo

Screen Recorder

Powerful screen recording software to capture your screen with webcam and audio.

How Do You Like This Article?

Check icon/ Check icon

INTERESTINGDULL

Check icon/ Check icon

SIMPLEDIFFICULT

Thank you! Here' re your choices:

Rate This Article: Excellent

Rating: 4.6 / 5 (based on 76 ratings)

Screen Recorder logo

Screen Recorder

Powerful screen recording software to capture your screen with webcam and audio.

FoneDog uses cookies to ensure you get the best experience on our website. Click here to learn more.