FoneDog Screen Recorder
FoneDog Screen Recorder
Special Offer
Special Offer


By Adela D. Louie, Last updated: April 1, 2024
Are you prepared to enhance your screen recordings with a dynamic edge? Envision the ability to record every intricate aspect of your on-screen actions, complemented with impeccably clear audio comments. In the era of digital technology, where visual communication is dominant, acquiring expertise on how to screen record with microphone can be a transformative skill.
If you are someone who creates material or presents professionally, this article serves as your guide. Bid farewell to muted screen shots and welcome interactive experiences that actively involve and fascinate your audience. Let us go into and unleash the complete capabilities of your screen recordings!
Part 1. Top-Notch Tool for Screen Recording with Microphone on PC – FoneDog Scren RecorderPart 2. Methods on How to Screen Record with MicrophonePart 3. FAQs: Screen Record with MicrophoneConclusion
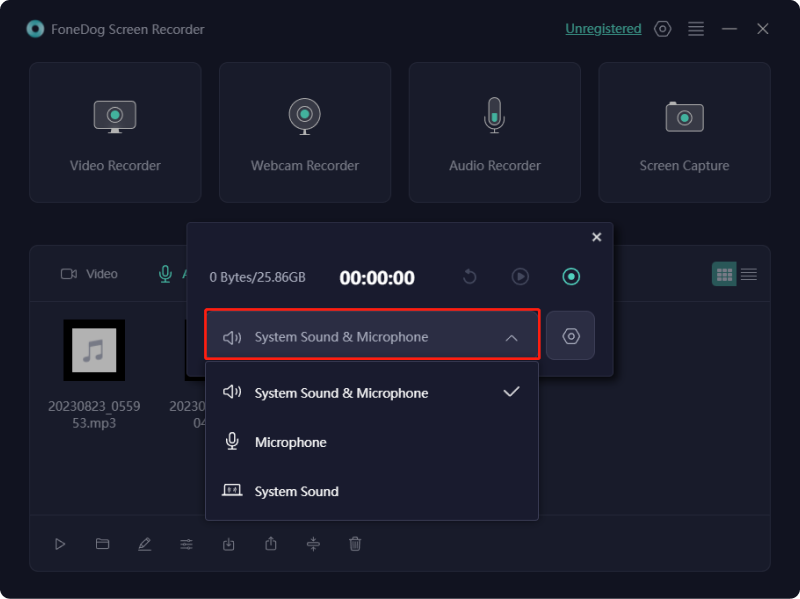
FoneDog Screen Recorder stands out as the premier tool for screen recording with microphone on PC. Offering seamless integration with the device's operating system, it enables users to effortlessly capture both system and microphone audio simultaneously.
With intuitive controls and customizable options, FoneDog ensures optimal recording quality. Whether for tutorials, gaming, or even for such presentations, its top-notch features make it the go-to choice for professional-grade screen recordings with audio on PC.
![]() Free Download
For Windows
Free Download
For Windows
![]() Free Download
For normal Macs
Free Download
For normal Macs
![]() Free Download
For M1, M2, M3
Free Download
For M1, M2, M3
What is the process of capturing screen with microphone? If you inquire about this on Google, you might encounter numerous irrelevant web pages or instructional videos. Presently, capturing screen with audio might pose a challenge, yet it remains achievable. Here are diverse approaches how to screen record with microphone across various devices. Refer to the options provided below.
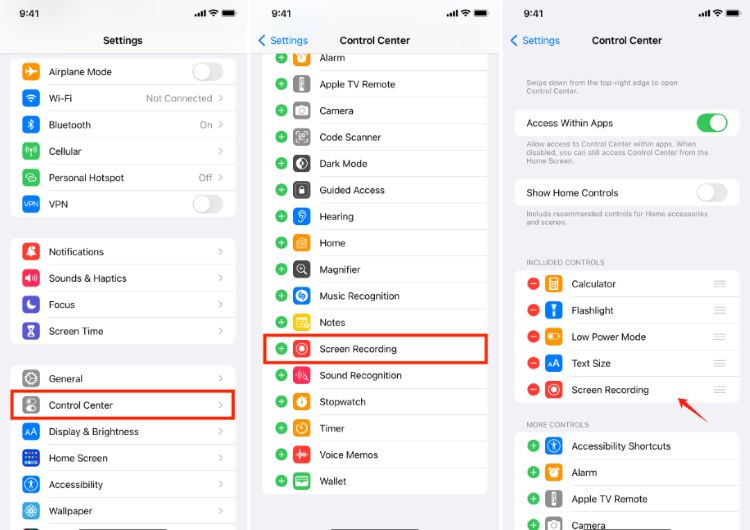
Should your iPhone or even iPad operate on iOS 11 or even such newer version, accomplishing tasks becomes seamless thanks to the included screen recorder. Let's now examine the guide:
In this section, we'll explore two techniques individuals can employ on Mac devices to capture their screens while incorporating microphone audio into the recordings.
Similar to Windows 10, Mac computers offer an integrated program for capturing the screen and microphone at the same time. Its operation is user-friendly, requiring just three easy steps to complete the task.
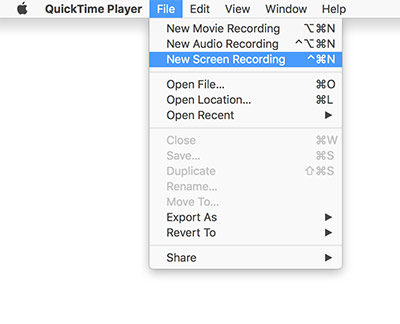
The built-in accessibility tool in macOS known as the Screenshot Toolbar is included in this list due to its capacity for convenient audio and video recording. Proper configuration is crucial to utilize the microphone alongside standard recording functions.
This tool is easily accessible through a simple keyboard shortcut, appearing with a press. While most Mac users can access it via the built-in toolbar strip above their keyboards on MacBook, it's essential to note its compatibility primarily with macOS Mojave and newer versions. Here's how to use the Screenshot Toolbar for microphone-enabled screen recording on a Mac:
Shift + Command + 5" to indeed activate the screenshot bar.It's noteworthy that users can adjust the recording location within the same menu as the microphone selection. Thus, this outlines the simple process for microphone-enabled screen recording on Mac using the Screenshot Toolbar.
The Game Bar comes pre-installed with Windows 10 and serves as an application tailored for gamers, facilitating the recording of gameplay videos. Apart from game recording, it offers functionality for capturing the entire computer screen, taking screenshots as well as including audio in screen recordings. Here are the steps to record your screen with microphone using Game Bar:
Windows + G" or perhaps simply locating Game Bar right within the Start menu.
Affirmative, it is indeed feasible to capture audio and video simultaneously on mobile devices using screen recording functionality. Contemporary smartphones and tablets typically provide integrated screen recording capabilities, enabling you to capture video and audio simultaneously.
When you record your screen with a microphone, it takes more resources to record, process, and sync the voice with the video, which can slow down your system. The level of effect, on the other hand, depends on the device and video recording software being used.
Limitations and restrictions may vary across different platforms and recording applications. Some platforms may impose recording duration limits, while certain apps might not support external microphones or may have limited control over audio settings during recording. It's advisable to review the specific guidelines and features of the chosen platform or application before recording with a microphone.
Multiple things may be responsible for the absence of sound in your screen recordings. Verify that your mobile device, tablet, or computer is not set to a muted state. Enable the audio settings on your device. If you are recording video on your phone, it is recommended to check for any updates or known issues that could interfere with the audio recording.
People Also ReadHow to Use QuickTime Screen Recording with Audio in 2024?Full Guide: How to Screen Record on Macbook Air with Sound
In conclusion, screen recording with microphone adds depth and clarity to your content, enhancing its effectiveness for various purposes. By following simple steps and utilizing reliable tools, such as FoneDog Screen Recorder, users can effortlessly create engaging recordings with synchronized audio, enriching their presentations, tutorials, and gaming experiences. Happy recording!
Leave a Comment
Comment

Tech Website Writing /Content Optimization
Singing, smiling, surprising every day!
So as a technical writer, it is my duty to gather effective and reliable solutions to answer questions on how to deal with the issues they are having with their devices.
Screen Recorder
Powerful screen recording software to capture your screen with webcam and audio.
Hot Articles
 /
/
INTERESTINGDULL
/
SIMPLEDIFFICULT
Thank you! Here' re your choices:
Excellent
Rating: 4.6 / 5 (based on 101 ratings)
