FoneDog Screen Recorder FoneDog Screen Recorder
Special Offer Special Offer
Only Only
$4.49 $4.49
to get a ONE-month license to get a ONE-month license
Sale ends in xx days Sale ends in xx days
Buy Now
sale

Full Guide: How to Screen Record on Macbook Air with Sound

By Adela D. Louie, Last updated: January 6, 2024

Have you ever thought about how to record the best sound and screen on your MacBook Air? This article will help you get to the magic of how to screen record on Macbook Air with sound, whether you're a content maker, a tech-savvy fan, or someone who just wants to save special moments on their computer.

We will make sure you don't skip a single sound detail by taking you through the whole process of screen recording on your MacBook Air in this detailed guide. Your screen, your sound, your story: from how-tos to video chats, lectures to game adventures. Let's jump in and make your online world really epic.

Part #1: How to Screen Record on Macbook Air with SoundPart #2: Top Alternative to Recording Screen on Macbook Air with Audio – FoneDog Screen RecorderPart #3: Tips for High-Quality Screen RecordingConclusion

Part #1: How to Screen Record on Macbook Air with Sound

Here's a step-by-step guide for both methods on how to screen record on Macbook Air with sound:

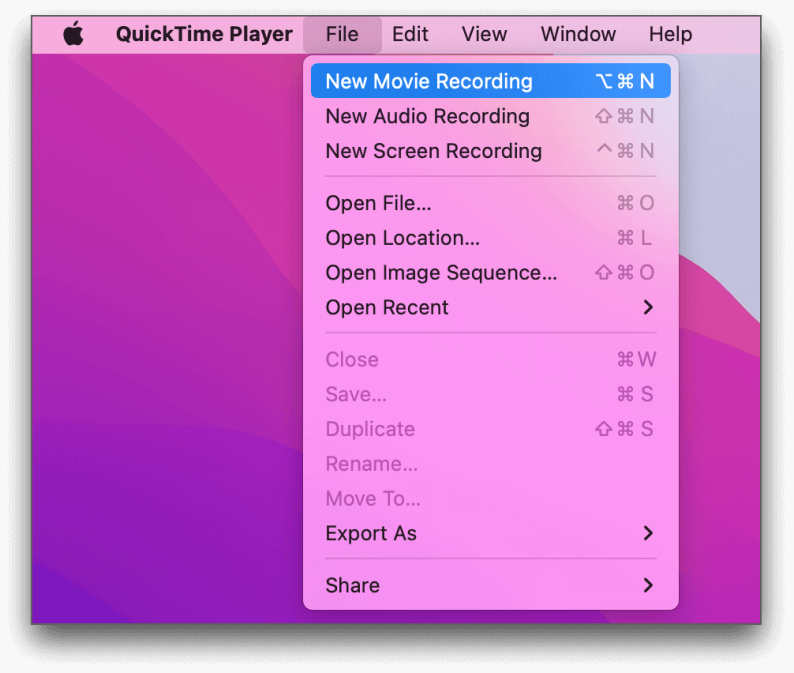
Method #1: Using macOS Built-in Screen Recording

  1. To get started, you may first access your Applications folder or employ the Spotlight search feature to locate and open QuickTime Player.
  2. Inside QuickTime Player's menu, select on the option that clearly signifies "File" and then choose "New Movie Recording".
  3. Within the recording window that pops up, click the small arrow adjacent to the record button (depicted as a red circle), triggering a dropdown menu to appear.
  4. Under the microphone settings, designate your sound input source. Opt for an "Internal Microphone" if you wish to record your own voice, or select an external microphone if one is available.
  5. If you intend to capture system audio, such as sounds from apps or websites, this requires a separate configuration. To do so, click the small arrow once more and pick on that option which then clearly signifies "System Capture" from the microphone options.
  6. Initiate your screen recording by clicking the red record button.
  7. To conclude the QuickTime screen recording, locate the "Stop" button in the menu bar (often represented as a square icon), or utilize the keyboard shortcut Command + Control + Esc.
  8. Following the conclusion of your recording, you can preserve your video by selecting "File", and then selecting the option that clearly signifies "Save". Choose a destination to save your screen recording complete with sound.

Screen Record on Macbook Air with Sound Using QuickTime

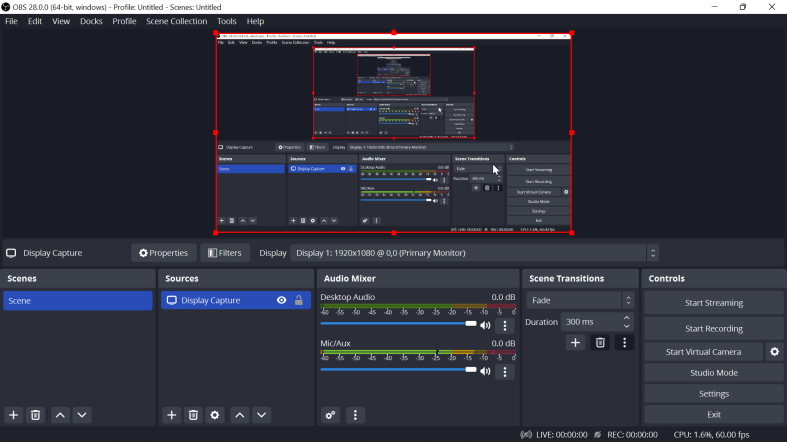
Method #2: Using Third-Party Screen Recording Software (e.g., OBS Studio)

  1. Visit the OBS Studio website and acquire the macOS application. Proceed to install it by following the on-screen instructions.
  2. Open OBS Studio by accessing it from your Applications folder.
  3. Inside OBS Studio, navigate to the "Preferences" option found in the OBS menu. In the "Audio" section, make sure to select the appropriate audio input devices for your microphone (e.g., Internal Microphone) and for capturing desktop audio (for system sound capture). You can verify the correctness of your audio settings by testing them.
  4. Create a new scene within OBS Studio by clicking on the "+" icon situated under the "Scenes" section.
  5. Populate your scene with sources by clicking on the "+" icon beneath the "Sources" section. To capture your screen for recording, add an option of "Display Capture" source.
  6. Customize the settings for the display capture to specify which part of the screen or particular application window you wish to record.
  7. To commence your screen recording, locate and click on "Start Recording" positioned in the lower-right corner of the OBS Studio window.
  8. When you're ready to conclude the recording, press either the option that indicates "Stop Recording" or use the designated hotkey (typically set to Ctrl + F9 by default).
  9. Following the conclusion of your recording, OBS Studio will prompt you to specify a location for saving your screen recording that includes sound.

Screen Record on Macbook Air with Sound Using OBS

Both of these methods provide the capability to perform screen recording on your MacBook Air with accompanying sound. The choice between them should be based on your personal preferences and specific requirements.

While the built-in macOS feature offers a straightforward approach, third-party software such as OBS Studio provides more advanced options for customization and the potential for live streaming, should you require those functionalities.

Part #2: Top Alternative to Recording Screen on Macbook Air with Audio – FoneDog Screen Recorder

If you want to fully record your screen with sound on a MacBook Air, FoneDog Screen Recorder is the best and easiest tool for the job. This powerful program lets you record your screen action smoothly, including high-quality sound, so your recordings are as useful and interesting as they can be.

windows Free Download For Windows mac Free Download For normal Macs mac Free Download For M1, M2, M3

Because FoneDog Screen Recorder is meant to be easy to use, both new and expert users can use it. It has a lot of benefits, including an easy-to-use design and a lot of features.

How to screen record on Macbook Air with sound using this tool:

How to Screen Record:

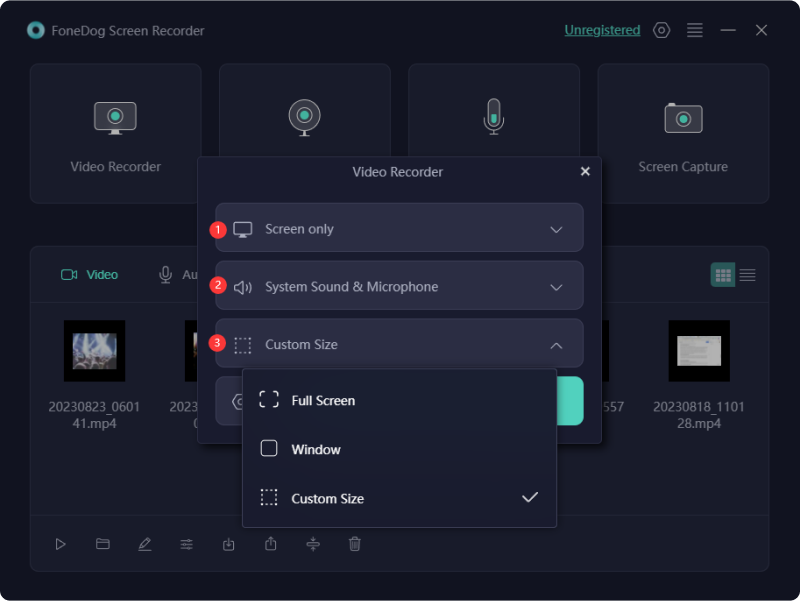
1. First, get FoneDog Screen Recorder and put it on your computer. You have to run the tool after setting it up.

2. You can record in more than one way with this. You can then choose "Full Screen", "Custom", or "Record Webcam Only" based on your needs.

Record Screen on Macbook Air with Audio – FoneDog Screen Recorder: Record Area

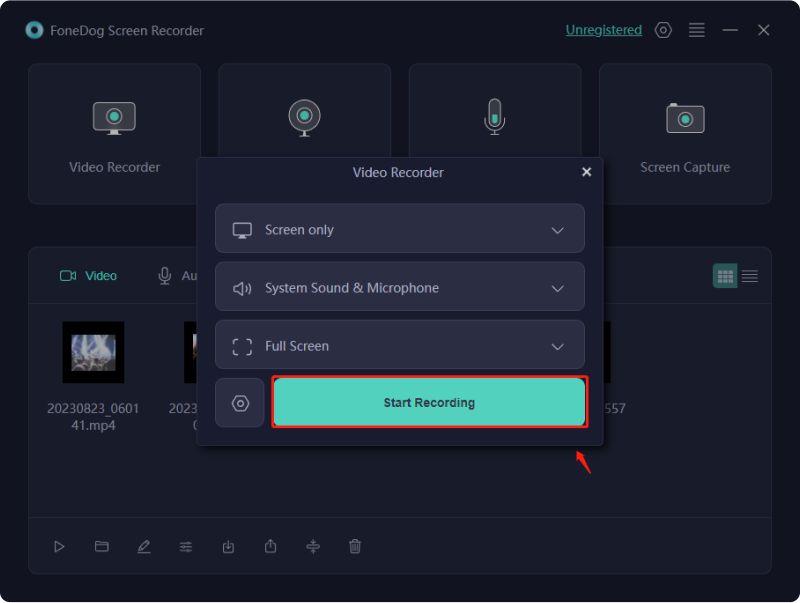
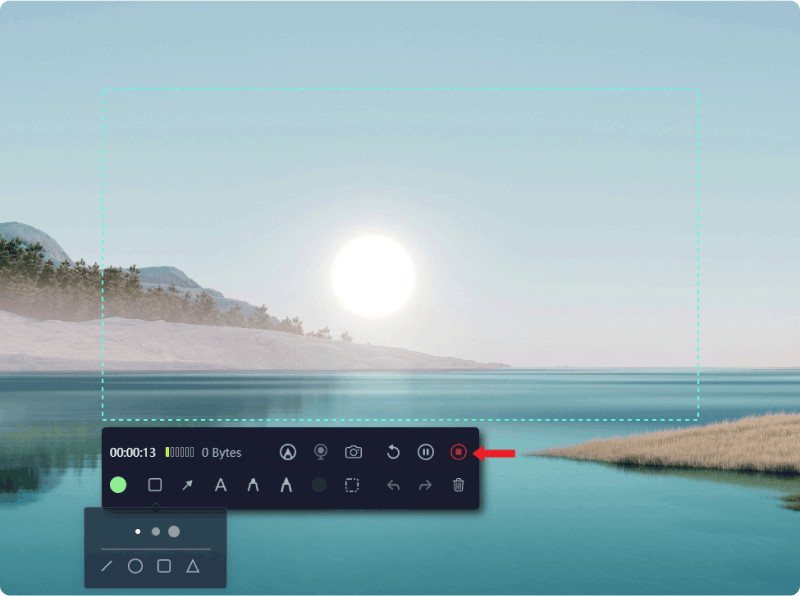
3. If you want to record your screen, press the "REC" button. You can also set hotkeys to make things even easier to use.

Record Screen on Macbook Air with Audio – FoneDog Screen Recorder: Start Recording

4. Click on the right buttons at any point during the recording to stop and start again. You can make notes on your movie in real time with FoneDog Screen Recorder by adding text, lines, and some shapes.

5. To end the recording, you must press the "Stop" button when you have all the news you need.

Record Screen on Macbook Air with Audio – FoneDog Screen Recorder: Stop Recording

6. If you listen to the tape first, you can change things, like leaving out parts you don't want. If you want to share the movie you just shot right away, you can do that on a number of sites.

Part #3: Tips for High-Quality Screen Recording

To ensure high-quality screen recordings, consider the following tips before or after you know how to screen record on Macbook Air with sound:

  1. Frame Rate: Use a higher frame rate (e.g., 30 or 60 frames per second) for smoother motion in your recordings, especially for video content or fast-paced actions.
  2. Clean Interface: Remove clutter from your desktop and close unnecessary applications or notifications that could distract viewers or reduce the visual appeal of your recording. And plus using a screen recorder that has no watermark.
  3. Use Adequate Lighting: Ensure good lighting conditions in your workspace to avoid grainy or dark recordings. Natural light or well-placed artificial lighting can significantly improve video quality.
  4. Position you’re Microphone: If you're recording audio, use an external microphone for better sound quality. Position it close to your mouth to minimize background noise and capture clear, crisp audio.
  5. Adjust Microphone Levels: Test and adjust your microphone input levels to avoid audio distortion or clipping. Aim for a balanced audio volume.
  6. Background Noise Reduction: Minimize background noise by closing windows, and doors, and reducing extraneous sounds in your recording environment.
  7. Choose the Right Codec: Select a suitable video codec for your recording. Common codecs like H.264 or H.265 provide good compression and quality. Experiment with settings to find the right balance between size and quality.
  8. Consider a Separate Audio Recording: For even higher audio quality, consider recording your audio separately and then syncing it with your video in post-production.

People Also ReadFrom Basics to Pro: Guide on How to Record Screen Windows 7Comprehensive Guide: How Mac Screen Record GIF 2024 [5 Tools]

Conclusion

In conclusion, having knowledge about how to screen record on MacBook Air with sound is a versatile tool for various purposes, from creating tutorials to capturing important moments. You can choose between the built-in macOS feature as well as third-party software like FoneDog Screen Recorder.

FoneDog offers an intuitive interface, high-quality recording, and user-friendly controls, making it an excellent choice for Mac users. Give it a try today and unleash your screen recording potential with FoneDog Screen Recorder!

Leave a Comment

Comment

Comment ()
author image

Adela D. Louie

Tech Website Writing /Content Optimization

Singing, smiling, surprising every day!

So as a technical writer, it is my duty to gather effective and reliable solutions to answer questions on how to deal with the issues they are having with their devices.

Screen Recorder logo

Screen Recorder

Powerful screen recording software to capture your screen with webcam and audio.

How Do You Like This Article?

Check icon/ Check icon

INTERESTINGDULL

Check icon/ Check icon

SIMPLEDIFFICULT

Thank you! Here' re your choices:

Rate This Article: Excellent

Rating: 4.5 / 5 (based on 109 ratings)

Screen Recorder logo

Screen Recorder

Powerful screen recording software to capture your screen with webcam and audio.

FoneDog uses cookies to ensure you get the best experience on our website. Click here to learn more.