By Adela D. Louie, Last updated: January 8, 2024
Are you ready to learn how to take great pictures of your laptop's screen? These days, being able to record your laptop screen is very useful, whether you're recording games, teaching, or just want to keep and share important moments. This complete guide will give you the information and tools you need to learn this very useful skill on how to record screen on laptop.
We have everything you need to make lessons, keep memories alive, or improve your slideshows. You'll find out about the best tools and tips for easy screen recording that will always give you great results. Okay, let's begin if you're ready to learn how to record your laptop screen.
Part #1: Best Laptop Screen Recorder – FoneDog Screen RecorderPart #2: How to Record Screen on Laptop in Runner-up WaysConclusion
Part #1: Best Laptop Screen Recorder – FoneDog Screen Recorder
FoneDog Screen Recorder stands out as one of the premier screen recording software tools available for laptops. With its user-friendly interface and powerful features, it has gained recognition as an exceptional choice for capturing laptop screens.
 Free Download
For Windows
Free Download
For Windows
 Free Download
For normal Macs
Free Download
For M1, M2, M3
Free Download
For normal Macs
Free Download
For M1, M2, M3
FoneDog Screen Recorder is a versatile solution designed to meet the needs of educators, content creators, professionals, and anyone seeking to record their laptop screens effortlessly. Whether you're looking to create educational tutorials, professional presentations, or captivating gaming content, this software has you covered.
Here's how to record screen on laptop using this tool:
Step #1: Download and Install
- Begin by downloading and installing the FoneDog Screen Recorder software on your laptop. You can typically find the installer on the official FoneDog website or a trusted software distribution platform.
Step #2: Launch the Software
- After installation, launch FoneDog Screen Recorder by clicking on the application icon.
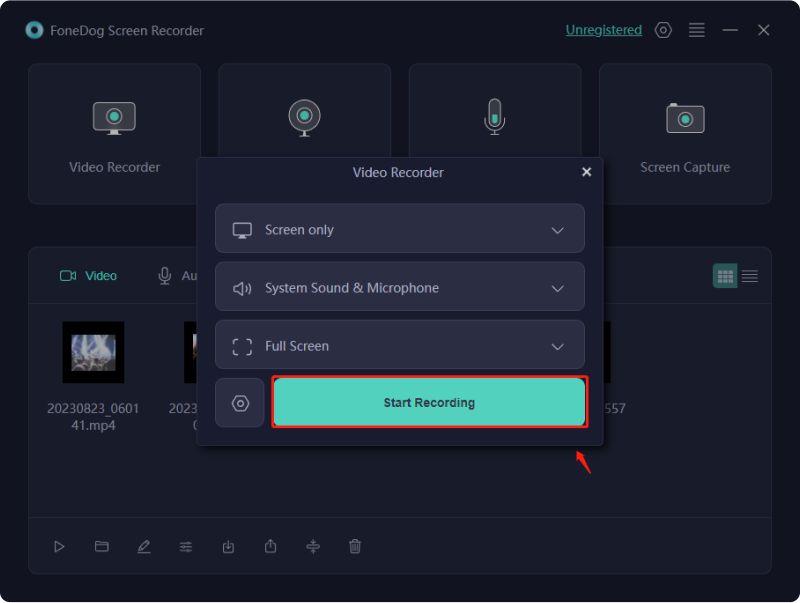
Step #3: Configure Recording Settings
- Customize your recording settings to suit your needs. You can select the recording area, choose audio input sources, set quality options, and even configure hotkeys for quick control.
Step #4: Start Recording
- Once your settings are adjusted to your liking, hit the "Record" button to initiate the screen recording. You can record your entire screen, a specific application window, or a user-defined area.
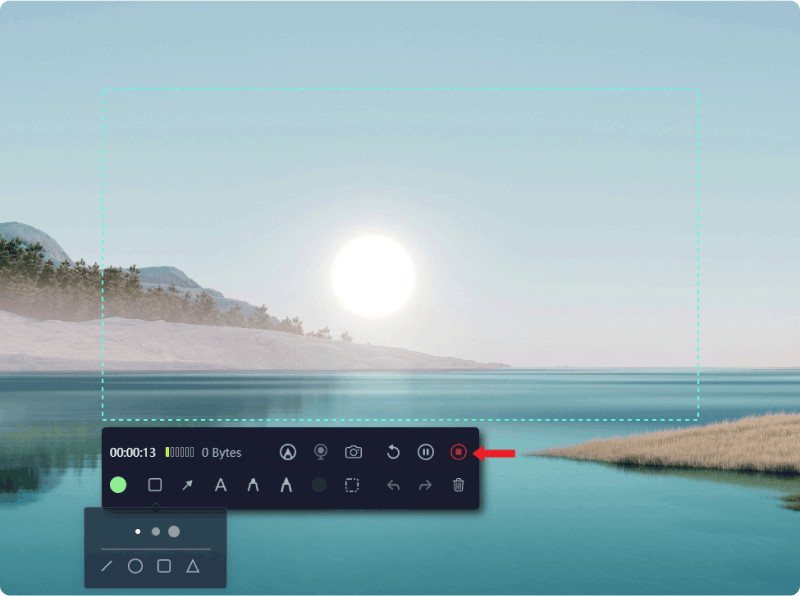
Step #5: Pause and Stop Recording
- During recording, you can pause and resume as needed. When you're finished, click the "Stop" button to end the recording.
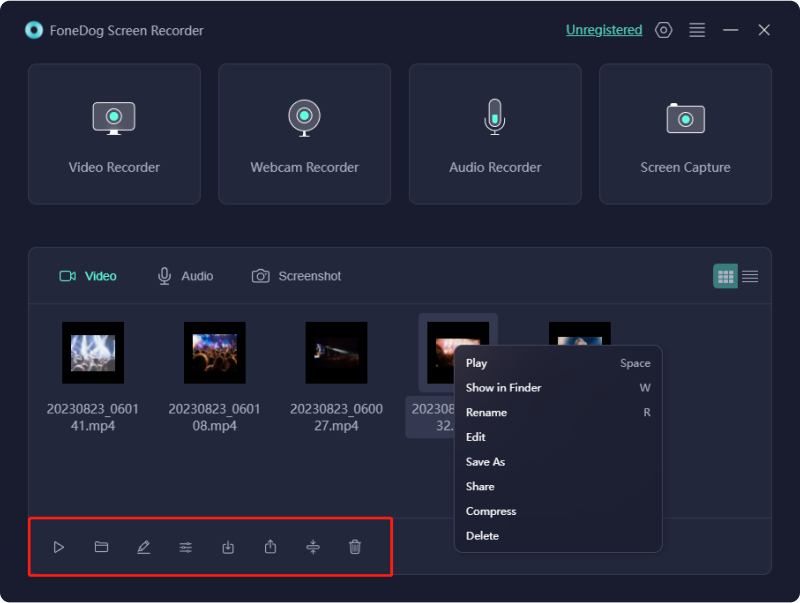
Step #6: Preview and Edit (Optional)
- FoneDog Screen Recorder often offers the option to review your recording and make quick edits. You can trim the video, add annotations, and more.
Step #7: Save or Share
- After finalizing your recording, you can save it to your preferred file format and location. FoneDog Screen Recorder also provides the convenience of sharing your recordings directly to various platforms.
With FoneDog Screen Recorder, you can unlock your laptop's full potential for content creation, training, troubleshooting, and more. It's a reliable and feature-rich screen recording solution that empowers you to bring your ideas and presentations to life. Whether you're a seasoned pro or just getting started, FoneDog Screen Recorder is your go-to tool for achieving outstanding screen recordings on your laptop.
Part #2: How to Record Screen on Laptop in Runner-up Ways
There are multiple methods on how to record screen on laptop, and we will provide a few common ones along with the steps to use each method:
Method #1: Built-in Screen Recording (Windows 10 and newer):
To initiate the screen recording process on your Windows laptop, you can follow these steps, which make use of the built-in Xbox Game Bar functionality:
- To commence the screen recording adventure, first, awaken the Xbox Game Bar, a versatile utility that resides within your Windows operating system. You can do this by executing a keyboard command. Simply press the 'Windows' key, a core element of Windows functionality, in conjunction with 'G'. This action serves as the key to unlocking the Xbox Game Bar, ushering in a realm of possibilities for capturing your laptop's screen activity.
- Once the Xbox Game Bar reveals itself, you'll notice a conspicuous red button, beckoning you to embark on your recording odyssey. Click this red recording button with the anticipation of capturing your screen's visual narrative. Your laptop, at this point, begins the process of diligently documenting the activities on your screen, ready to convert them into a visual chronicle.
- When the time comes to conclude your screen recording, you possess a couple of options. First, you can simply press the same red button you employed to commence the recording. This action acts as a universal pause-and-stop toggle, allowing you to wrap up the recording session effortlessly. Alternatively, if you prefer keyboard shortcuts, you can press 'Windows' + 'Alt' + 'R' to cease the recording process, offering you another avenue to gracefully bring you’re recording to a close.
- After the screen recording mission is accomplished, you may be wondering where your newly captured videos are housed. Fear not, for they reside within a dedicated repository known as the 'Capture' folder. This is where your recorded masterpieces are safely stored, awaiting your retrieval and further creative endeavors.

So, armed with the knowledge of these steps, you can seamlessly and efficiently record your laptop screen using the Xbox Game Bar feature on your Windows laptop, ensuring that your screen's stories are preserved for posterity.
Method #2: Screen Recording Software:
- To begin, you should acquire screen recording software for your laptop. This software can be found on the internet and is available in various options like OBS Studio, Camtasia, or ShareX. Download the software and install it on your laptop.
- After the installation is complete, open the screen recording software you've chosen. Upon launching the program, you'll gain access to a range of functionalities to tailor your screen recording experience.
- Within the software, you'll have the opportunity to personalize your recording settings to suit your specific needs. This involves making decisions such as defining the recording area on your screen, configuring audio sources to capture, and selecting the desired output format for your video.
- When you're satisfied with your chosen settings, you can kickstart the screen recording process. This is usually as simple as locating and clicking on a button labeled 'Record' or 'Start'.
- Once you've recorded the content you intended, it's time to bring the recording to a halt. This can typically be accomplished by clicking on the 'Stop' button within the software.
- The screen recording software often comes equipped with built-in tools for post-production tasks. You can utilize these tools to edit and refine your recorded video. After editing, you'll be able to save the video in your preferred format and location on your laptop.
By following these detailed steps, you can make the most of your chosen screen recording software, ensuring that your recording is tailored to your precise requirements and that the final output meets your expectations..
Method #3: Online Screen Recorders:
- Navigate to an online screen recording service such as Screencast-O-Matic, Apowersoft Free Online Screen Recorder, or Loom.
- Once on the chosen website, adhere to the provided guidance in order to commence the screen recording process. Typically, this involves specifying the region of your screen to capture, configuring audio input settings, and customizing other preferences to suit your needs.
- Initiate the recording by activating the corresponding function on the website's interface. When you have successfully captured the desired content or completed your screen recording task, proceed to conclude the recording session using the website's designated feature.
- Following the recording, you have the option to either download the recorded video to your local storage for future reference or share it directly with your intended audience, depending on your specific requirements and objectives.
Method #4: Using PowerPoint (Windows):
Follow these detailed steps on how to record screen on laptop using PowerPoint:
- First, open Microsoft PowerPoint on your laptop.
- If you don't already have a presentation in progress, create a new one. You can do this by going to the 'File' menu, selecting 'New', and choosing a blank presentation or template to work with.
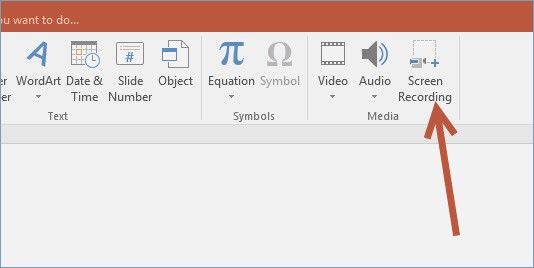
- Once your presentation is ready, navigate to the 'Insert' tab in the PowerPoint menu bar. You'll find this tab near the top of the PowerPoint interface.
- Within the 'Insert' tab, you'll find various options for adding content to your presentation. Select the 'Screen Recording' option from this menu.
- A crosshair cursor will appear, allowing you to select the specific area of your screen that you want to record. Click and drag to enclose the area you wish to capture.
- With your chosen area highlighted, commence the recording by clicking the 'Start Recording' button. PowerPoint will begin capturing everything within the selected region.
- Once you've recorded the desired content, bring the recording to a halt. To do this, click the square icon, which typically appears in the upper-left corner of your screen while recording. This will cease the recording process.
- Your recording will automatically be inserted into a slide within your PowerPoint presentation. You can review, edit, or enhance the recording as needed right from within PowerPoint. Additionally, you have the option to save the recorded content for future use or distribution.
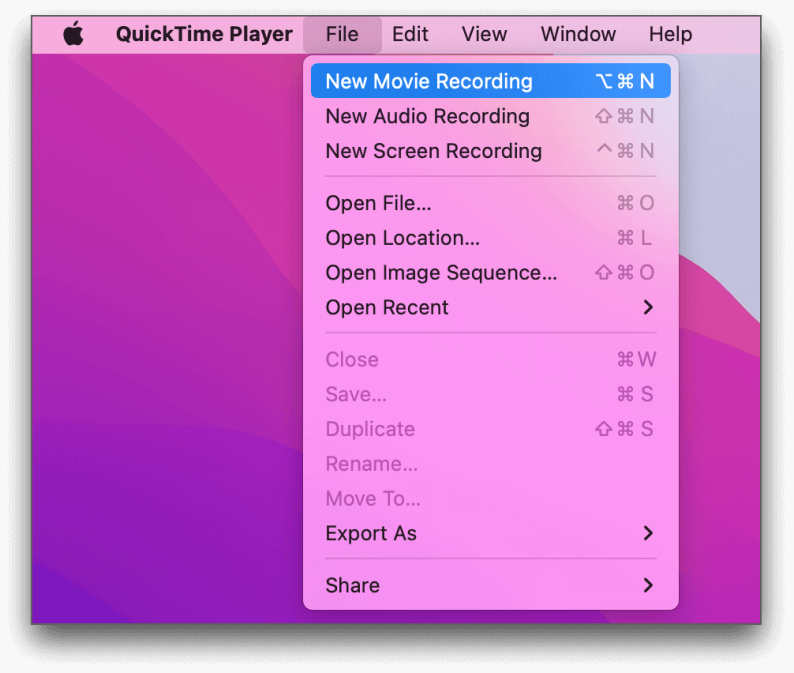
Method #5: QuickTime (Mac):
- Begin by launching the QuickTime Player application on your laptop.
- In the QuickTime Player's menu bar, navigate to the 'File' option and then choose 'New Movie Recording' from the dropdown menu.
- Locate the recording settings by clicking on the arrow icon situated next to the record button. This step allows you to configure various options related to your screen recording, such as selecting the input source and adjusting quality settings.
- Once you have customized your recording settings to your satisfaction, initiate the screen recording by clicking the record button. This will start the recording process, capturing the content displayed on your laptop screen.
- When you have successfully recorded the desired content or completed your screen recording, terminate the QuickTime screen recording by clicking the record button once more.
- To save your recorded content for future use or further editing, access the 'File' menu in QuickTime Player, and choose the appropriate save or export option, which will enable you to store the recording in your preferred format and location.
Choose the method that best suits your needs and platform, and follow the outlined steps to record your laptop screen effectively. Each method offers unique features and capabilities, so you can pick the one that aligns with your requirements and preferences.
People Also Read2024 Guide on How to Fix Error - Screen Record Not WorkingWindows Screen Record Shortcut: Record on Windows 10/11 Easily
Conclusion
In conclusion, mastering how to record screen on laptop can open a world of possibilities for education, content creation, troubleshooting, and communication. Now, take the next step in unleashing your creativity and productivity by using FoneDog Screen Recorder. It's an excellent tool for capturing and sharing your laptop's screen effortlessly. Embrace the power of laptop screen recording and unlock new horizons in digital expression. Happy recording!


 /
/
