FoneDog Screen Recorder FoneDog Screen Recorder
Special Offer Special Offer
Only Only
$4.49 $4.49
to get a ONE-month license to get a ONE-month license
Sale ends in xx days Sale ends in xx days
Buy Now
sale

How to Use the Steps Recorder Windows [2024 Guide]

By Adela D. Louie, Last updated: December 29, 2023

Are you tired of trying to explain a computer issue to a tech-savvy friend, only to receive bewildered looks in return? In the digital age, understanding and resolving tech hiccups is a must. That's where the Steps Recorder Windows comes to the rescue, it is a sheer free screen recording tool.

Whether you're dealing with mysterious errors or software glitches, or simply want to streamline your tasks, our article will walk you through the entire process. Get ready to capture, document, and share your computer's every step effortlessly, making problem-solving a breeze.

Part #1: How to Access And Make Use Of Steps Recorder WindowsPart #2: Best Alternative to Steps Recorder Windows – FoneDog Screen RecorderConclusion

Part #1: How to Access And Make Use Of Steps Recorder Windows

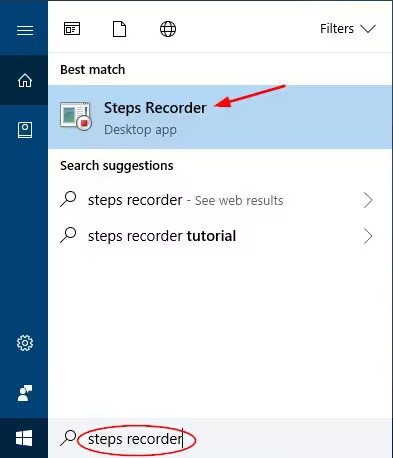
Utilizing and accessing Steps Recorder Windows is a simple endeavor. The following is an instructional manual to assist you in commencing:

  1. Accessing Steps Recorder:
    • Click on the Start menu or press the Windows key on your keyboard to open the Start menu.
  2. Type "Steps Recorder" in the search bar or the "Type here to search" box. You should see "Steps Recorder" or "Record steps to reproduce a problem" in the search results.
  3. Click on "Steps Recorder" in the search results to launch the application.

Note: In some Windows versions, you may find it as "Problem Steps Recorder". The functionality is the same.

  1. The Steps Recorder interface will open, and you are now ready to record your actions.
  2. Recording Your Steps:
    • To begin recording, click the "Start Record" button.
    • Perform the actions you want to record. Steps Recorder will capture each action you take.
  3. Pausing and Resuming Recording:
    • If you need to pause the recording at any point, click the "Pause Record" button. To resume, click the "Resume Record" button.
  4. Stop Recording:
    • When you've captured all the necessary steps, click the "Stop Record" button.
  5. Reviewing Recorded Steps:
    • After stopping the recording, you will see a new window displaying all the recorded steps, including screenshots and descriptions of your actions.
  6. Adding Comments:
    • You can add comments to specific steps by clicking on a step and selecting the "Add Comment" button. This can help provide additional context or explanations for each step.
  7. Saving the Recording:
    • To save the recorded steps, click the "File" menu and select "Save As". Choose a location on your computer to save the file.
  8. Sharing the Recording:
    • If you need to share the recorded steps with someone, you can save it as a ZIP file and then share the ZIP file. This will include all the screenshots and descriptions.
  9. Closing Steps Recorder:
    • You can close Steps Recorder once you've saved or shared the recording.

Access And Make Use Of Steps Recorder Windows

Pro Tips for Maximizing the Utility of Steps Recorder Windows:

  1. Use Custom Comments: Instead of relying solely on the automatically generated comments, add your own descriptive and concise notes to clarify each step.
  2. Trim Unnecessary Steps: After recording, review the steps and remove any irrelevant or sensitive information to create a cleaner, more focused record.
  3. Combine with Problem Steps Recorder: If using an older Windows version, the "Problem Steps Recorder" tool may be available alongside Steps Recorder. Use both tools to capture a more comprehensive record of issues.
  4. Organize and Categorize: Group related recordings into folders or categories to maintain a structured and easily accessible archive.
  5. Share Securely: Use secure methods when sharing recordings, especially if they contain confidential information. Especially if you're doing meetings like Zoom or Google Meet capturing.
  6. Test Your Recorded Steps: Before sharing a recording with others, test it yourself to ensure clarity and accuracy.
  7. Master Advanced Features: Explore any advanced features specific to your Windows version to harness the full potential of Steps Recorder.
  8. Educate Your Team: If used in a team setting, educate your colleagues on how to use Steps Recorder effectively to streamline issue reporting and resolution.

By implementing these pro tips, you can make the most of Steps Recorder, enhancing your troubleshooting, documentation, and communication capabilities in Windows.

Part #2: Best Alternative to Steps Recorder Windows – FoneDog Screen Recorder

Finished talking about the Steps Recorder Windows, let’s move on to a highly versatile one. FoneDog Screen Recorder emerges as a top-notch choice, offering a wide array of features and user-friendly functionality. Let's delve into what makes FoneDog Screen Recorder the best screen recording solution, its key features, and how to make the most of its screen recording capabilities.

windows Free Download For Windows mac Free Download For normal Macs mac Free Download For M1, M2, M3

Key Features of FoneDog Screen Recorder:

  1. Versatile Screen Recording: FoneDog Screen Recorder enables you to capture anything on your screen, be it full-screen activities, specific application windows, or custom regions.
  2. High-Quality Output: Enjoy crisp and clear recordings with options to capture in various resolutions and frame rates.
  3. Audio Recording: Capture both system sound and microphone audio simultaneously, perfect for creating engaging video content.
  4. Webcam Overlay: Seamlessly integrate your webcam feed into your screen recordings, ideal for creating tutorials, vlogs, or video presentations.
  5. Annotation Tools: Enhance your recordings with real-time annotation tools, including text, lines, shapes, and highlights.
  6. Scheduled Recording: Set a timer for automatic recording, making it convenient for capturing webinars, live streams, or any time-sensitive content.
  7. Task Scheduler: Schedule multiple recording tasks in advance and let FoneDog Screen Recorder do the work for you.
  8. Video Editing: Edit and trim your recorded videos right within the software, eliminating the need for third-party editing tools.
  9. Multiple Output Formats: Save your recordings in popular formats such as MP4, AVI, and more, ensuring compatibility with various devices and platforms.

How to Make Use of FoneDog Screen Recorder:

1. Download and Installation: Begin by downloading and installing FoneDog Screen Recorder on your computer.

2. Launch the Program: After installation, launch the program from your desktop.

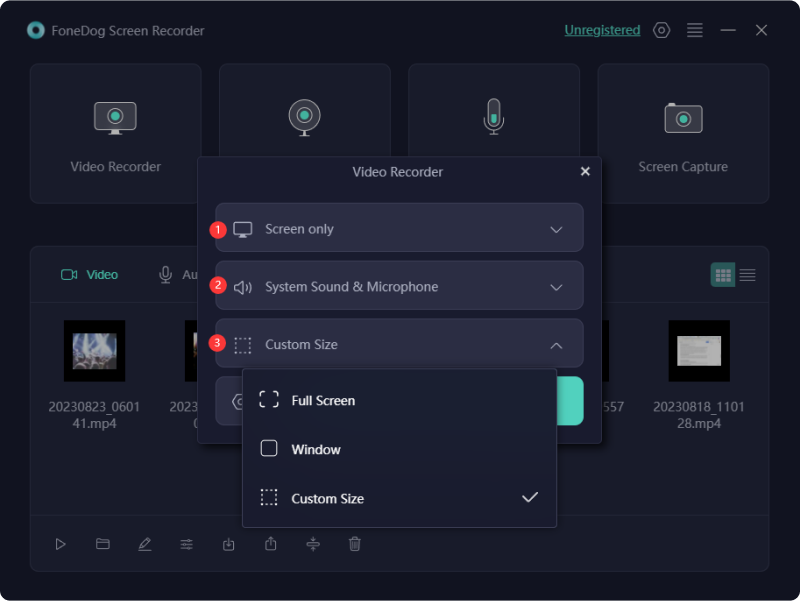
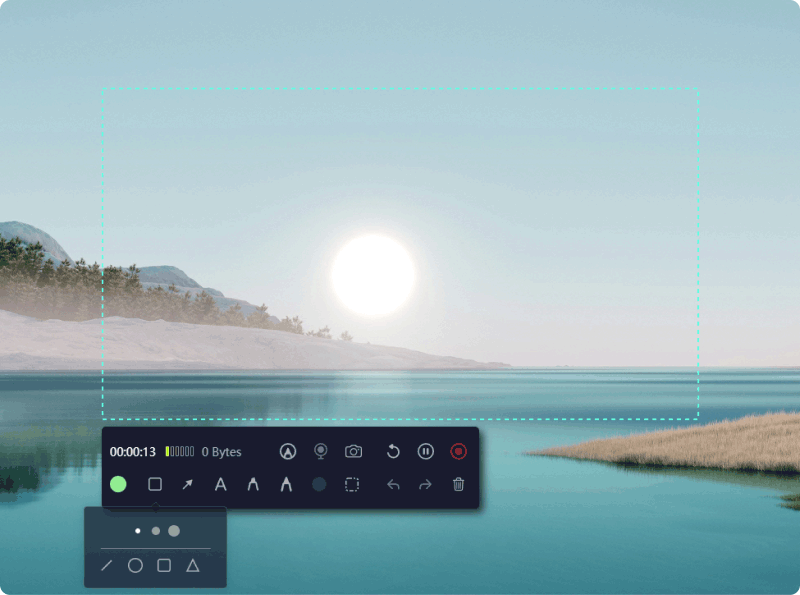
3. Select Recording Area: Choose whether to record the full screen, a specific application window, or a custom region by adjusting the recording frame.

Best Alternative to Steps Recorder Windows – FoneDog Screen Recorder: Recording Area

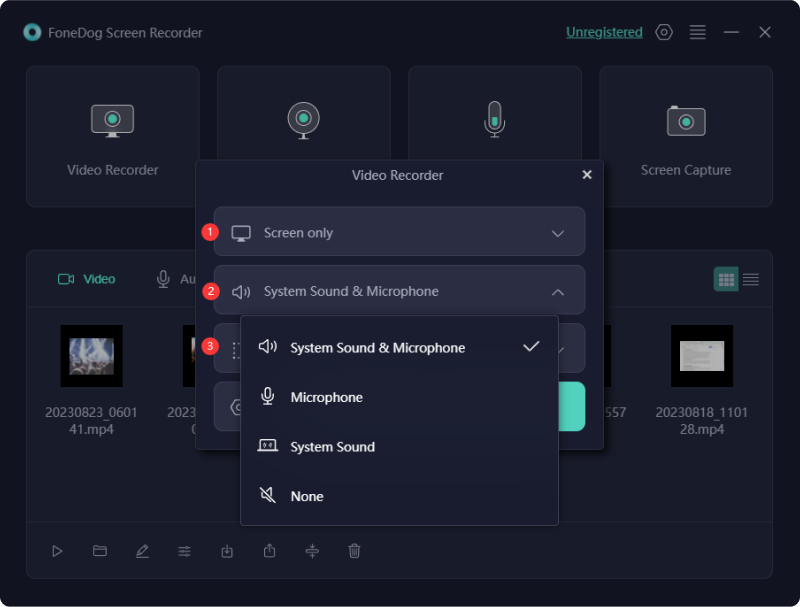
4. Audio Settings: Configure your audio settings, including system sound and microphone input. You can also enable the webcam if needed.

Best Alternative to Steps Recorder Windows – FoneDog Screen Recorder: Audio Settings

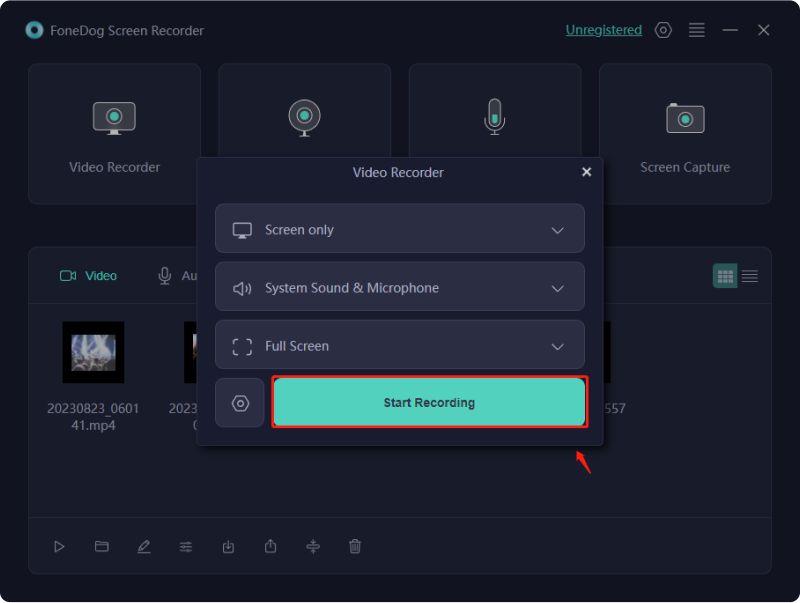
5. Recording Controls: Start, pause, or stop your recording using the on-screen controls or customizable hotkeys.

Best Alternative to Steps Recorder Windows – FoneDog Screen Recorder: Start Recording

6. Annotation and Editing: Utilize the annotation tools during recording to add text, shapes, or highlights. After recording, use the built-in editor to make any necessary edits.

Best Alternative to Steps Recorder Windows – FoneDog Screen Recorder: Add Annotation

7. Save and Share: Once your recording is complete, save it in your preferred format and share it with your audience or store it for future use.

Best Alternative to Steps Recorder Windows – FoneDog Screen Recorder: Save Recording

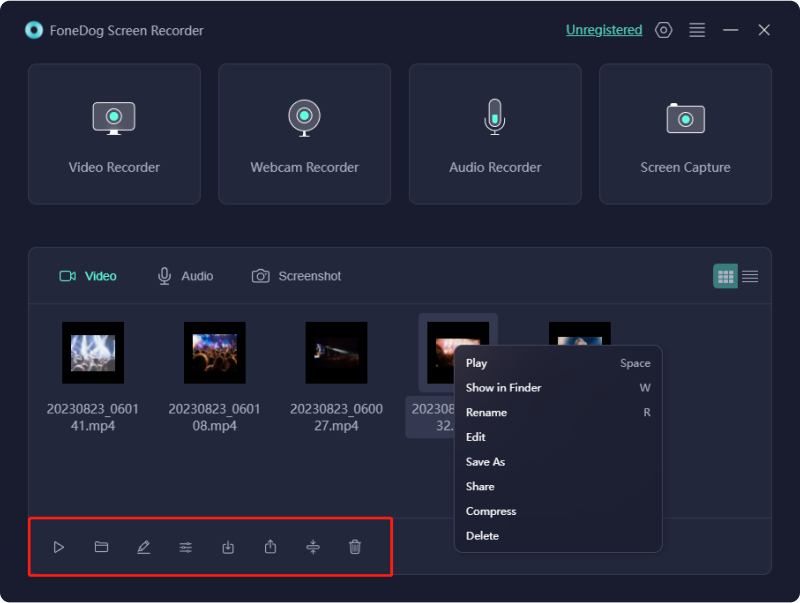
FoneDog Screen Recorder empowers you to capture, create, and share your screen content with ease, making it an invaluable tool for professionals, educators, gamers, and content creators. With its comprehensive features and intuitive interface, it stands out as the ultimate screen recording solution for all your needs.

People Also ReadCapturing the Moment: Choose the Best GIF RecorderComplete Guide: Capturing with Movavi Screen Recorder

Conclusion

In conclusion, Steps Recorder Windows is a valuable ally in simplifying your computing experience. With its ability to record and document your actions, troubleshoot issues, and create tutorials, it's an indispensable tool.

From capturing the intricacies of software problems to sharing step-by-step guides, Steps Recorder empowers users to communicate and resolve issues with ease. Start using Steps Recorder today to streamline your computer-related tasks and enhance your overall digital journey. Your computer challenges will become a thing of the past.

Leave a Comment

Comment

Comment ()
author image

Adela D. Louie

Tech Website Writing /Content Optimization

Singing, smiling, surprising every day!

So as a technical writer, it is my duty to gather effective and reliable solutions to answer questions on how to deal with the issues they are having with their devices.

Screen Recorder logo

Screen Recorder

Powerful screen recording software to capture your screen with webcam and audio.

How Do You Like This Article?

Check icon/ Check icon

INTERESTINGDULL

Check icon/ Check icon

SIMPLEDIFFICULT

Thank you! Here' re your choices:

Rate This Article: Excellent

Rating: 4.7 / 5 (based on 94 ratings)

Screen Recorder logo

Screen Recorder

Powerful screen recording software to capture your screen with webcam and audio.

FoneDog uses cookies to ensure you get the best experience on our website. Click here to learn more.