FoneDog Screen Recorder
FoneDog Screen Recorder
Special Offer
Special Offer


By Vernon Roderick, Last updated: June 4, 2024
Technology offers us to work conveniently with our devices and to save our various important files such as photos, music, videos, documents, applications and many others where we can easily access and navigate to these files any time when we need them.
However, we cannot always have it as infallible. There are times that mistakes happen such as when we accidentally overwrite a file and save the changes while working on it. Data issue is a common problem that anyone can encounter. This involves loss of data may it be deleted, missing or corrupted data.
This article will guide you on how to recover overwritten files. There are several methods presented here that will help you roll back the changes and restore the file to its original or previous versions.
Moreover, a data recovery tool is also introduced to quickly and safely recover overwritten files and lost or deleted data in any sort of format from any of your devices. Recovering files will not be difficult now because of the available data recovery program such as FoneDog Data Recovery which is discussed more in detail below.
After some years of writing software, we have created a professional and reliable data recovery tool for everyone.
Check this tip: Download FoneDog Data Recovery to quickly restore overwritten files or any types of data in simple steps. If you want to try some other manual methods, we have also collected some great information and basic solutions below.
Data Recovery
Recover deleted image, document, audio and more files.
Get deleted data back from computer (including Recycle Bin) and hard drives.
Recover loss data caused by disk accident, operation system crushes and other reasons.
Free Download
Free Download

Part 1: How to Recover Overwritten File Using Previous VersionsPart 2: How to Recover Overwritten File Using Backup and RestorePart 3: How to Recover Overwritten File on Mac via Time Machine BackupPart 4: How to Recover Overwritten File on Mac Using Previous VersionsPart 5: How to Recover Overwritten File via Undo OptionPart 6: How to Recover Overwritten File via Cloud BackupPart 7: How to Recover Data Loss Using FoneDog Data RecoveryPart 8: In Summary
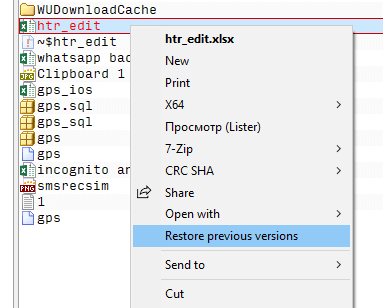
This section will teach you the basic process on how to recover the overwritten files from your computer by restoring its previous versions in Windows OS. This may work for those files that are recently overwritten or not many computer operations have been done yet on the device.
As soon as you realized that you have overwritten a file and saved it, stop immediately in doing further work on your computer and do recover overwritten files right away. Make sure that you have backups to restore.
If after doing the steps above in restoring the previous versions of the file do not work, read the discussion of the data recovery tool in Part 7: How to Recover Data Loss Using FoneDog Data Recovery.
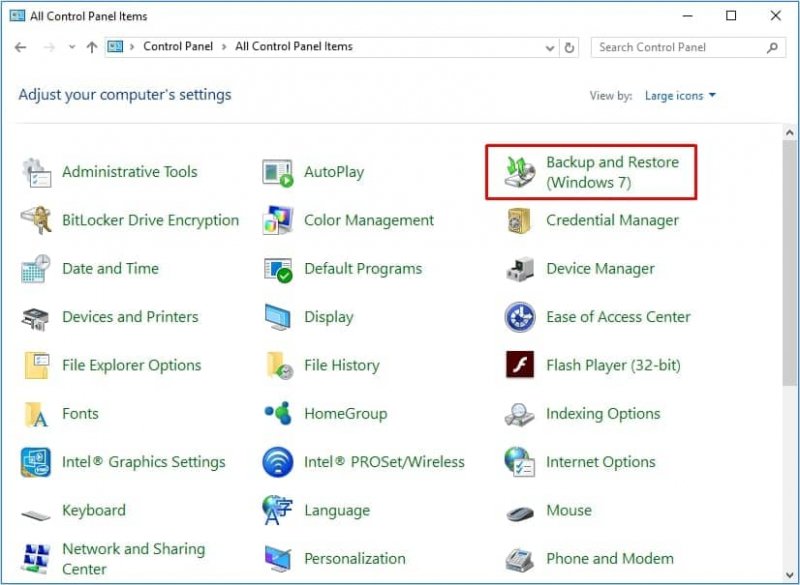
This section will provide the basic information on how to restore an overwritten file on your computer by using Backup and Restore in Windows. Make sure that you have the backups to recover overwritten file and that the device or media drive where you saved your backup file is connected to your computer before you do the file recovery.
To know how to create a regular backup of your files, use File History and follow these steps:
This section will provide you with the step by step instructions on how to recover overwritten files using the Time Machine backup in Mac. The Time Machine is a utility that will do a regular backup of your files automatically when set.
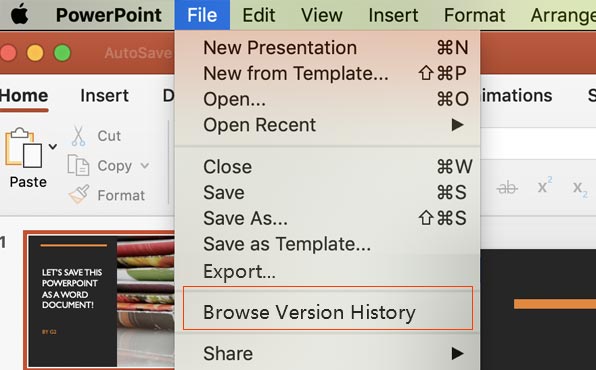
This section provides the information on how to recover overwritten files in Mac by utilizing the Mac file system which you can roll back to the previous versions of the file and restore it.
-OR-
This simple method will teach you how to recover overwritten files by undoing the changes or deletion in the folder.

This simple process will guide you on how to recover overwritten files from your Google Drive and iCloud if you have made backup copies of your files in the cloud. This will need you to connect to the cloud and log on to your account.
Data issues will not be a problem anymore, thanks to FoneDog Data Recovery, a reliable and professional data recovery program that will allow you to restore any type of file from any device such as computers including Recycle Bin, hard drive, USB flash drive, memory cards, digital cameras, and other removable drives.
You can recover any format of files such as an image, audio, video, document, archive and other files from any problematic situation. FoneDog Data Recovery securely and safely recovers your files without you worrying about any data loss.
With this tool, you can do three easy steps such as launch, scan, and restore. Available for both Windows and Mac operating systems, the FoneDog Data Recovery tool offers a free version for you to try.
You can also purchase the tool with a 30-day money-back guarantee and full-packed features.
Launch the FoneDog Data Recovery program after you have downloaded and installed the application. Open the shortcut icon located on your desktop or click its pinned icon on the taskbar (if a shortcut is created or the app is pinned to the taskbar). You can also look for the FoneDog Data Recovery tool by going to Start and search it from the Programs list.
Data Recovery
Recover deleted image, document, audio and more files.
Get deleted data back from computer (including Recycle Bin) and hard drives.
Recover loss data caused by disk accident, operation system crushes and other reasons.
Free Download
Free Download
You can recover any type of files such as a photo, video, audio, email, document, archive, and other files. Select the file types to recover and the disk drives (hard disk drive or removable drive) where you want to recover overwritten files. It is important to note that while doing the restore, make sure a good connection is established between the computer and the media device.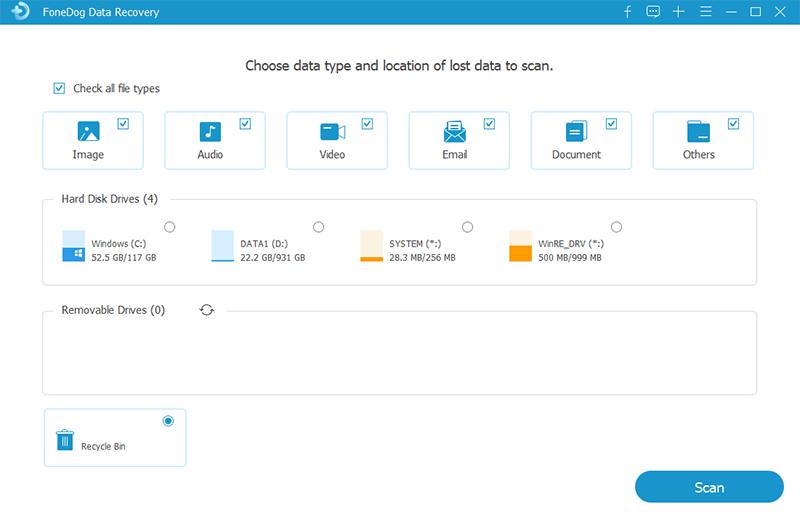
Select the scan mode: quick or deep scan. If the first scan does not return the files that you want to restore, you can do the next scan mode which is the Deep scan. It takes longer to complete but returns more results. Click on the Scan button to proceed. Results will be returned based on the options you have selected or entered.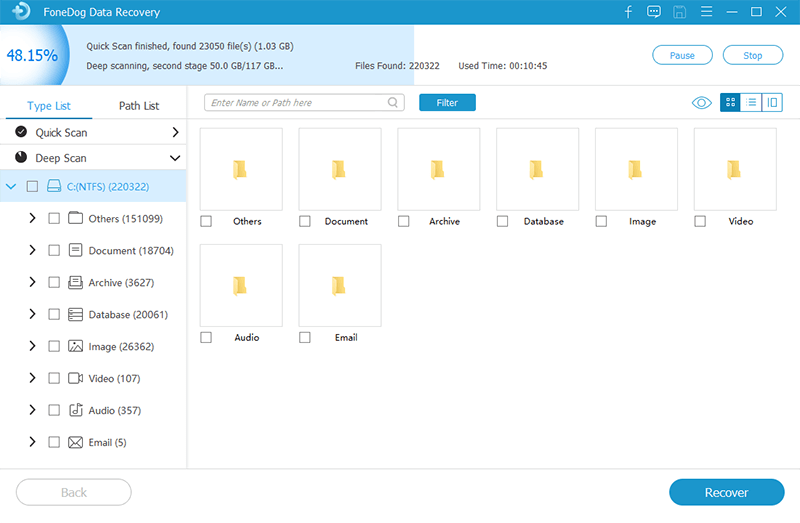
You can choose to preview the files that you want to recover after the data scan and filter the results. Select the files that you want to restore and click the Recover button. Wait until the recovery process has completed its run making sure that you do not shut down or restart your computer during the process to prevent errors.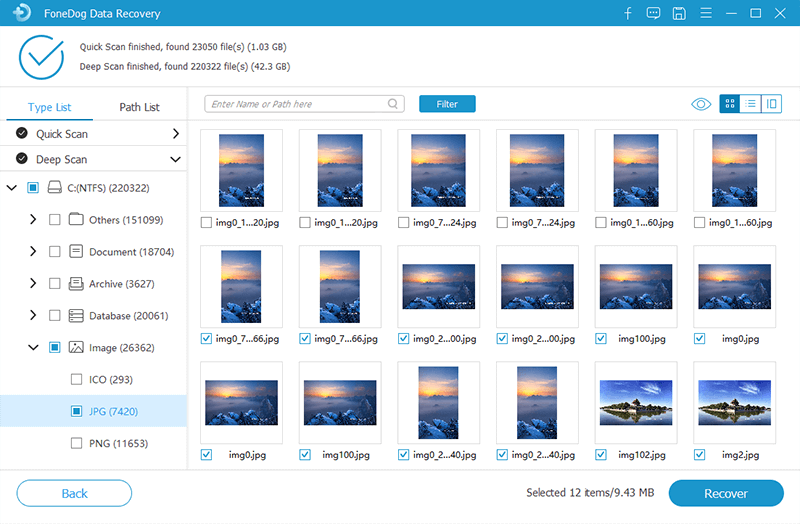
Mistakes happen such as in the case of overwriting files in our devices. It makes us disappointed when we experience this kind of situation. But you do not need to worry as there are several processes discussed in this tutorial guide on how to recover overwritten files.
It is recommended to always create regular backup copies of your files in other devices aside from your computer so that when systems fail or accidental overwriting and deletion of files happen, you can easily restore the files.
When you have accidentally overwritten a file, stop immediately from doing anything on your computer. Then, do the file recovery as soon as possible. Save the recovered files on another drive or location different from the location where the overwritten file is saved.
If all else fails, FoneDog Data Recovery will help you restore your files of any type may it be an image, audio, video, email, document and other types of files. You can recover the data from any of your devices in any problematic situation. Do the data recovery conveniently and safely with a high success rate and secured data.
Leave a Comment
Comment

Technical Expertise for PC/Website Optimization
One of my passion is to develop software of my own
I write articles to share knowledge about IT technology and some experience in developing my own software, and developing my own software is one of my passions for work.
Data Recovery
FoneDog Data Recovery recovers the deleted photos, videos, audios, emails, and more from your Windows, Mac, hard drive, memory card, flash drive, etc.
Free Download Free DownloadHot Articles
 /
/
INTERESTINGDULL
/
SIMPLEDIFFICULT
Thank you! Here' re your choices:
Excellent
Rating: 4.7 / 5 (based on 86 ratings)
