FoneDog Screen Recorder
FoneDog Screen Recorder
Special Offer
Special Offer


By Gina Barrow, Last updated: July 23, 2017
"How can you recover deleted files from Android phone internal memory? What would you do when suddenly all your vacation photos were gone, and when all along you believed that you saved them all on your phone internal memory? What to do? Help me please~~"
From an Anonymous Android user
Accidentally deleting pictures saved on your phone is really annoying. It will pretty much frustrate you or more likely drive you crazy knowing that you can never have those memories back. The good thing about today’s technology is that almost everything is possible. Thanks to all the engineers and dedicated specialists who devote their time and passion for the growth of technology.
Therefore, your losing data or photos can be recovered regardless of where you store them whether on Android phone internal memory or its SD card. What matters now is how you can recover files easily and effectively. In this article, we will guide you on how to recover deleted files by understanding first how the internal memory works.
Part 1. How Files are Being Stored in the Android Phone Internal MemoryPart 2. Set up Micro SD Card as Portable or Internal StoragePart 3. How to Recover Deleted Files from Android Internal Memory?Part 4. Video Guide: How to Restore Deleted Files from Android Phone Internal Memory
Technically speaking, the Android phone internal memory is the hard disk of the mobile device where all the operating system resides including all default apps. The internal memory is the default system storage for mobile devices. All media files like photos, music, and videos are those you can move or transfer to the external memory card or SD card.
Why do you still get “Insufficient Storage” even if you have bigger space for internal memory? This is because the default apps including the operating system take much space even if you have not stored any downloaded apps.
With the most recent Android 6.0, Marshmallow there is a feature that allows you to set up the micro SD card as portable internal storage. Even if the SD card is adopted as so-called “internal memory”, it cannot be used as a substitute for the Android phone internal memory itself.
When you use the SD card to run as the internal storage, it cannot perform exactly as the normal internal storage does. The read and write capability of the Android phone will be affected and will become slower compared to the usual default storage. So arguably using this explanation above, you can, therefore, conclude that the internal memory is still better than the external memory or SD card in terms of performance.
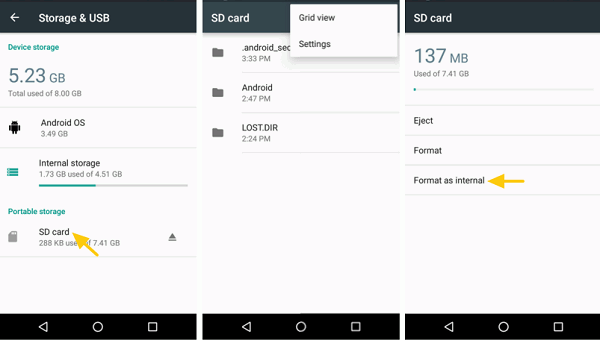
To Use Micro SD Card as Internal Storage
As we mentioned above, your SD card can act as either portable or be part of the internal storage of the mobile device. If you are curious on how to set up the SD card as a portable internal storage, follow these guides:
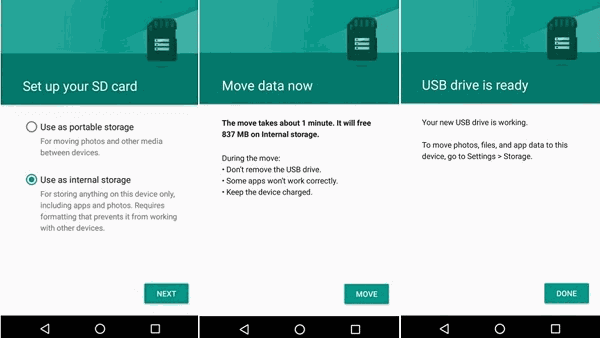
Format SD Card
You can actually format the SD card to let it perform as part of the phone’s internal memory.This will then format the SD card to be a part of the internal storage
Note:
Remember that when you use SD card as a portable internal memory, it will erase files from the SD card so better make sure that when you do this procedure, you have backed up all your important data such as photos, videos, and other media contents.
You can do any kinds of the back as long as you can easily restore them whenever needed. Another important thing to consider is to always choose a speedy SD card when you do so, though it might be costly compared to the regular SD cards, the performance will not be compromised.
If file recoveries for the external memory are easy and flexible, you can also perform Android phone internal memory recovery. You can do recovery on the Android phone internal memory once files are deleted. There could be a lot of reasons why these files were gone but one thing is for sure, you can retrieve them easily as long as these files were not overwritten. The most common cause of file deletion is user-triggered or caused by accidents. But it seemed pretty tough realizing that the files are saved on the internal memory which we all know can be quite difficult to retrieve.
But of course, there is always an exception to the rule. So when you experience data loss or accidental deletion especially to media contents, it is strongly advised that you stop saving new files to avoid overriding of the contents. You see, once a file is deleted the internal memory, it is not yet permanently deleted unless overwritten. The files are hidden somewhere in the device memory and only needs to be recovered using third-party recovery programs since you are unable to locate them unless a third party software will interact.
There are thousands of desktop programs that offer recovery to internal memory but finding the one that will work for you is more difficult than the issue itself. So the problem now is how and where to find the most effective recovery software that can easily retrieve those deleted files from the Android phone internal memory.
If you have been searching the whole internet just to find this recovery software, you have come to the right article. We will introduce you to a recovery program that will definitely save all your heartaches away. There is one good recovery program called FoneDog Android Data Recovery which has so far the highest retrieval rate in the industry and has the most user-friendly interface. clicking through the process is popular even to those who are not technical people.
FoneDog Android Data Recovery is compatible with almost all Android devices and can recover deleted or missing photos, messages, contacts, call history, music, and much more. This program features a preview before recovery which is very helpful to all users to verify the files first before they can download or recover. Just click here to try out how it works with recovering deleted messages.
If you would like to know how to use this recovery program, follow these:
If you have not yet installed FoneDog Android Data Recovery, download and install on your computer and follow the onscreen instructions for successful installation. Launch the program right after.

Using a USB cable, you need to connect the Android phone to the computer by making sure that the USB debugging has been enabled. If not, you can manually enable the USB debugging by going to Settings> Scroll down and find About Phone>Tap the Build Number seven (7) times with a patterned succession or when you see a message that says “You are under Developer mode”> Go back to Settings> Tap Developer Options> Tick the USB Debugging box to enable.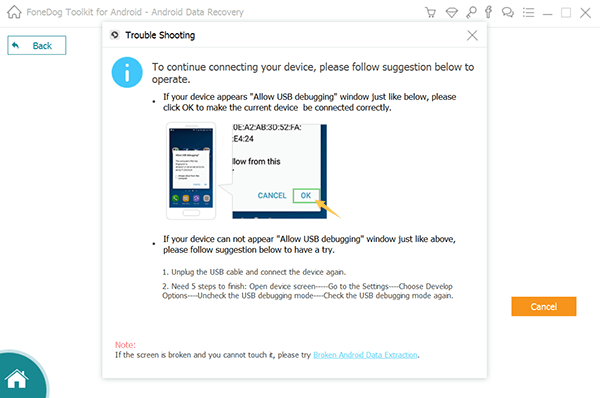
On the next screen, you will see all the available files you can recover such as Contacts, messages, call logs, documents, gallery, audio, and much more. Choose the files you want to be recovered and click Next to continue.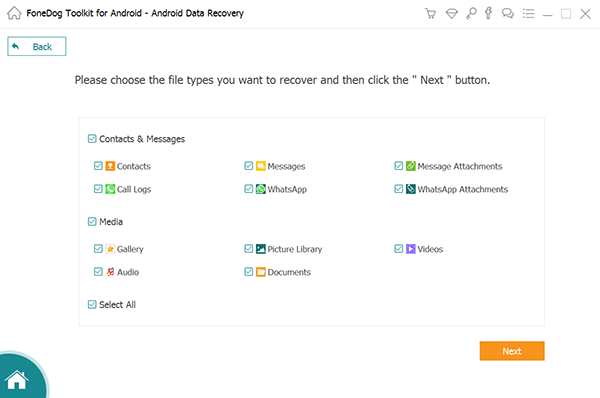
Once you have selected the type of scanning, FoneDog Android Data Recovery will take its time to scan your Android device. The scanning time may take some time depending on the total amount of data to be recovered.
After the scanning is completed, you will see all the files stored on the Android phone internal memory on your computer screen. You can go over each file category on the left side and preview them on the right side. You can verify and confirm each recovered item by simply ticking the boxes beside each. Once you have completed the files to be recovered, click on the Recover button on the bottom of the screen. This will create a folder on the computer based on the location you wanted.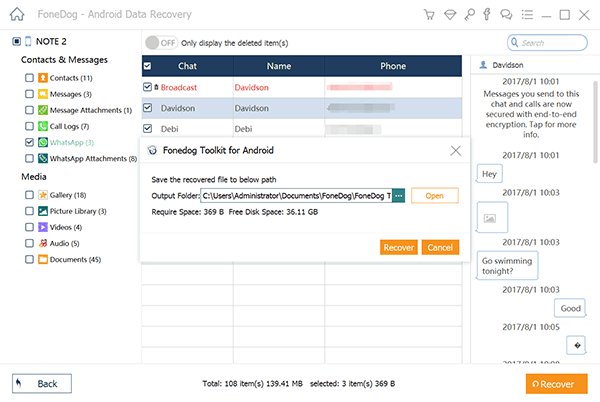
That’s it! You just simply followed a simple guide on how to recover deleted files on Android phone internal memory easily. There is no need to be an expert in order to get your important files back. You only need FoneDog Android Data Recovery and you are safe.
Leave a Comment
Comment

Technical/Creative Writer
Kitchen, my safe space; black, my favorite color
Was a Technical Specialist for a while, troubleshooting Smartphone and Software-related issues until a writing stint caught my attention.
Android Data Recovery
Recover deleted files from Android phone or tablets.
Free Download Free DownloadHot Articles
 /
/
INTERESTINGDULL
/
SIMPLEDIFFICULT
Thank you! Here' re your choices:
Excellent
Rating: 4.6 / 5 (based on 82 ratings)
