
By Nathan E. Malpass, Last updated: March 1, 2023
Editing images and videos require a lot of tools and techniques. One such technique you may want to do is to put multiple videos in one screen. This is possible with the right tools at your disposal. Here, we will discuss how to do it.
In addition, we will tell you the top tools you can use to put multiple videos in one screen. Finally, we will provide a bonus tip regarding the best conversion tool you can use.
Part #1: How to Put Multiple Videos on One Screen through iMoviePart #2: Other Tools to Put Multiple Videos in One ScreenPart #3: Bonus: The Best Video ConverterPart #4: Conclusion
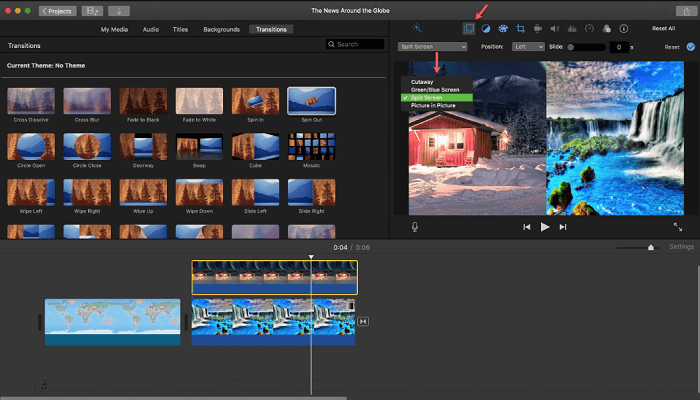
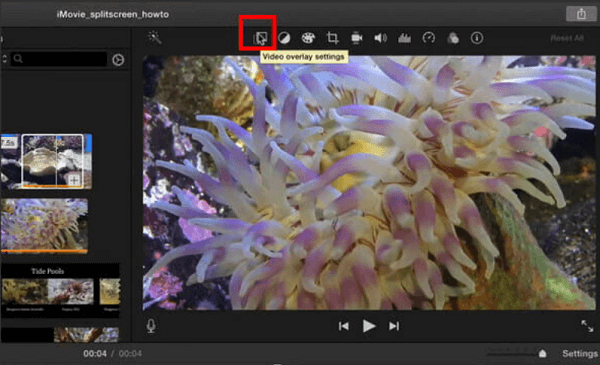
The Split-Screen feature can be used to join two clips so that they both play simultaneously. You can also choose whether the attached clip shows on the frame's right, left, bottom, or top and whether it glides within its frame. You can customize the duration of a slide-in transition and even utilize a frame-by-frame video-editing toolkit.

Above the viewer, the controls for split-screen will be displayed, and cropped representations of the two clips will actually be displayed within the viewer. Move the clip within the interface’s timeline to a different position. Or, you can also drag it towards another position to alter when the effect of split-screen appears. You may also lengthen or shorten it by dragging the ends to put multiple videos in one screen.

Windows Movie Maker is included in the Windows Live Essentials package and is available for free to Windows users. Install this Microsoft package if you want to put multiple videos in one screen but you don't already have it.
Windows Movie Maker features a rudimentary timeline and supports drag and drop. Because it offers a restricted range of templates and features, it is designed for short editing operations rather than professional or commercial production.
You can add photographs and movies, as well as mic and webcam video recordings, credits, captions, effects, animations, titles, and graphic effects. A video can be split, trimmed, changed in speed, and the start and end positions changed. It allows you to burn the film to DVD or save it in several formats for use on YouTube, Facebook, Vimeo, and other sites.
Overall, this application can be used to make decent films for free software, but it lacks the quality of a professional one because it lacks effects and themes.

The purpose of Movavi's video editing software is to make creating movies and clips as simple as possible, avoiding the competition's often unnecessary complexity. That sounds fantastic, but how well does it work in practice?
After all, making appealing movies frequently necessitates the use of numerous complex tools and skills. You'll also want a program that's responsive and produces a rapid final product. The quick answer is: Yes. Movavi Video Editor Plus is one of the finest at cramming a lot of features into a user-friendly interface.
Movavi Video Editor Plus is refreshingly simple, with clear names for each aspect. You can use random transitions throughout the project, a set transition for all clip joins, or a single transition for the selected clip. You can also choose the length of time.
However, because the UI allows you to select many transitions, you must uncheck all but the one you want to use on a single charge.
Movavi is a program for editing videos with a straightforward, user-friendly interface. Basic keyframing, chroma key, PiP, motion tracking, and titling are included in the package.
It isn't as speedy and it doesn’t have plenty of features as some of the competition, but it allows you to quickly create appealing work.

Wondershare Filmora is a simple and stylish video editing program for beginners. In about 15 minutes, anyone can learn how to use this application, as well as how to put multiple videos in one screen.
The end effects are always beautiful, but if you use the free version, your footage will be watermarked. This photo film maker is positioned as a competitor to Apple iMovie and Windows Movie Maker, according to the makers.
Many essential capabilities of Wondershare video editor include the ability to add animations, overlays, and elements such as text, music, and GIF images to videos. It also includes features that allow users to crop film, change the size of clips, and adapt them all to a specified playback time.
You may also utilize the tilt-shift feature to blur specific areas of the video, remove noise from your video and audio, and so on. However, if you utilize Filmora's free edition, the functionality is somewhat limited.
Its user interface is based on the concept of "all tools in front of you". It will appeal to many beginners who dislike traditional video editing software with confusing tool layouts.
Its trial edition only allows you to export recorded material 10 times, and it adds the Filmora logo to all exported projects.
Pay note to the fees that vary depending on the operating system if you want to operate without watermarks.

- $39.99/year for Wondershare Filmora Personal
- $89.99/year for Wondershare Filmora Pro
- $49.99/year for Wondershare Filmora Personal
- $89.99/year for Wondershare Filmora Pro
You can acquire a full license without having to pay a monthly fee. Students may also be eligible for a discount.
Camtasia is a screen recording and video production software that allows you to record, edit, and share videos. It can assist users in creating content for courses, tutorials, and product demos, among other things. Users can generate videos by recording their desktop screens or using webcams.
Camtasia allows users to customize video templates and add annotations and effects to recordings. This technique works on both Mac and Windows computers.
Music and sound effects can be added to videos using the platform's built-in library. Users may also submit audio clips. Before releasing screen recordings, users can use Camtasia's editing tools to add video transitions, animations, and personalized quizzes. Videos can be uploaded to YouTube, Vimeo, Screencast, or any other web platform...
Camtasia's video editing software is also strong but simple to use, which is the major reason I suggest it. You can not only record and edit content captured on your computer, but also content captured from other sources, such as a video camera or a smartphone. The video editing features in Camtasia are extremely excellent, and they are a large part of what sets it apart from rival products.
In this section, we will discuss the best video converter you can get to put multiple videos in one screen nowadays. This is FoneDog Video Converter. It supports more than 300 different file types for conversion. Plus, you can work with both audio and video files.
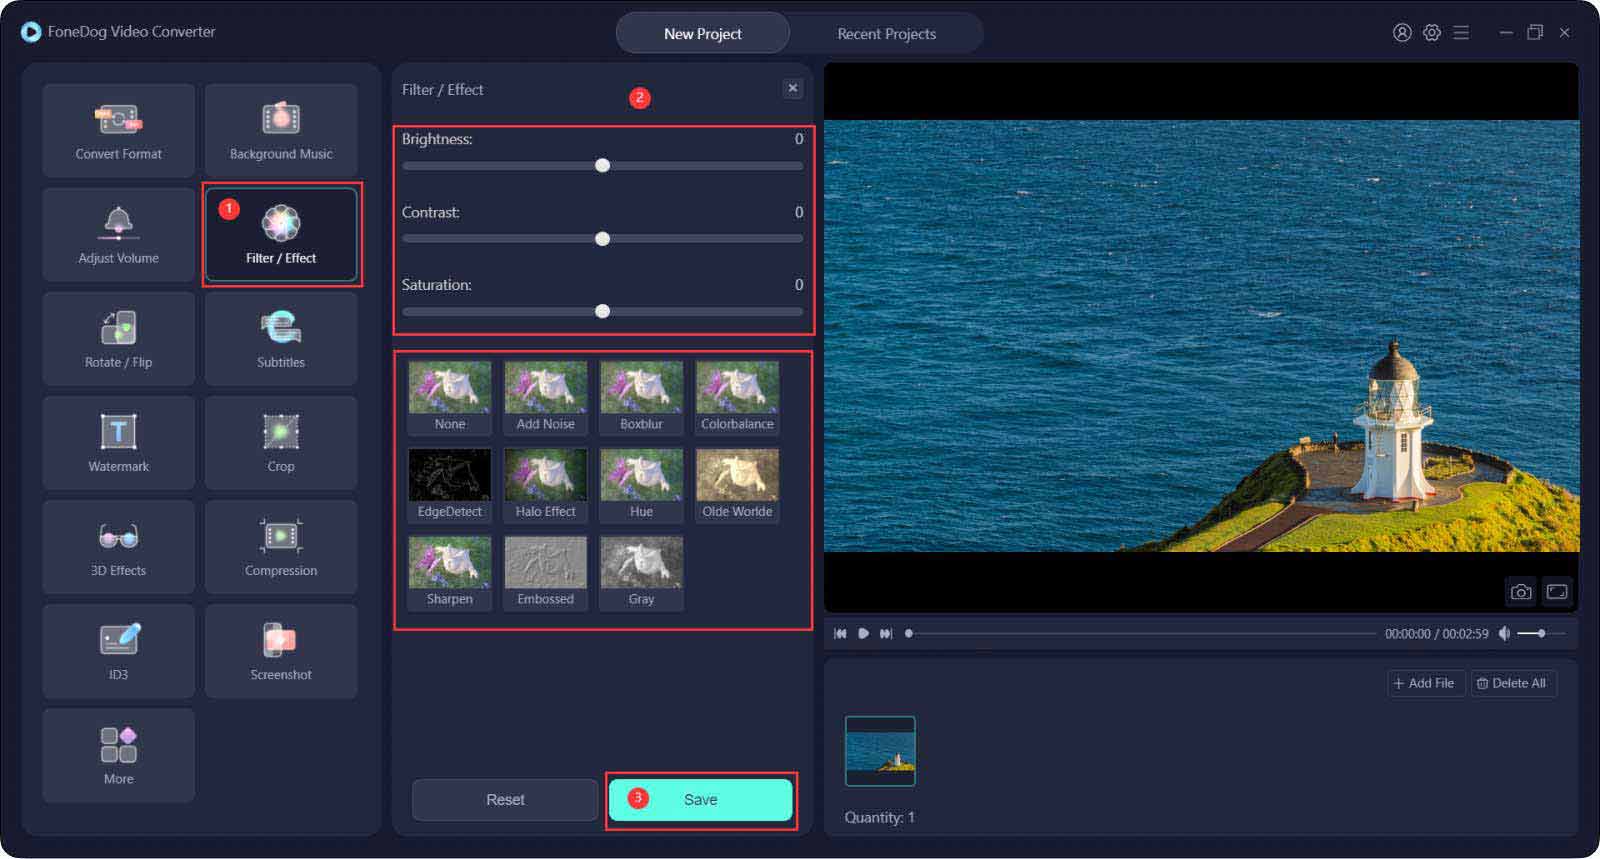
This video-converting tool also has video editing utilities for users. It allows cropping, rotating, trimming, adding subtitles, adding external audio tracks, and adding effects, among others. In addition, you can use it to upscale your videos from a lower resolution to a higher resolution to give the video more clarity.
The tool is very quick to convert videos and audio files too! It works with hardware acceleration technology on your computer to help you achieve the results in a quick manner. In addition, it offers multiple editing options for the users of the tool.

People Also ReadBest Top PPT to Video Converter [2024 Updated]Free FLV Converters - Fastest FLV Files Conversion
This guide has given you the best solution on how to put multiple videos in one screen. We first taught you how to do it with iMovie using its split screen feature. After that, we gave other tools you can use to put multiple videos in one screen. These tools include Windows Movie Maker, Movavi Video Editor Plus, Filmora Wondershare Video Editor, and Camtasia.
Finally, we introduced the best audio and video converter you can get in 2024. This is FoneDog Video Converter, a tool that has multiple capabilities for your entertainment needs. You can use it to convert both audio and video files. In addition, it has video editing capabilities for you to ensure that you make the best output possible.
You can grab FoneDog Video Converter at FoneDog.com. You can even start with the free trial to test out the tool before you actually buy it. Visit their site today and you won’t have to worry about conversion and editing needs!
Leave a Comment
Comment
Hot Articles
/
INTERESTINGDULL
/
SIMPLEDIFFICULT
Thank you! Here' re your choices:
Excellent
Rating: 4.6 / 5 (based on 75 ratings)