FoneDog Screen Recorder
FoneDog Screen Recorder
Special Offer
Special Offer


By Adela D. Louie, Last updated: October 13, 2018
By going through recovery mode, you will be able to fix various issues on your mobile devices. It does not really matter if what you are aiming for to do is to recover, wipe out data, fast boot your Android device or just to get more information about your mobile device. This is where actually going through recovery mode can be very helpful.
Here, we are going to talk about several things about getting to recovery mode on your Android device and we are going to look what it can do and how to enter recovery mode Android.
Part 1: Things You Need To Know About Android Recovery ModePart 2: Things That Android Recovery Can Do For Your Android DevicePart 3: Backup All Your Data Before Going Into Recovery ModePart 4: How to Enter Recovery Mode on Your Android DevicePart 5: Conclusion
People Also ReadThe Top Way to Solve an Error when Entering Recovery Mode
Recovery mode is actually a process wherein it is commonly used and seen on any Apple device. However, Android devices also have this type of process.
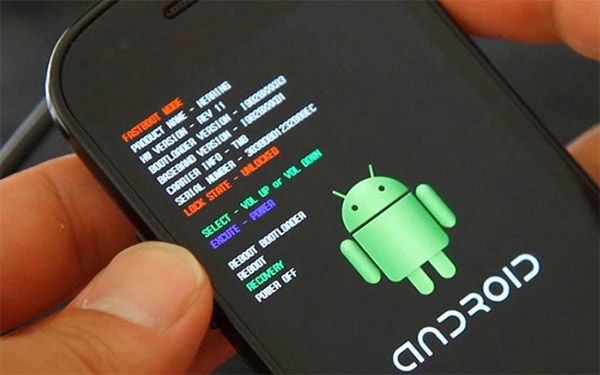
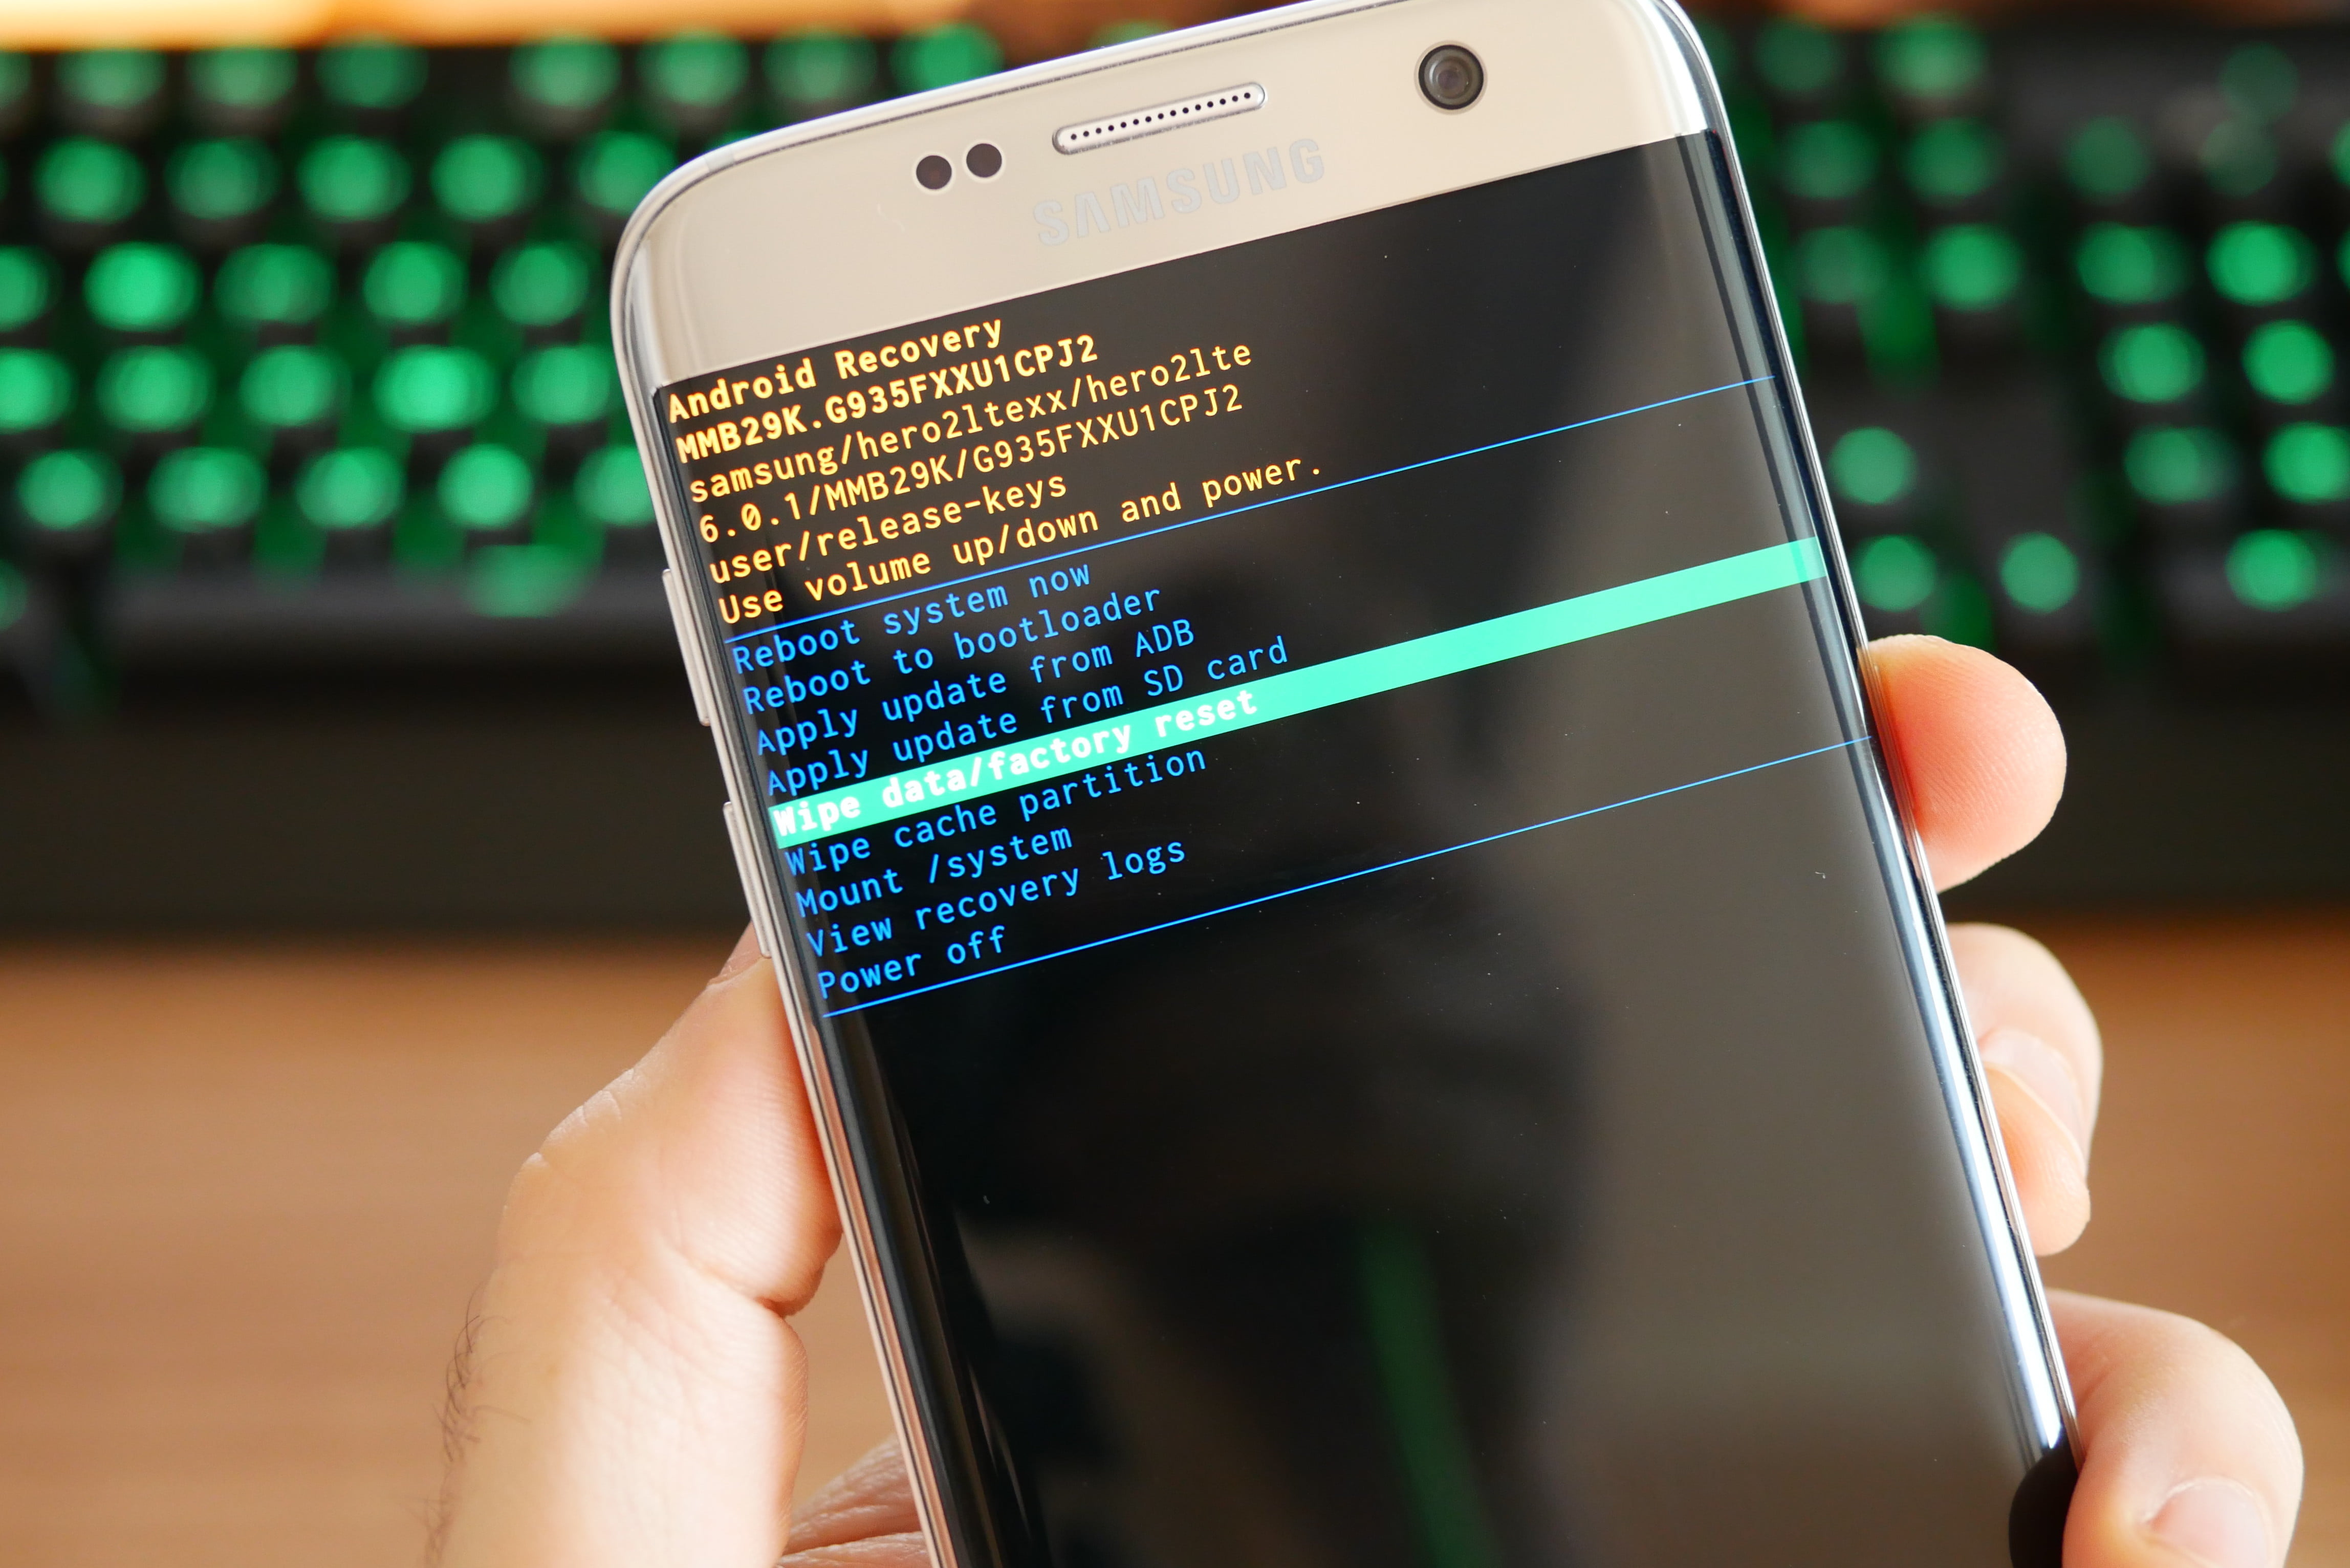
On your Android device, recovery mode actually refers to the bootable partition wherein the recovery console is actually installed. The Android Recovery Mode actually have tools that you can use for you to fix some installations on your Android device and as well as for you to install the updates on your Operating System.
As our technology today grow faster in especially on mobile devices, then you will also start experiencing complexity in terms of its functions that we can do on our mobile devices. This complexity that you are experiencing on your Android device can bring up some issues as well.
This is where Android Recovery Mode can be very useful. This is because of the following that it can do to help you.
These are the things that recovery mode on Android can do for you and also the reason why you must know how you can get in and out of Android Recovery Mode.
As what we have mentioned earlier, there are several things that recovery mode can help you with. However, you must be cautious enough before you enter recovery mode on your Android device.This means that before you proceed, you have to make sure that you backup all of the important data that you have stored on your Android device. You know, just in case that the process is required to wipe out all the data on your Android device. As what they say, you will never know what will happen.
Backing up all the data on your Android device is actually a very simple and easy thing to do all thanks to the FoneDog Toolkit – Android Data Backup and Restore.
The FoneDog Toolkit – Android Data Backup and Restore, obviously as what the name states, it can help you to backup all of your important data from your Android device to your PC. This tool can also help you in backing up your apps and app data.The FoneDog Toolkit – Android Data Backup and Restore will also allow you to review and restore your backup to any Android device that you have. This is because this tool actually supports over 8000 Android devices. Amazing right? Now here is what you need to do to start backing up your data on your Android device.
How to Backup Data Using FoneDog Toolkit – Android Data Backup and Restore:
Step 1: Download and Install FoneDog Toolkit
Of course, the first thing that you need to do is for you to download the FoneDog Toolkit from our official website, www.fonedog.com. Once that you have successfully downloaded the program, go ahead and install it on your PC.
Step 2: Launch FoneDog Toolkit
After successfully installing the FoneDog Toolkit go ahead and run the program on your computer. Here, you have to make sure that there are no any other backup applications that are running in the background. If so, then you have to close those other backup applications and leave only FoneDog Toolkit running.
Step 3: Connect Your Android Device on PC
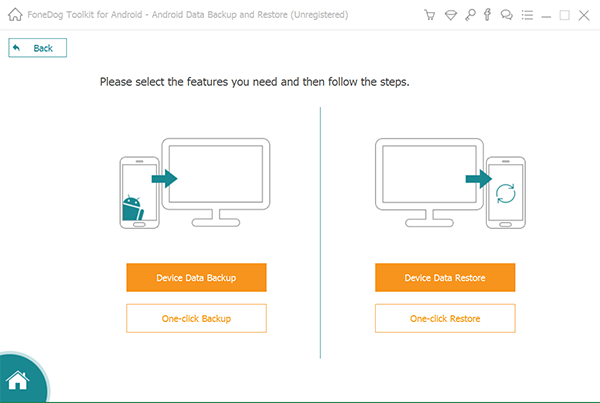
Once that the FoneDog Toolkit is up and running, go ahead and connect your Android device to your PC using your USB cable. And then, on the main interface of the program, go ahead and choose “Android Data Backup and Restore".Here, you have to make sure that USB Debugging is enabled on your Android device. This is for the program to completely get into your Android device and get all the data that is stored there
NOTE: If your Android device is running on a 4.0 or above OS, then you will be able to see a pop-up window that will appear on your screen. All you need to do is for you to allow USB debugging by tapping the “OK” button.
Step 4: Choose Backup Option
Once that you have connected your Android device to your PC, the FoneDog Toolkit – Android Data Backup and Restore will then start recognizing your Android device. Once that your device is recognized by the program, go ahead and click on “Device Data Backup”.The FoneDog Toolkit – Android Data Backup and Restore will then check all your data that you have on your Android device. However, you can still selectively select all the data that you only want to backup.
Step 5: Choose The Type of Data to Backup
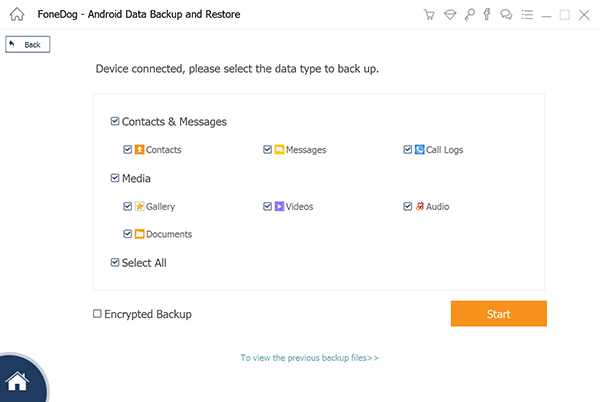
After that, the FoneDog Toolkit – Android Data Backup and Restore will then show you all the file types that it supports to backup. You will be able to see on your screen file types such as Contacts, Messages, Call Logs, Gallery, Video, Audio, and more.From the list shown on your screen, go ahead and choose all the file types that you want to backup by ticking on the checkbox beside each file types. After that, click on the “Start” button.
Step 6: Scanning Your Data
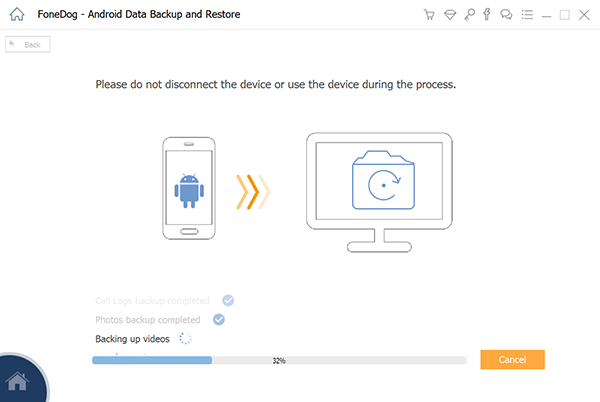
Once that you have clicked on the “Start” button, the FoneDog Toolkit – Android Data Backup and Restore will then begin scanning all the data that you have on the files that you have selected. Make sure that you do not interrupt the process and do not disconnect your Android device from your PC.
Step 7: Backup Complete
Once that the scanning is complete, it also indicates that the process of backing up all the files that you have selected is complete. Therefore, you will be able to view the content of your chosen files. You can also restore the backup made on to your Android device once that you are done with going through recovery mode.

BONUS: Restoring Your Backup on Android Device After Recovery Mode
Now, since that you have a clear backup of all your data from your Android device, you can just easily have them restored on your Android device once that you are done with your recovery mode. As a bonus, here is how you can do it using the FoneDog Toolkit – Android Data Backup and Restore.
Step 1: Launch and Connect
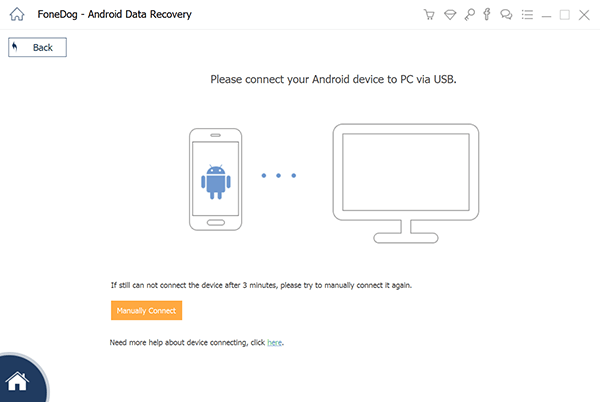
Go ahead and launch the FoneDog Toolkit – Android Data Backup and Restore on your PC. Then, go ahead and have your Android device connected to your PC using your USB cable.
Step 2: Choose Backup File to Restore
Once that the FoneDog Toolkit – Android Data Backup and Restore detected your Android device, go ahead and choose the most recent backup made. You will be able to determine it using the time and the date indicated on each backup file.
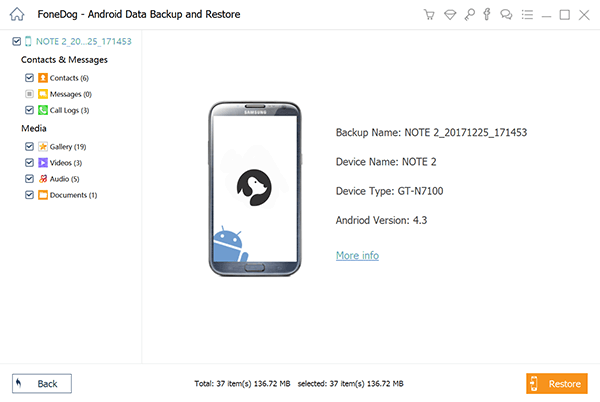
Step 3: Choose Data to Restore
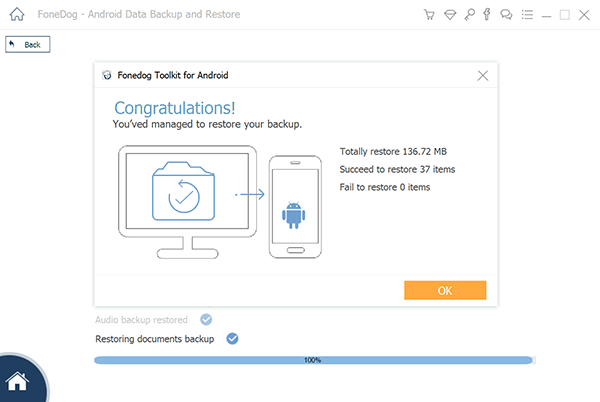
Once that you have chosen the backup file that you wish to restore, go ahead and click on the “Start” button. The program will then start scanning your backup file.Once that the scanning process is complete, you will then see file types on the left side of your screen. From that list, go ahead and choose all the files that you want to restore on your Android device and then click on the “Restore” button. Confirm this action by clicking on the “OK” button.Make sure that you do not disconnect your Android device from your PC while the restoration is in process. The FoneDog Toolkit – Android Data Backup and Restore will notify you once that the process is complete.
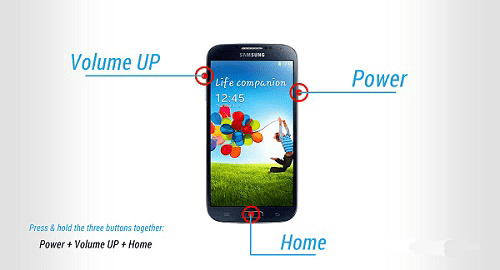
Now that you have made a backup of all the data that you have on your Android device, you can now proceed in going through recovery mode.You can enter recovery mode using the hardware keys of your Android device. This is the reason why this is the last option used if you are going to make some troubleshooting on your Android device.However, how you enter your Android device into recovery mode actually depends on the brand of your Android device. Some brands have the same way in entering into recovery mode and some are entered differently from the others.Because of this, here are the steps with how you can enter recovery mode depending on your Android device.
If you are using phones such as Google Pixel 2, Pixel XL, or a Nexus P6, then here is how you can have it enter recovery mode
Getting your Android device into recovery mode is very easy and can become helpful for your Android device to fix some issues that you are experiencing with it. However, you have to make sure that always backup your data on your Android device so that you will not lose any of your important data. And the best way for you to back up your Android device is by using the FoneDog Toolkit – Android Data Backup and Restore.
Leave a Comment
Comment

Tech Website Writing /Content Optimization
Singing, smiling, surprising every day!
So as a technical writer, it is my duty to gather effective and reliable solutions to answer questions on how to deal with the issues they are having with their devices.
Android Data Backup & Restore
Back up your Android data and selectively restore to Android
Free Download Free DownloadHot Articles
 /
/
INTERESTINGDULL
/
SIMPLEDIFFICULT
Thank you! Here' re your choices:
Excellent
Rating: 4.7 / 5 (based on 78 ratings)
