FoneDog Screen Recorder
FoneDog Screen Recorder
Special Offer
Special Offer


By Nathan E. Malpass, Last updated: August 8, 2020
How can I fix iPhone stuck in recovery mode when upgrading to iOS 11.3? Today I downloaded and tried to install the new iOS 11.3 on my iPhone 6s. After having an error stating that the download of iOS 11.3 could not be installed. Now, my iPhone 6S stuck in recovery mode during iOS 11.3 upgrading. Has anyone ever been in this situation that your iPhone 6 stuck in recovery mode even though clicked Restore or Update? Please help me! ~Sara
So here you are using your iPhone and looking to upgrade it to the newest update available. You plug in your Apple device and expect nothing out of the ordinary to happen - except something does happen.
You notice Recovery Mode is activated on your iPhone, and you attempt to exit it, but the Recovery Mode stays the same. Yes, my fellow iPhone enthusiasts, you have guessed it - your iPhone is stuck in Recovery Mode, a bit ironic isn’t it?
Let’s face it, the iPhone is not immune to errors and malfunctions. Like any device in existence, the iPhone has a host of problems that can occur at any moment due to misuse, software issues or hardware damage.
We have to come to accept this fact and with it when your iPhone stuck in Recovery Mode, also accept that troubleshooting and solutions are readily available. This is where the folks at FoneDog come in, and you can rest assured that we have your back. Everything you need to know will all be provided here by yours truly.
With this said, let us now take a look at what exactly has caused the iPhone to get stuck in the first place and how we can ultimately mend the situation. Let us get started!
Part 1. What Causes Your iPhone to Get Stuck in Recovery Mode?Part 2. Getting Your iPhone Out of Recovery ModePart 3. The Easiest and Most Time Efficient Method Fix Stuck on Rcovery ModePart 4. Conclusion and Recommendations
Aside from the main topic where our iPhones get stuck in Recovery Mode due to a firmware update, there are also a few other factors which could bring forth the same problem that your iPhone gets stuck in Recovery Mode. Check out the reasons listed here.
As there may be numerous reasons still out there, these four are the most common. Take note if any of these relate to your situation and take this knowledge along when we now go into actually fixing the problem that your iPhone stuck.
Now that we know a bit more about why our precious iPhones can fall victim to the Recovery Mode loop when we don’t need Recovery Mode at all, let us get into the methods we have laid out for you to get things back to normal.
This method is usually considered the ‘bread-and-butter’ fix per se for most problems on your iPhone 6 or iphone8 even iphoneX. The issue here is that there is a possibility of actually losing data when trying out this method. Let us say that you don’t mind data loss and would really like to get your iPhone working properly ASAP - yes this method is for you then. We recommend you try to backup your data via iCloud or iTunes, before proceeding.
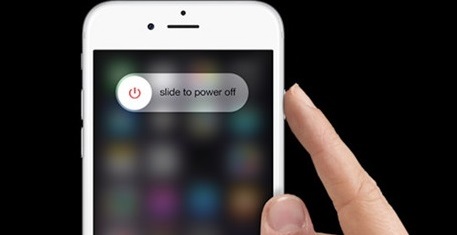
To begin, all you need to do is press and hold the ‘Power Button’ and the ‘Home Button’ together for a few seconds until you see a white Apple logo appear. For newer iPhones, simply use the Volume Down button. The reason for this is because the newer models made the Home Button Touch ID sensitive.
After you have finished the procedure and noticed you got out of Recovery Mode, make sure you recover your back up data immediately.
Now we will get into a more advanced restore, in fact, the deepest restore available for any iOS device, the DFU Mode. Most casual users are not aware of this restore, nor ever need to use it until situations like this arise. It is a mode kept mostly for technicians to use, but anyone can do it as long as you take precautions. If you are confident enough to give it a try, then let us first get ourselves prepared.
Preparation
Precautions

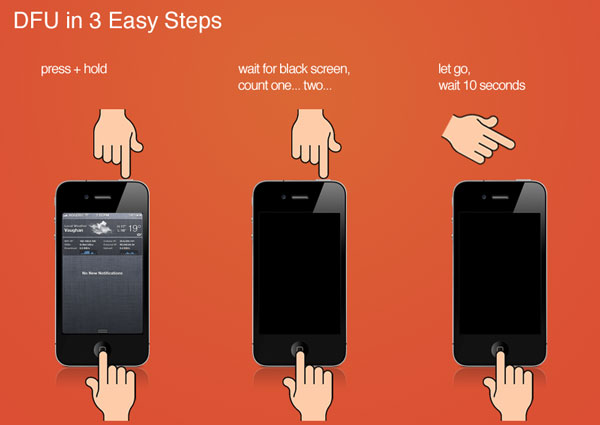
How to Enter DFU Mode (iPhone 6, iPod or iPad)
On your Mac or Windows computer, a screen should pop up indicating that it has detected a device in DFU Mode. (It may say “recovery mode” - but as long as the screen is black you are officially in DFU Mode).
*This process may take a few tries to succeed. Timing is important so proper counting or a timer is recommended.
How to Enter DFU Mode (iPhone 7, iPhone 7 Plus)
Now that you have entered DFU Mode, use iTunes and select ‘Restore’. From here it should be a cake walk. Hopefully, through this method, your iPhone has finally started to act normally again.
How to Exit DFU Mode
In contrast to getting into the DFU Mode, exiting is quite easy.
All you need to do is to first disconnect your iOS device then press and hold down the Power Button and Home Button for 10 seconds.
Alternatively, for the iPhone 7 and iPhone 7 Plus it would be the Volume Down button. The same thing applies for an iOS device which entered DFU Mode through the alternative method.
The Apple logo should appear as an indicator that it is booting up again and successfully exiting out of DFU Mode
Method 3: Using Tiny Umbrella
Sometimes we need an extra helping hand from a third-party program and Tiny Umbrella is just the one we are talking about. You can download this program via Softpedia or CNET and have it installed on your Mac or PC. From there, follow these steps we have provided. Please note that before starting, your data may be at risk of being lost. Once again, backing up via iCloud or iTunes is highly advised.
Once you have completed "Exit Recovery Mode", your iPhone should be able to boot up properly.
If for ever reason your iPhone still has been able to exit Recovery Mode and be seemingly forever in the loop, then do not worry. We have one final method available that is as easy as 1, 2, and 3.
This is where FoneDog - iOS System Recovery becomes a total no-brainer to use. It is important to also take notice that this method will NOT meddle with your data. A great advantage!
Here are the steps for getting your iPhone back into working condition:
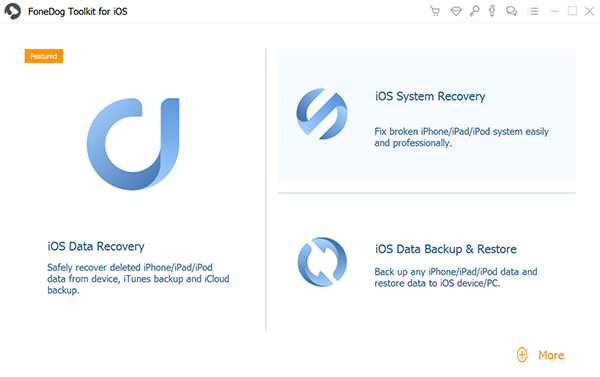
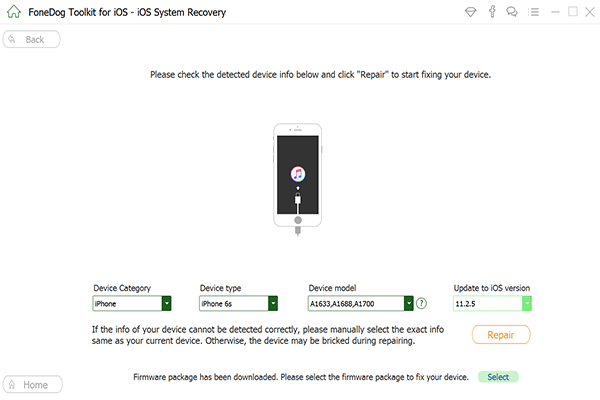
In the main menu, click on ‘iOS System Recovery’. You may have also noticed several other options such as ‘iOS Data Recovery’, “iOS Data Backup & Restore” and the like. These are for anything else you need repairs for. Then Click ‘Start’.
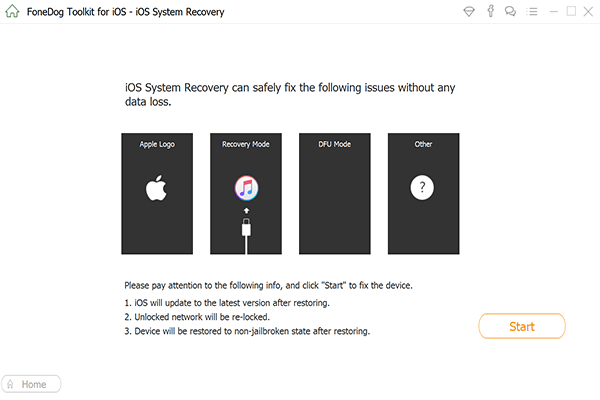
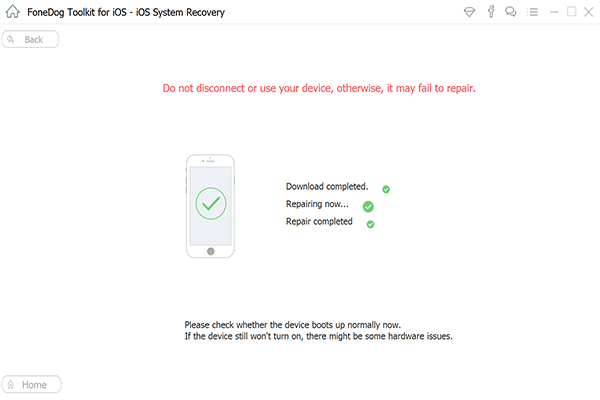
Your iOS device will once again be automatically detected. Its firmware can be updated by clicking on ‘Repair’. Recovery will begin immediately. As you may have noticed, your iPhone has begun working as usual!
Allow FoneDog - iOS System Recovery to finish the process. Finished! You are now ready to use your iOS device like normal.
As you can see, with FoneDog all the work is done for you. You would not need to go through long processes anymore.
It does everything from a complete system recovery to getting your precious data back to fixing those annoying restarts and errors. All you need is a computer or a laptop. We also made it easier than previous versions to get everything done faster!
Hopefully, through use, you have seen how FoneDog - iOS System Recovery has lived up to its promises. Taking care of all your errors of your iOS device quickly, efficiently and with little effort.
Remember, if you unfortunately forgot to make a backup of your data on your iOS device, you actually do not have to worry at all. To solve this, we recommend using the FoneDog - iOS Data Recovery software. Anything that you lost, will immediately be restored 100% guaranteed.
Know that since you do not need to go to the repair shop anymore, you will be assured that all your data is kept safe. No longer would you need to leave your device in someone’s hands which may be interested in more than simply fixing. All your data belongs to you, and only you.
In addition, you would not need to wait days since you can get your iOS device like iphone ipad now fixed in minutes! This also includes not having to pay any service fees - how about that!
So all that is left is for you to try out our products! We stand by them 100% and so do our satisfied customers. Be part of the vast amounts of users who always have their device up and running at a full performance!
Leave a Comment
Comment

iPhone/Android Devices’ Maintenance Expert
Staying home, listening to music, writing tech articles
Many people asked me to repair their mobile phones so I have a lot of experience in mobile phone repair, and I know a lot about Android or Apple phones.
iOS System Recovery
Repair various iOS system errors back to normal status.
Free Download Free DownloadHot Articles
 /
/
INTERESTINGDULL
/
SIMPLEDIFFICULT
Thank you! Here' re your choices:
Excellent
Rating: 4.5 / 5 (based on 65 ratings)
