FoneDog Screen Recorder
FoneDog Screen Recorder
Special Offer
Special Offer


By Vernon Roderick, Last updated: February 7, 2020
Do you want to Root your Samsung Phone? Are you one of those phone users who would like to make their devices uniquely their own by changing how the phone interface looks like? Are you annoyed at the many apps on your phone that are pre-installed but you don’t really like, much less use? Do you want to customize your phone as if you’re the one who created it?
If you answered YES to all these questions, then you might just want to root your Android phone! This page will guide you through the different methods of rooting Samsung devices so that you can get “Superuser” access on your Samsung’s Android software!
Part 1. Things to Remember Before Starting the Rooting ProcessPart 2. How to Root Your Samsung Device using FoneDog Toolkit for AndroidPart 3. How to Root Samsung Devices Using iRootPart 4. How to Root Samsung Devices Using Kingoroot
While rooting can help you to gain access to your Samsung phone’s full potential, errors on the rooting process can lead to bricking your phone (you know, a “dead” phone, or one that won't turn on in any way, shape or form, and is literally only useful as a brick). To make sure that this doesn’t happen to you, you should probably remember the following things:
The best way to root your Samsung Device is through our software, the FoneDog Toolkit for Android. After downloading and installing FoneDog Toolkit for Android, simply follow the steps below to root your Samsung Galaxy S3, Galaxy S4, Galaxy S5, G900V, Note 2 or Note 4.
Tip: 4 Methods of How to Solve the Broken Samsung Phone.
Launch the FoneDog Toolkit for Android on your PC and click on “ Root” in the menu.

Using a USB cable, connect your Samsung Galaxy Note device to your PC or laptop.
Make sure that USB debugging is turned on on your device so that the program can detect it. If USB debugging is not turned on, a pop-up message will appear on your phone, asking you to enable USB debugging. Tap on “OK” to enable it.
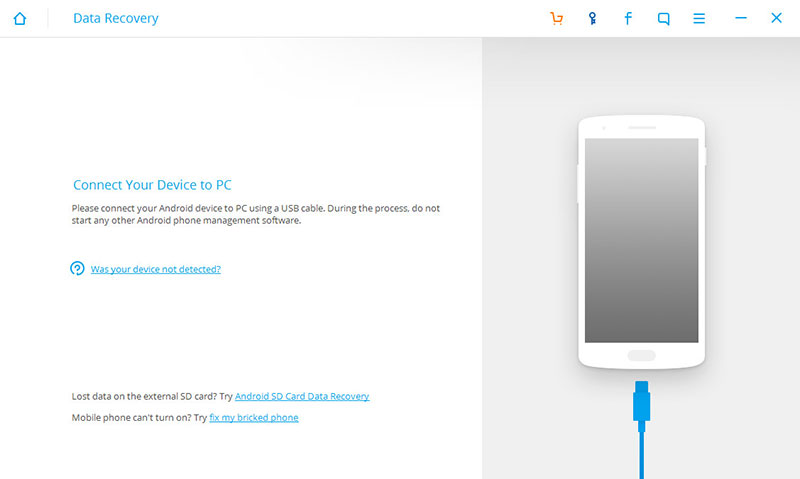
Just wait for a few minutes to allow the program to detect the Samsung Galaxy Note device. You will see as follow.
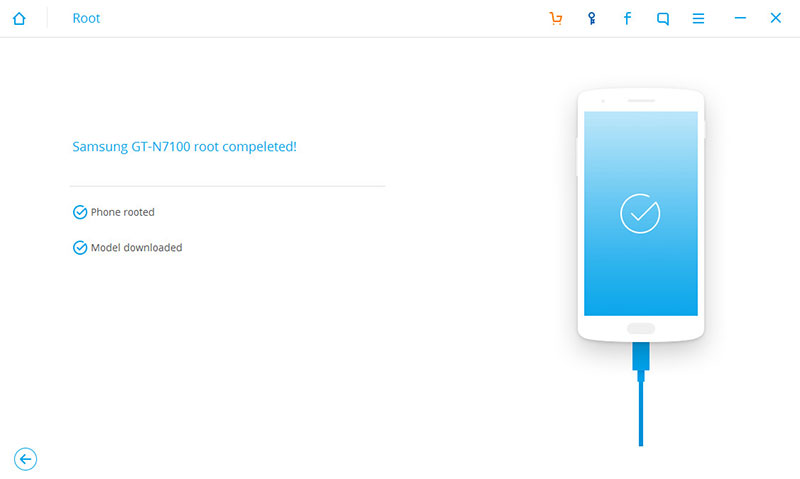
After the program has successfully detected your device, rooting can now begin. Click on “Root Now” to start the rooting process.
During the rooting process, a pop-up message will appear on your Samsung Galaxy Note, asking you if you would like to root the device. Tap on “Confirm” to continue with the rooting process.
After a few minutes, the program will show another window indicating that rooting has been completed. Congratulations, your Samsung Galaxy Phone is now rooted! Quite easy, huh? That’s FoneDog Android Root Toolkit for you!
Another app to consider to root Samsung devices is iRoot. It is not as smooth as Android Root but can be quite a good alternative, especially for Samsung Galaxy S4 users. Check out the software and follow the instructions below!
On your PC or laptop, go to iRoot’s official website (http://iroot-download.com/). Install the software and launch it on your computer.
Make sure to turn on USB debugging on your phone. You can do this by going to your phone’s Settings > Developer Options and by check the USB Debugging box.
Connect your Samsung Galaxy S4 to the PC using a USB cable and launch the iRoot program. It will then check the root permissions on your phone.
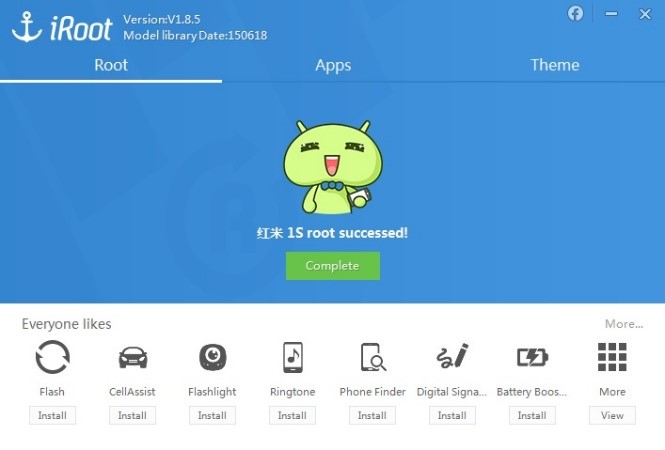
Install the drivers required for your phone and then, click on “Root” button on the iRoot program. This will begin the rooting process on your device.
When the rooting process is done, iRoot will install a SuperSU app on your mobile. To complete the process, click on “Complete” button on the screen.
The last app that we’re going to feature is the widely known application called Kingoroot. This guide will help you to root your Samsung Galaxy S4 using this application. Simply follow the instructions below!
On your PC or laptop, go to Kingoroot’s official website (https://www.kingoapp.com/). Install the software and launch it on your computer.

Connect your Samsung Galaxy S4 to the PC using a USB cable and let Kingoroot do the installation of the drivers for you.
Then, click on “Root” button on the Kingoroot program. This will begin the rooting process on your device.
When the rooting process is done, Kingoroot will show the screen on the left.
And that’s it! Your Samsung Galaxy S4 is now rooted!

Leave a Comment
Comment

Technical Expertise for PC/Website Optimization
One of my passion is to develop software of my own
I write articles to share knowledge about IT technology and some experience in developing my own software, and developing my own software is one of my passions for work.
Android Data Recovery
Recover deleted files from Android phone or tablets.
Free Download Free DownloadHot Articles
 /
/
INTERESTINGDULL
/
SIMPLEDIFFICULT
Thank you! Here' re your choices:
Excellent
Rating: 4.6 / 5 (based on 63 ratings)
