FoneDog Screen Recorder
FoneDog Screen Recorder
Special Offer
Special Offer


By Vernon Roderick, Last updated: January 18, 2020
Here’s a scenario: You were preparing everything you needed for your future activities on your Acer when suddenly, the device encountered severe problems. Perhaps the first thing that comes to mind is the need to rely on professionals.
You might go to a recovery service nearby, or ask your IT friend to do Acer recovery on your device, but that shouldn’t always be the case. Just as how they can do it, you can do it, too.
Before that, though, you should learn about the methods of Acer recovery in detail. And that’s what this article is all about. Let us start with the first method and the one we recommend the most.
Method #1: Recover Acer Files through a Specialized ToolMethod #2: Acer Recovery Management for Acer RecoveryMethod #3: Do Acer Recovery with Acer System RecoveryMethod #4: Do Acer Recovery via Recovery DiskConclusion
People often rely on data recovery services. But little do they know that these data recovery services also rely on one thing, and that is the use of data recovery tools.
Be it their own, or third-party software, they will always have a tool to do Acer recovery. If that’s the case, then as long as you have one as well, you can do what they can do, too. And that’s precisely why we recommend FoneDog Data Recovery.
By now, there must be questions popping in your head.
Data Recovery
Recover deleted image, document, audio and more files.
Get deleted data back from computer (including Recycle Bin) and hard drives.
Recover loss data caused by disk accident, operation system crushes and other reasons.
Free Download
Free Download

What is FoneDog Data Recovery and why should I use it?
FoneDog Data Recovery is your typical tool that professionals often use for recovery tasks, including Acer recovery. That sums up what this software is. As for why you should use it, it’s simply because it’s one of the most powerful tools out there.
For one, it supports most file types, formats, and even file systems. That means it can also support Acer recovery. It is available on both Windows and Mac so there’s no issue with compatibility.
So how can you use this software?
There are three steps you need to follow. Let’s start with the first one.
The software should be downloadable from the official website, and you can easily install it once the file is downloaded. Either way, you’ll see the same interface once you open it, and it should show the file types and location. Simply select the file types you want to recover. There’s also the option to Check all file types. As for the location, it won’t be an option since the drive is fixed and you’ll have to choose the one with your files.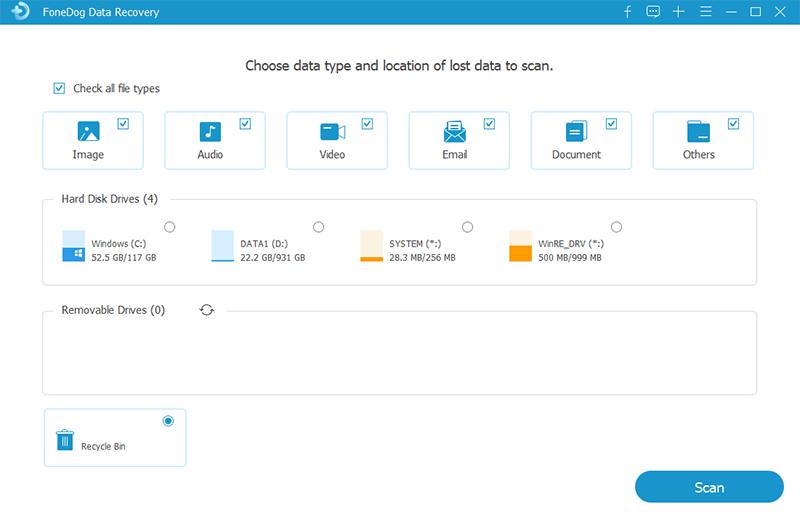
Once you finish configuring, click on the Scan button. The scanning process will go the way you configured it, scanning only the selected file types from the selected drive. You may choose Deep Scan if you feel that Quick Scan is not enough to scan your drive thoroughly.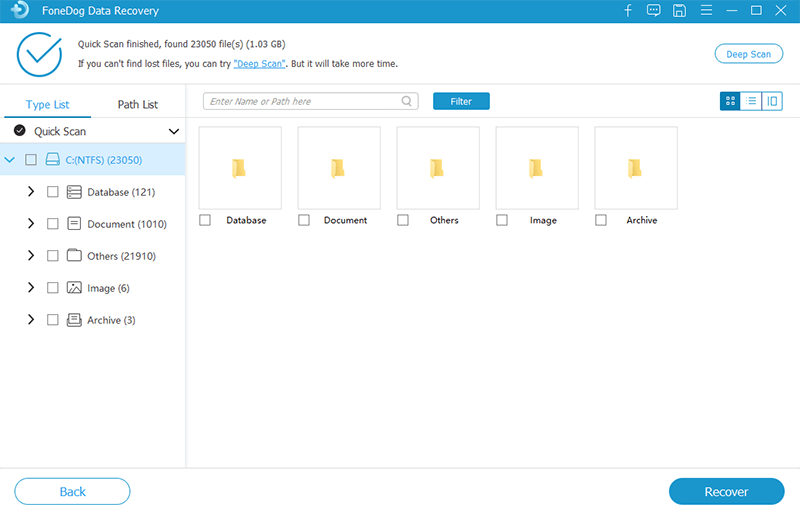
Recovery will be a simple process. You just have to select the files you want to recover from the list that you’ll be getting. You can search for those files either through the Filter function or search bar. Regardless, once the selection is done, click on Recover.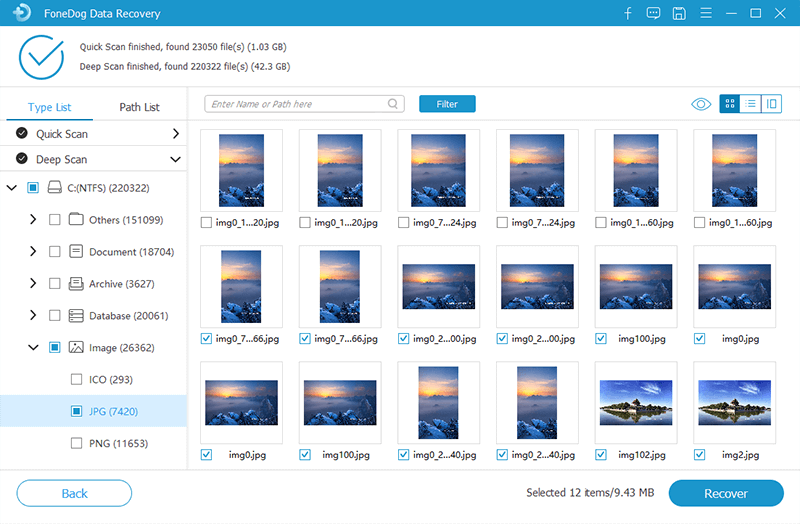
The scanning is accurate with the option to make it more accurate with Deep Scan. The recovery might be simple, but it is also accurate.
At this point, there shouldn’t be any files left to recover. If there are and you’re still missing some files, then it might be better to rely on another method for Acer recovery.
The one we discussed earlier, FoneDog Data Recovery, is third-party software. That means it has nothing to do with Acer, although it is still capable of doing Acer recovery. This time, we have a method that makes use of Acer’s own recovery methods. Thus, we introduce to you Acer eRecovery Management.
Acer eRecovery Management is a built-in tool that contains many functions. One of these functions is Acer recovery. In addition to being effective, you can expect that it is safe and secure as well since it is directly from the Acer corporation.
However, the Acer recovery available with this tool isn’t what you might expect. Instead of recovering individual files, it is one that restores the computer to the factory settings altogether. Either way, it’s an effective method for resolving most issues.
Either way, here are the steps you need to follow in order to use the Acer recovery Management:
There are a number of ways you can launch the tool. For one, you can use the Start menu, then type in “Acer eRecovery Management” on the search bar. You will then be able to see the tool so just click on it. You may also proceed to Start, then head to Programs, go to Empowering Technology, and finally head to Acer eRecovery Management.
Note: There should be a password for launching the software. You should input six zeros since this is the default password.
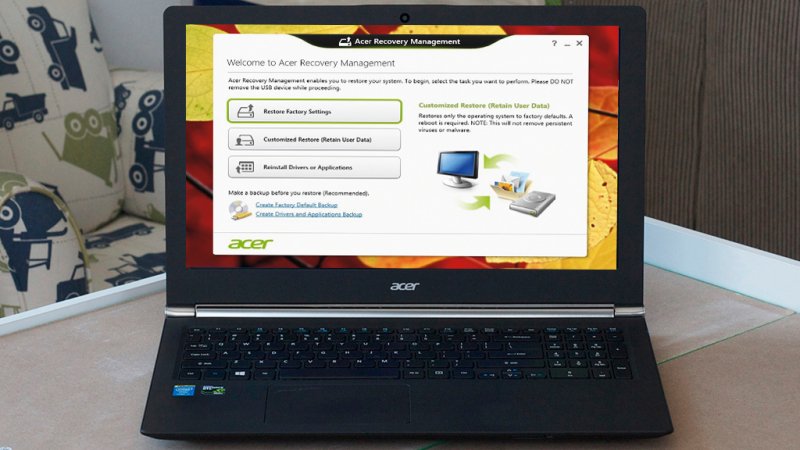
If it’s the first time you’re opening Acer Recovery Management, then you will be prompted to burn a factory image for the disk. You simply have to follow the onscreen instructions until the disk is properly setup.
In addition to creating the disk, you will also be prompted to create a backup. This time, however, it’s not only on the first launch but with every launch. Although it is an optional step, we recommend creating a backup. You will have options for this.
The first one is to create a backup on your hard drive. In able to use this, you have to make sure there is enough space on the hard drive. This is ideal since you can access it anytime. The second one is through a disk. This also has its perks, and one of them is that it is portable.
Regardless of whether you choose to create a backup or not, you can still proceed with the Acer recovery. To do this, you have to go to Recovery actions.
There will be a list of options, namely ‘Restore factory default image’ and the ‘Restore C: from a user backup image’. Either one will do to help you conduct Acer recovery.
That’s pretty much everything you need to know in order to do Acer recovery using this tool. But what if you can’t access it? In such a case, we recommend finding the tool manually, and that’s our next option.
Although it is a manual method for the second option, it also has its unique functions. Without further ado, here are the steps you need to follow for the second way of accessing Acer’s recovery function.
To access this function, you have to first power off the device by pressing the power button for at least 5 seconds. Next, you turn it on again. While booting, press the Alt + F10 keys on your keyboard. This should lead you to a screen with a variety of options.
The screen you’ll be shown will show you at least four options, and one of them should be Troubleshoot. Select this option to get another set of options.
On the Troubleshoot section, click on the Reset this PC option. You will, again, have a list of options. There should be two options, namely ‘Remove everything’ and ‘Keep my files’. We suggest selecting Keep my files so as to avoid unnecessary data loss.
Once you’re done with the configurations from steps 1 to 4, the device should be ready to be reset. Now restart your device. It should take longer than expected and it might restart a couple of times before Acer recovery is finished. Once that’s done, just keep on following the on-screen instructions on the device.
That’s about all you have to do to manually do Acer recovery. Although it’s not as convenient as methods #1 and #2, it is still a viable option. Now we head to our last method for Acer recovery.

As you may notice in the first three methods that we discussed, we never used anything but tools. But what if there is a way to make the job easier with the use of another device? This is what using a recovery disk is all about.
A repair or recovery disk is very hard to come by, but you can always get it from the manufacturer along with your device. This is especially true for Acer products.
These repair disks are made so that if you need to do Acer recovery, you can easily do so by connecting it to your device. Without further ado, here are the steps on how to use a recovery disk to conduct data recovery:
To start with, you have to make sure you actually have a repair disk at hand. If you do, then all you have to do is connect that repair disk on the disk reader of the device. This should be done while the computer is shut down.
Once you turn on the device while the disk is connected, there will be a setup window during boot up. Here, you can choose to boot the device from the Acer recovery disk that you used, and we suggest that you do so.
Now follow the onscreen instructions that show up upon booting the repair disk, until you see the repair window. On this window, there should be a Repair this PC option. Click on this option and proceed to do what you did in method #3. Click on Troubleshoot, head to Reset this PC, then select Keep my files.
This time, you will see a list of operating systems. Just choose what you are currently using, then there should be other configurations. Just proceed with how you want until you can see the Repair button which you should then click.
This will refresh the system that you’ve been using up until now, and make it anew. At that point, you no longer have to do anything besides navigating your freshly repaired computer.
Those are the four best ways to do Acer recovery.
Data Recovery
Recover deleted image, document, audio and more files.
Get deleted data back from computer (including Recycle Bin) and hard drives.
Recover loss data caused by disk accident, operation system crushes and other reasons.
Free Download
Free Download
Without a doubt, Acer is easily one of the most popular and effective brands when it comes to electronics. This is especially true with storage devices. However, it’s still far from being perfect. That’s why you should expect some issues when using it.
Fortunately, we have already discussed these four different ways to do Acer recovery. Although that should solve the problem, it would only be temporary. For that reason, we suggest coming up with preventive measures next time.
Leave a Comment
Comment

Technical Expertise for PC/Website Optimization
One of my passion is to develop software of my own
I write articles to share knowledge about IT technology and some experience in developing my own software, and developing my own software is one of my passions for work.
Data Recovery
FoneDog Data Recovery recovers the deleted photos, videos, audios, emails, and more from your Windows, Mac, hard drive, memory card, flash drive, etc.
Free Download Free DownloadHot Articles
 /
/
INTERESTINGDULL
/
SIMPLEDIFFICULT
Thank you! Here' re your choices:
Excellent
Rating: 4.8 / 5 (based on 64 ratings)
