FoneDog Screen Recorder
FoneDog Screen Recorder
Special Offer
Special Offer


By Gina Barrow, Last updated: January 27, 2020
Technology allows us to keep mobile and still get the things we need to be done. To keep up with this setup, a computer is not the most ideal choice. You can get similar benefits and features as you would with a computer but with more fluidity through the use of a laptop. Among laptop brands, Asus laptop is a popular choice.
Many companies and businesses choose Asus laptops for their employees and the workforce. For some unforeseen reasons, we may require an Asus laptop recovery to move forward with the business. Restoring an Asus laptop back to its factory settings can be done more for a myriad of reasons.
There is the reason the hard drive needs to be formatted or that the operating system needs reinstallation to remove the virus infection. There can be more reasons behind this. What is important is that we know how to get this job done. Before we proceed to this step, we need to ensure that we keep our data safe and secure first.
Part 1 - How to Retrieve Data via Data Recovery Before Asus Laptop RecoveryPart 2 - How to Restore Asus LaptopPart 3 - How to Use the Asus Recovery Key to Restore the Failed SystemPart 4 - Ending Note
Keeping backup and recovering data are some steps to consider before having an Asus laptop recovery. Foremost, have you to ensure that no data will be lost. For sure, your laptop will contain important data. Don’t let them go to waste and guarantee that they are safe with the help of FoneDog Data Recovery. Here are the things you should do:
Download and install FoneDog Data Recovery software on your computer. After installation, launch the software.
Data Recovery
Recover deleted image, document, audio and more files.
Get deleted data back from computer (including Recycle Bin) and hard drives.
Recover loss data caused by disk accident, operation system crushes and other reasons.
Free Download
Free Download

Data retrieval is easy with FoneDog Data Recovery. It is compatible with different data types, so you are guaranteed to recover any type of data you have. To recover data, just choose the required file type and the disk for data retrieval. After that, begin scanning.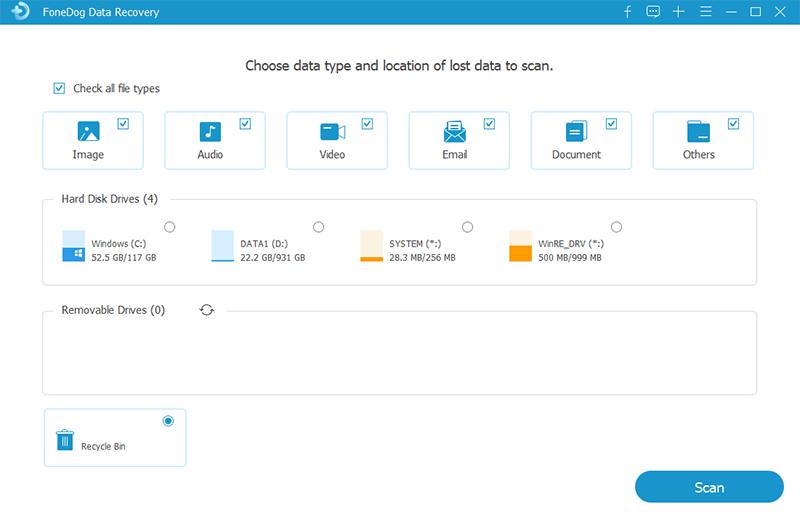
A list of deleted files will show. Select the data you need to retrieve ad hit “Recover.” Wait until the recovery process gets done.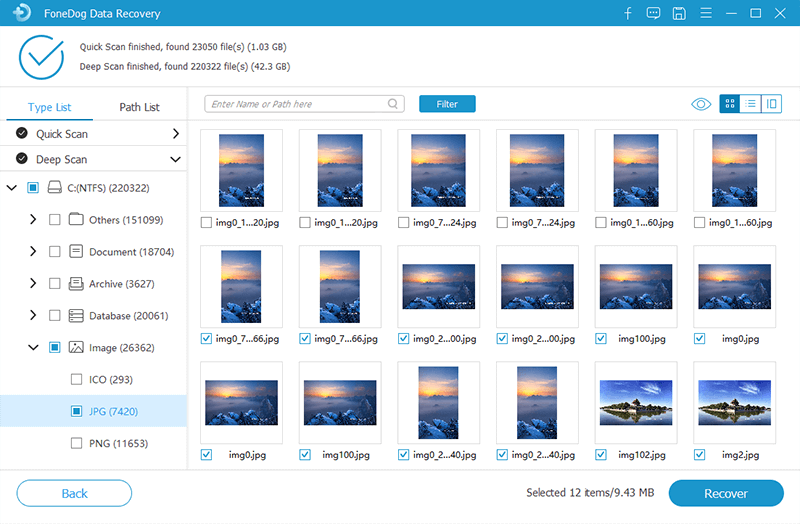
FoneDog Data Recovery is a powerful and professional data recovery software ideal for Asus laptop recovery. It offers a free trial and a 30-day money-back guarantee that gives you a win-win every time. With FoneDog Data Recovery, you get efficient and effective data recovery results and high success rates.
Never fear about losing the data in your Asus laptop should you need to restore it. Just have FoneDog Data Recovery handy and all else will fall into place. Get back data fast, safe, and secure with FoneDog Data Recovery! Download the software now and experience first-hand data recovery success.
An Asus laptop is a best friend to many people. At some point in time, you might require restoring it back to its factory settings. Be it to better the performance of the laptop or just simply try to erase the data if you are planning to sell it. There are plenty of reasons for wanting to revive the Asus laptop back to its original form. Follow these steps and restore your Asus laptop as good as new:
This is a quick and simple way to restore the Asus laptop back to its factory setting should you need to have it done.

Not all the time you can successfully boot up Windows in your Asus laptop. When the system fails, you can turn to the Asus recovery key to restore the laptop to factory default settings. Here’s how:
Make sure that you back up and transfer all important data to another device before getting this process done. Using the key to recover the OS will format system partition and will erase all the data it has. This is a great option when you are trying to get rid of virus infections, enhance its performance, or just to prevent data leak if you want to sell it.
Data Recovery
Recover deleted image, document, audio and more files.
Get deleted data back from computer (including Recycle Bin) and hard drives.
Recover loss data caused by disk accident, operation system crushes and other reasons.
Free Download
Free Download
We love how laptops get us around and help us finish the task at hand. We also love how they safeguard and keep important data for us. But when the time comes that we need to go back to where it first started, hence restore factory settings; it is great to refer to this article to correctly get the job done.
And as for the best data recovery software, it’s FoneDog Data Recovery all the way! Download and try the software to guarantee safe and secure data all the time.
Leave a Comment
Comment

Technical/Creative Writer
Kitchen, my safe space; black, my favorite color
Was a Technical Specialist for a while, troubleshooting Smartphone and Software-related issues until a writing stint caught my attention.
Data Recovery
FoneDog Data Recovery recovers the deleted photos, videos, audios, emails, and more from your Windows, Mac, hard drive, memory card, flash drive, etc.
Free Download Free DownloadHot Articles
 /
/
INTERESTINGDULL
/
SIMPLEDIFFICULT
Thank you! Here' re your choices:
Excellent
Rating: 4.8 / 5 (based on 72 ratings)
