FoneDog Screen Recorder
FoneDog Screen Recorder
Special Offer
Special Offer


By Vernon Roderick, Last updated: May 17, 2021
Hard drives are, without a doubt, one of the most important components of a computer. Alas, there are only a few brands of external hard drives out there that can be considered worthwhile, and one of them happens to be Buffalo hard drives. That’s why it has such a huge user base. And with lots of users, it’s natural that there’s that one person who wants to know how to do Buffalo data recovery.
If that includes you, then you’re in luck because today, we’re going to talk about everything one needs to know about Buffalo data recovery. We will also introduce a data recovery software FoneDog Data Recovery, which can not only perform the recovery of buffalo data but also finish the recovery of formatted hard disk or restore Acer, etc.
Part 1. An Overview Of Buffalo External Hard DrivePart 2. Is It Possible To do Buffalo Data Recovery?Part 3. Why Did You Lose Files From Buffalo Hard Drive?Part 4. What Happens When Buffalo Suffers From Data Loss?Part 5. Use A Data Recovery Software To Perform Buffalo data recoveryPart 6. Backup – Data Loss Countermeasures
Buffalo is just one of the many brands for external hard drives. Usually, their products can have a 500GB space to 2TB, although others can exceed the 10TB mark. Simply put, it is easily one of the best brands out there in terms of storage quality.
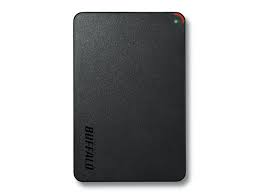
There are two types of these hard drives, namely LinkStation and TeraStation. In addition to the storage, the security is also tight on both of these classifications. Although there are differences between the two, it’s both worth mentioning. That takes us to one of the many questions people ask about the software.
Can data loss occur on a Buffalo external hard drive?
Some people take for granted the quality of the hard drive that they tend to forget that data loss is inevitable. Nothing is an exception in the face of it. With that being said, you shouldn’t think that a Buffalo hard drive is exempted from this fate, no matter how good the product is.
However, considering the size and complexity of the hard drive, you can pretty much guess the magnitude of the problem when data loss occurs on a Buffalo external hard drive. This leads us to one of the most frequently asked questions by users.
This should be the first question you ask yourself when facing data loss. After all, the answer to this question may be what determines whether this article would be useful or not. And as you might expect, Buffalo data to recoveryis absolutely possible. However, another question is, “Can you do the Buffalo data recovery by yourself?” Although difficult, it’s also not impossible, as long as you belong to at least one of these scenarios:
If at least one of these conditions is fulfilled, then you can expect a successful Buffalo data recoveryeven if you do it without direct assistance from professionals. Nevertheless, it should still be complicated enough to make you struggle at the beginning. For that reason, we suggest doing Buffalo data to recoveryin the most optimal conditions possible, and one factor to accomplish this is by learning about the cause.
As usual with any problems, it’s better to know about the reason for its appearance so you can pluck it from the root. That way, not only will you be resolving the issue, you’ll also minimize your chances for the same problem to occur again. So why exactly did the files disappear from your Buffalo hard drive?

In most of these cases, there are different way to tackle them. Regardless, here’s another thing you need to know about data loss so you can make Buffalo data recoverymore likely to succeed.
Now you know what caused data loss. But what happens after that? For one, take note that there are factors that affect the success of Buffalo data recovery. The first one was the cause. The second was is what you do after data loss. With that said, here are some tips you need to remember right after data loss strikes:
With this, you can guarantee the highest possible chance of success for the Buffalo data to recovery. Now we head to our last section which will discuss how you can do Buffalo data recoverythe best way possible.
There are tons of ways to recover your files. However, most of those methods will require you to create a backup beforehand. Unfortunately, many people tend to take their files for granted, neglecting the task of creating backups.
If you’re one of those people, then recovering through a backup isn’t for you. Instead, we have another suggestion, which is by using data recovery software. That’s why we suggest using FoneDog Data Recovery.
So what is FoneDog Data Recovery?
To put it in simplest terms, FoneDog Data Recovery is software that recovers all sorts of files, from small-sized documents to videos that can take up most of your disk space. In short, the software doesn’t discriminate, especially on storage drives. With that said, here’s how you can use the software to do Buffalo data recovery.
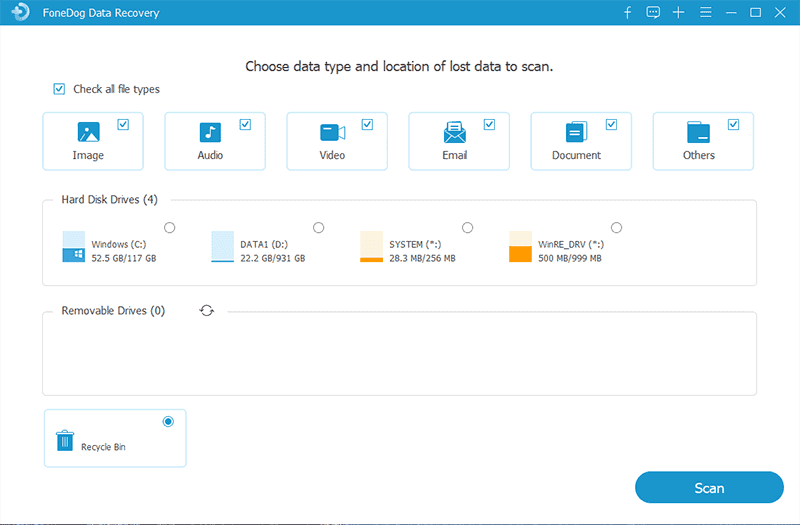
Upon downloading and opening the FoneDog Data Recovery software, you should see an interface that will display the file type and storage drive. For the file type, we suggest clicking on Check all file types. That way, you can cover more ground by choosing this. As for the location, you should be the one who knows where the files were originally located.
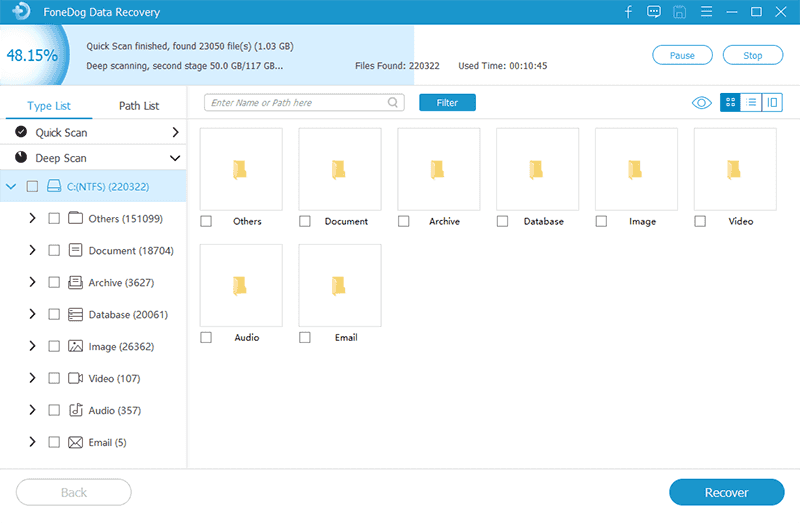
Regardless of how you configure the scan, once you’re done, just click on the Scan button. The Quick Scan will start by default. It should be quicker than normal, but you may also use Deep Scan to continue scanning for more accurate results. The Deep Scan option should be at the top bar with the ‘Quick Scan finished’ message.
Finally, after the scanning process, you will be taken to the third screen which should be filled with files. These are the files that you were supposed to have but lost. Simply click on the corresponding box of the files you want to recover. Once that’s done, click on the Recover button.
This is a paragraph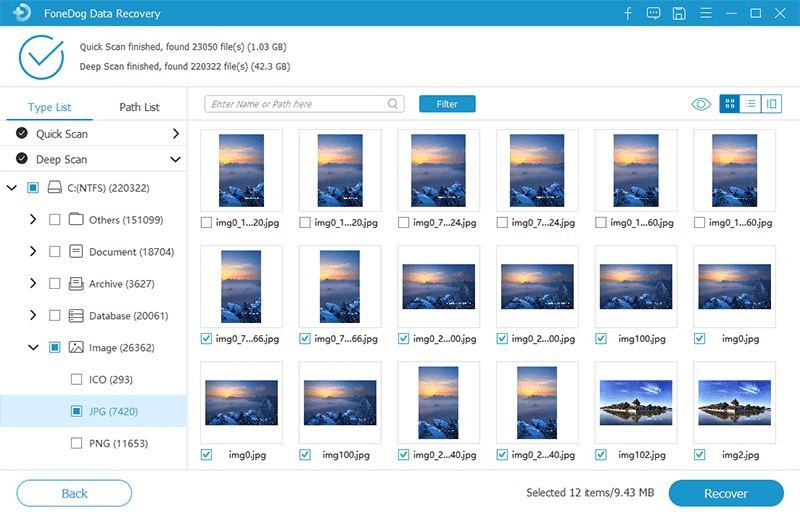
By following these steps, you should be able to pull off Buffalo data recovery easily. Regardless, there’s no guarantee that you’ll be able to completely recover all files. For that reason, to avoid any problems later on, we suggest creating a backup of your hard drive. This leads us to our next and last topic.
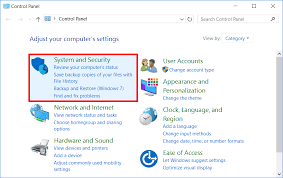
To create a backup for your Buffalo hard drive for future uses, we will need to create a system image for that hard drive. It’s not that difficult, but it’s only not too simple. Without further ado, here are the steps to prepare a backup system image for Buffalo data recoveryuses later on:
At last, you should be able to create a backup easily. Now in the case of data loss, you can do Buffalo data to recoveryby heading to the same Backup & Restore window and selecting the restore file you created. That’s pretty much everything you need to know about creating a backup.
People Also ReadGuide: Know About Outlook Email Recovery Software Free DownloadHow to Fix When Your SSD Not Showing Up In Disk Management
Data loss is not only common, but it also doesn’t discriminate. That’s why even popular brands will suffer from the same fate others are having. We’ve discussed everything you need to know about Buffalo data recovery, but that doesn’t make you eligible to neglect your files. So to top it all off, make sure to take proper countermeasures like creating a backup.
Leave a Comment
Comment

Technical Expertise for PC/Website Optimization
One of my passion is to develop software of my own
I write articles to share knowledge about IT technology and some experience in developing my own software, and developing my own software is one of my passions for work.
Data Recovery
FoneDog Data Recovery recovers the deleted photos, videos, audios, emails, and more from your Windows, Mac, hard drive, memory card, flash drive, etc.
Free Download Free DownloadHot Articles
 /
/
INTERESTINGDULL
/
SIMPLEDIFFICULT
Thank you! Here' re your choices:
Excellent
Rating: 4.7 / 5 (based on 91 ratings)
