FoneDog Screen Recorder
FoneDog Screen Recorder
Special Offer
Special Offer


By Adela D. Louie, Last updated: October 19, 2019
Having a data error cyclic redundancy check is one reason as to why you will not be able to access any files that you have on your hard drive. And with that, you might be getting an error which tells you that you cannot access your drive due to an error. And having this error can keep you from finishing any task that needs to be done by you.
And since you have so much important data stored on your hard drive or to those external hard drives that you have lost access with, you might first think of a way on how you can fix the data error cyclic redundancy check.
That is why in this post, we are going to show ways on how you can fix the data error cyclic redundancy check for you to gain access on your files from your hard drive.
Part 1: Getting to Know the Data Error Cyclic Redundancy CheckPart 2: How Can You Fix Data Error Cyclic Redundancy Check?Part 3: Conclusion
Before we proceed with the solutions on how to fix the cyclic redundancy error, let us first go ahead and know more about it. After all, it will not harm you to know what the error is before you can fix it, right?
The cyclic redundancy check or also known as the CRC is said to be as an error which is commonly experienced by those in the digital world such as in networks or in storage devices for it to be able to see any changes to your data.
The CRC or cyclic redundancy check is the one responsible for doing a data verification way for it to be able to see any accuracy of all of the data that you have on your hard drive, DVDs, CDs, and other means of external storage.
What Does the Cyclic Redundancy Check Error Mean?
Once that there is something wrong with the media on the hard disk that you have, then that is the time that you will experience getting the CRC error. There are also some other reasons as to why you can get the cyclic redundancy check error and one example of which is having a corruption on the registry. Another reason is because of a failed installation on the program, files that are not configured, and a hard disk that is cluttered.
Aside from the fact that the data error cyclic redundancy error check does not allow you to access any of your files from your hard drive, it can also become a reason for it to start a system failure on your computer. Aside from that, it can also be a reason for any data loss on your hard drive.
And because of this, it an immediate solution that you try and fix this error. And with that, we are going to show you ways on how you can fix the cyclic redundancy error.
Before you go ahead and do the fix for the data error cyclic redundancy check, you may want to do a recovery process from your external hard drive, disk, or from your SD card. This way, you will be able to make sure that you will still be getting all of the important files in case something might happen to your device.
So with that, we have the FoneDog Data Recovery. This program will allow you to recover any lost data and that it can support to recover your photos, videos, emails, audios, and documents from the hard drive that you can no longer have access.
So for you to know how the FoneDog Data Recovery works, here is a quick and easy tutorial that you can follow to restore your data from your hard drive or your memory card that gives you the cyclic redundancy check error.
You can get the FoneDog Data Recovery tool from the FoneDog website and have it installed on your Windows computer.
Then, go ahead and open up the FoneDog Data Recovery tool on your computer. And from there, you can go ahead and choose the type of data and the hard disk drive that you would like to recover. After that, go ahead and click on the Scan button.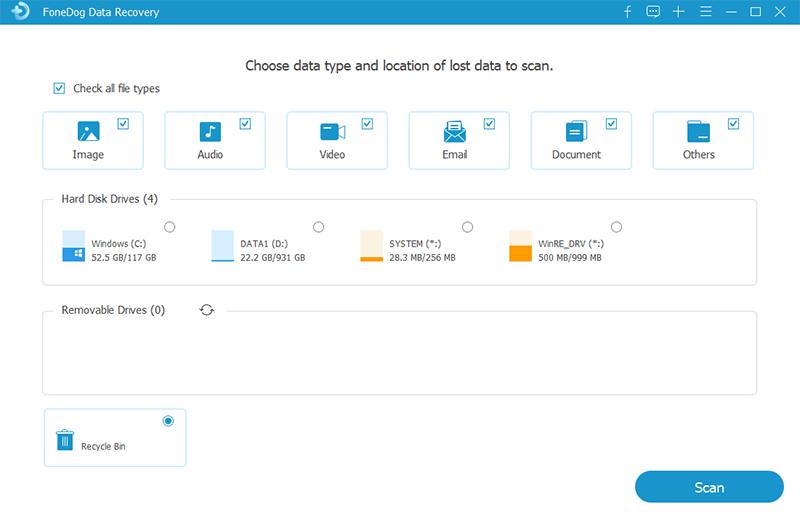
NOTE: In case you would like to restore some data that is from your SD card or your hard drive, then all you need to do is to link your device to your PC. From there, the FoneDog Data Recovery tool will then be able to scan your device.
When you do a scanning process, there are two options that you can choose from. A “Quick Scan” wherein the tool will do a quick scan and finishes faster. The other one is the “Deep Scan” wherein you can do is in case that you get more of your data. However, this can take a longer time.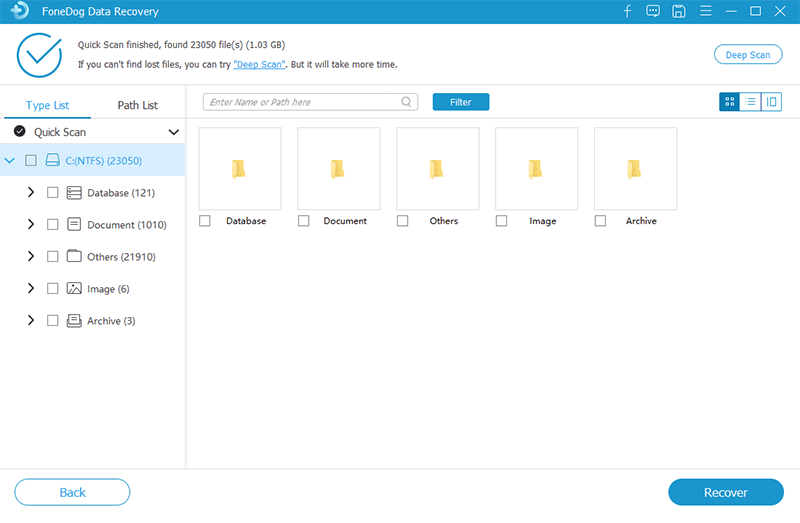
And once that you are done with the scanning process, all of the results will then be shown on your screen under the Path List and the Types List.
Then, all of the lost data that you have from the hard drive that has a cyclic redundancy check error will appear on your screen. So all you need to from here is to select on those data that you would like to recover. And once done, go ahead and click on the Recover button for you to get your data and save it to somewhere you like.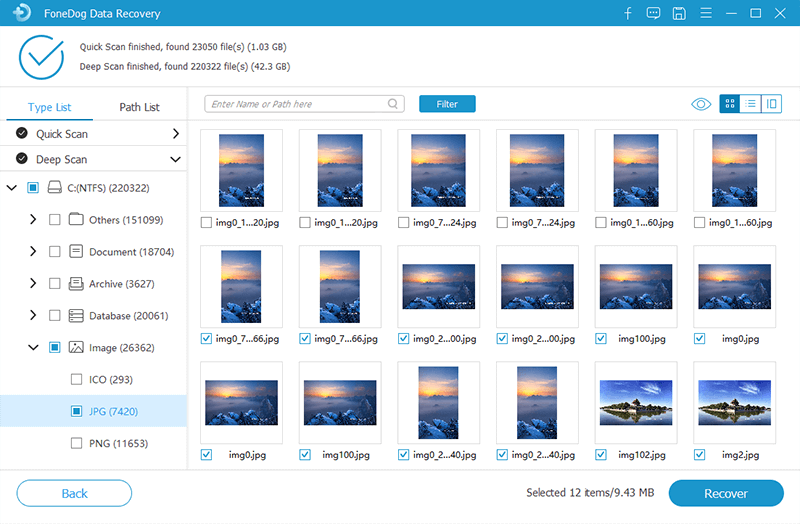
Using the CHKDSK in a Windows computer, you will be able to have a scan and at the same time repair any error in your drive or any corrupted file that causes you to have a cyclic redundancy error. So for you to do this method, here is what you will be needing to do.
Step 1: Go ahead and launch the Command Prompt by searching it using the Start button menu. From here, you have to make sure that the CHKDSK is run as your administrator for you to perform a scan. So you have to right-click on the Command Prompt and then click on “Run as Administrator” option.
Step 2: After that, go ahead and key in CHKDSK X: /f from the Command Prompt. Here, all you need to do is to replace the “X” with the name of your hard drive that you want to scan.
Step 3: Once that the scanning process is done, the CHKDSK will then show you details and then will have your computer restart.
Aside from the method above for CHKDSK, there is one alternative way on how you can do this.
Step 1: Go ahead and right-click on the drive that you are having problems with and then click on the “Properties” button. After that, go ahead and click on the “Tool” tab and then click on the “Check Now” button.
Step 2: And then, you will be given with a two check disk option. The first option is “Automatically fix file system error” wherein it will run a basic scan and can only take up to 20 minutes. The other option, however, will take you hours to scan it. So from there, you can just choose which option would you like to run.
Step 3: Once that you run the CHKDSK for you to repair your drive, it will not start to scan right away. Thus, you need to restart your PC for you to have the CHKDSK begin the scanning process.
Fix #3: Fix the Dara Error Cyclic Redundancy Check on a DVD
Before you go ahead and fix the data error cyclic redundancy check on a DVD device, you first have to make sure that the DVD you are trying to fix does not have any damages or any scratches. Also, you have to make sure that you have cleaned any dust that is on the DVD using a cleaning tool.
So, for you to fix the data error cyclic redundancy check on a DVD, here is what you will be needing to do.
Step 1: Go ahead and run the System Configuration. From there, go ahead and right-click on the Start button and then select on Run. After that, enter “MSConfig” for you to launch it.
Step 2: And then, go ahead and click on the Service tab and then select from there the Disable All for you to turn off all of the services you see on your screen.
Step 3: Another thing that you need to do is to disable all of the startup items.
Step 4: After that, go ahead and restart your PC and then put your computer into safe mode.
Step 5: And once that your computer is in safe mode, go ahead and insert your DVD to your PC. Then goa head and choose “This PC”, launch your disk, and then right-click on the SETUP.EXE and have it run as Administrator.
Step 6: Lastly, go ahead and complete the installation process and then reboot your computer. Once that your computer is back on, go ahead and try to open your DVD and check if you are still able to have the cyclic redundancy check error.
The Windows system files come with a hard drive, configuration files, DDL files, and several files that consist of the Windows registry. And as what we have said earlier, having a registry corruption can become the reason for getting the data error cyclic redundancy check on your PC. So it is a good option for you to repair the missing and the corrupted files that you have on your computer.
Just go ahead and follow the steps below to do so.
Step 1; Go ahead and hit on the Start button and then key in cmd.
Step 2: After that, right-click on the Command Prompt and then select the Run as Administrator option.
Step 3: If in case that you have the Windows 10 computer, you have to run the DISM.exe first for you to have your computer protect the data that you have: DISM.exe/Online/Cleanup-image/Restorehealth
Step 4: Once that you are done with the DISM, go ahead and enter this command for you to begin to scan and at the same time repair the system files: SFC /Scannow
So, as you can see, having the data error cyclic redundancy check can prevent you from doing several things from your computer. And this includes getting to access those important files that you have from your hard drive, SD card, DVD, and other external storage devices that you are using. So with that, you have to make sure that you immediately repair this error.
And once that you were able to have this problem fixed, then you will be able to have access on your hard drive and other external storage devices that you have. And when it comes to solutions that you can do, you can choose from all of the fixes that we have shown you above. Depending on the device that you want to fix with the error, we surely have the right solution for you.
One more thing, before you go ahead and process the method wherein you are going to fix the data error cyclic redundancy check on your computer, you have to make sure that you use the FoneDog Data Recovery first. This way, you will be able to recover any data that you have lost on your hard drive, SD card, and another external storage device that you are using. This tool will help you get back those data that you need in no time and the safest, and easiest way.
Leave a Comment
Comment

Tech Website Writing /Content Optimization
Singing, smiling, surprising every day!
So as a technical writer, it is my duty to gather effective and reliable solutions to answer questions on how to deal with the issues they are having with their devices.
Data Recovery
FoneDog Data Recovery recovers the deleted photos, videos, audios, emails, and more from your Windows, Mac, hard drive, memory card, flash drive, etc.
Free Download Free DownloadHot Articles
 /
/
INTERESTINGDULL
/
SIMPLEDIFFICULT
Thank you! Here' re your choices:
Excellent
Rating: 4.8 / 5 (based on 97 ratings)
