FoneDog Screen Recorder
FoneDog Screen Recorder
Special Offer
Special Offer


By Adela D. Louie, Last updated: November 25, 2021
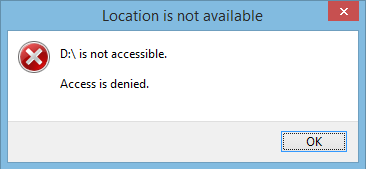
Have trouble with your windows computer? Are you not able to access your drive and is giving you an error message that says your access to your drive is denied? If so, then we are going to show you some solutions on how you can fix when the drive is not accessible, access is denied in Windows occur.
When you are unable to access some folder on your PC, it is annoying, but when you get those access denied notice from your hard drive, that looks much scarier. But do not worry because when this happens to you, you will be able to solve this in no time. Why? Because this kind of issue is one of the most common issues that you will experience with your windows computer. And that is what we are going to show you in this post.
Part 1. Need to Know Facts When Drive is Not Accessible, Access Denied in Windows Part 2. How to Fix Drive is Not Accessible, Access is Denied on Windows Part 3. The Best Way to Recover Lost Data on Computer Part 4. Conclusion
Now, before we go ahead and show you some solutions to fix the problem, here are some good-to-know facts about when the drive is not accessible. This might help you as well in understanding the problem and solving them.
When you receive an error that says our drive is not accessible, access is denied in windows, this indicated that there is something wrong with the hard drive of your computer. And in some worst cases, this could cause your data to get lost from your hard drive.
And this problem happens in any type of situation and can also happen in different types of the operating system. And when this happens, it only means that the data stored on your drive is somewhat corrupted.
And with all these being said, we have indicated below some solutions that you can do on your windows computer in order for you to solve this problem. Go ahead and try to apply them for you to fix the problem.
Now that you have known the basic things you need to know when you get such errors, here are now some fixes that you can do on your windows to fix it.
If you are using a Windows 10 computer, here are the steps that you should follow.
If you are using a Windows 7 computer, then here are the steps that you need to follow.
And in case that you cannot access files on your Windows 7 computer drive, then here are the steps to fix it.
And in case that the drive is still not accessible, here is another alternative that you can do on your Windows 7 computer.
The drive is not accessible, access is denied in Window problem could happen even if you are using a Windows Vista computer. And if that happens, here are the steps that you should follow for you to fix it.
In this case, you will be needing to get the encryption key for Windows Vista wherein the EFS or Encrypting File System is not supported. And once that you have done this, just go through the steps below.
If the drive is not accessible, access is denied in Windows problem happens to you and you are using a Windows XP computer, then here are the things that you need to do. But, you have to remember that changing the version of your operating system, also changes the Security ID of its user. Here are the steps below on how you can do this.
Now, as we have mentioned earlier, in a situation like the drive is not accessible, access is denied in Windows, there is a possibility that your data on your computer might get lost because of the error happening. That is why we are going to introduce to you one of the best software that you can use in order for you to get back your precious data. And that is no other than the FoneDog Data Recovery.
The FoneDog Data Recovery is software that will help you get back the data that you lost such as your files, videos, photos, and so much more. By using the FoneDog Data Recovery, you will be able to get back your lost data from different hardware such as your memory card, hard drive, flash drive, and even from the trash bin.
You can easily restore data after a factory reset on your PC. And the great part of this is that you will be able to use the FoneDog Data Recovery on both a Mac and Windows computer.
Now, since you have lost your data from the hard drive of your Windows computer, then the FoneDog Data Recovery is the best tool you can use. And with that, here is a quick guide that you can follow.
First is of course, you have to download the FoneDog Data Recovery on your Windows computer. And then, have it installed as well.
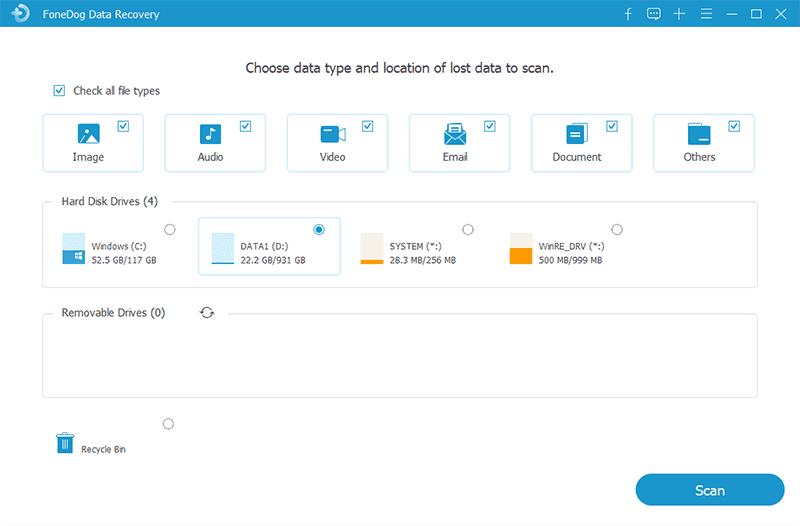
Once that you have installed the FoneDog Data Recovery, launch the program so you can begin on using it. On the main page of the program, the FoneDog Data Recovery will ask you to choose the type of data that you wish to recover and its last location. Choose any type of data you want from the given choices and on the storage, simply click on the hard drive that you are not able to access earlier.
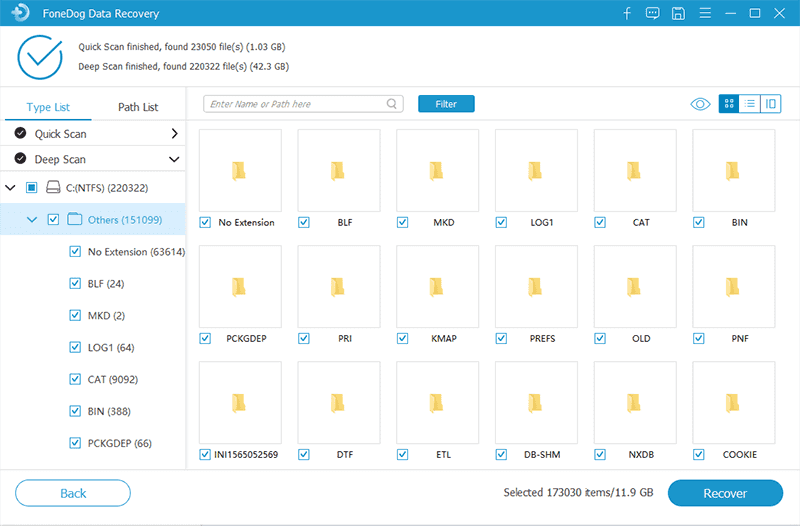
Once that you have chosen the data and the storage where you want to recover it, the FoneDog Data Recovery will ask you to process a scan. Here, all you need to do is to click on the Scan button. The program comes with two ways of scanning. One is the quick scan and the other one is the deep scan. Choose either of the two-scanning methods. However, if you choose the deep scan process, this will take some time.
Once that the scanning process is complete, The FoneDog Data Recovery will show you all of the deleted items from your hard drive. From there, all you need to do is to preview the files on your screen and then choose which of them that you would like to recover and click on them.
Once that you are done choosing the files you want to get back, just go ahead and click on the Recover button at the bottom of your screen. Here, all you need to do is to wait for the process to complete.
As you can see, when you receive an error that says your drive is not accessible, access is denied on Windows, there are a lot of ways on how you can fix it. Depending on the operating system of your Windows computer, you can choose to follow the easy solutions that we have shown you above.
And since that losing data is one downside when you have this error, we have highly recommended that you make use of the FoneDog Data Recovery. This is one safe and easy software that you can use in order for you to get back those files that you have lost during the process of fixing the error. This has been proven and tested by many users and they were successful in getting those lost data back to their Windows computer in no time.
People Also ReadWhere And How Can I Find The Tools Menu on Windows 10?A Complete Guide About the Seagate Data Recovery Software
Leave a Comment
Comment

Tech Website Writing /Content Optimization
Singing, smiling, surprising every day!
So as a technical writer, it is my duty to gather effective and reliable solutions to answer questions on how to deal with the issues they are having with their devices.
Data Recovery
FoneDog Data Recovery recovers the deleted photos, videos, audios, emails, and more from your Windows, Mac, hard drive, memory card, flash drive, etc.
Free Download Free DownloadHot Articles
 /
/
INTERESTINGDULL
/
SIMPLEDIFFICULT
Thank you! Here' re your choices:
Excellent
Rating: 4.6 / 5 (based on 70 ratings)
