FoneDog Screen Recorder
FoneDog Screen Recorder
Special Offer
Special Offer


By Nathan E. Malpass, Last updated: July 14, 2025
In our digital age, we capture countless memories with our Mac cameras, freezing moments in time with a single click. But what happens when those cherished photos mysteriously vanish, leaving you with a sense of loss? The good news is that all hope is not lost, and you don't need to break the bank to recover these invaluable snapshots.
In this article, we will explore the world of free Mac camera photo recovery methods, shedding light on the tools and techniques that can help you retrieve your lost photos without draining your wallet. Whether you're dealing with accidental deletions, formatting mishaps, or other unexpected photo loss scenarios, we've got you covered. Let's embark on a journey to unlock and preserve your precious memories, one pixel at a time.
Part 1. How to Recover Camera Photo Files on MacPart 2. The Best Tool to Recover Camera Photo Files on MacPart 3. Conclusion
One of the simplest yet often overlooked methods for recovering deleted photos on your Mac camera is checking the Trash. When you delete photos, they are not immediately removed from your system; instead, they are moved to the Trash, where they can be easily restored. Here's how to do it:
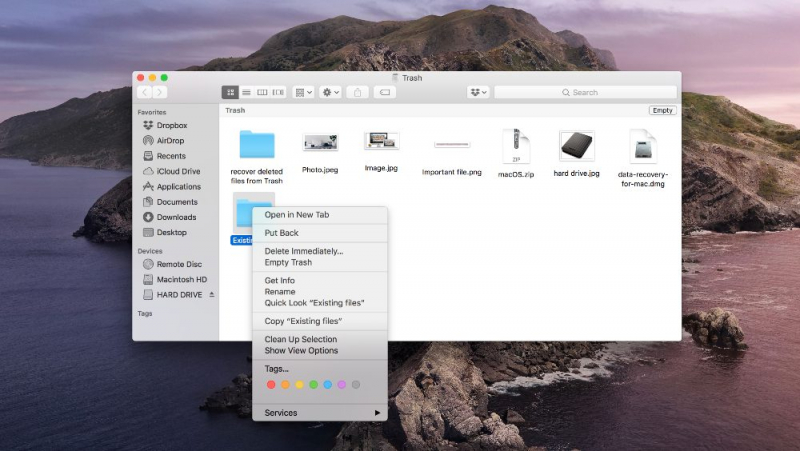
Caution: If you've emptied the Trash since deleting the photos or they've been in the Trash for too long, this method may not work. However, for recent deletions, it's a quick and easy way to recover your photos without the need for any special software.
In the following methods, we'll explore additional techniques and tools for Mac camera photo recovery, including using Time Machine, utilizing built-in macOS features, and employing third-party software to ensure the best chances of recovering your precious memories.
Time Machine is a powerful built-in feature on Mac that serves as a reliable backup and recovery tool. If you have been consistently using Time Machine to back up your Mac, there's a good chance you can retrieve deleted photos. Here's how to do it:
Time Machine allows you to recover not only deleted photos but also previous versions of files, making it an excellent tool for safeguarding your data.
Remember that the effectiveness of this method depends on how regularly you back up your Mac using Time Machine. If you haven't been backing up your Mac, it might not be able to recover your deleted photos. In such cases, you may want to explore other methods or consider setting up regular backups to prevent future data loss.
Using the Terminal can be an advanced method to recover deleted photos on your Mac camera. This method is only recommended if you are comfortable with command-line operations. Here's how you can use the Terminal to attempt photo recovery:
cd ~/.Trash
ls
mv filename newlocation
For instance:
mv myphoto.jpg ~/Pictures
This command moves "myphoto.jpg" to your Pictures folder.
This method can be powerful, but it also requires precision to avoid potential errors. Be cautious when using the Terminal, as any incorrect commands could lead to data loss or unintended consequences. If you are not comfortable with the command line, it's recommended to explore the previous methods mentioned in this article or seek assistance from someone who is experienced with Terminal commands.
If you've used an SD card or an external hard drive with your Mac camera to store photos, it's important to check these external storage devices for photo recovery. Sometimes, the photos you're looking for may not be deleted from the camera itself but rather from the external storage. Here's how to proceed:
Always double-check the Trash on your external storage device as well, as deleted files may still be recoverable from there.
If you're dealing with an SD card, remember to properly eject it from your computer before removing it physically. Avoid using the card until you've successfully recovered your photos to prevent data overwriting or corruption. Additionally, consider making backups of your photos to prevent future loss.
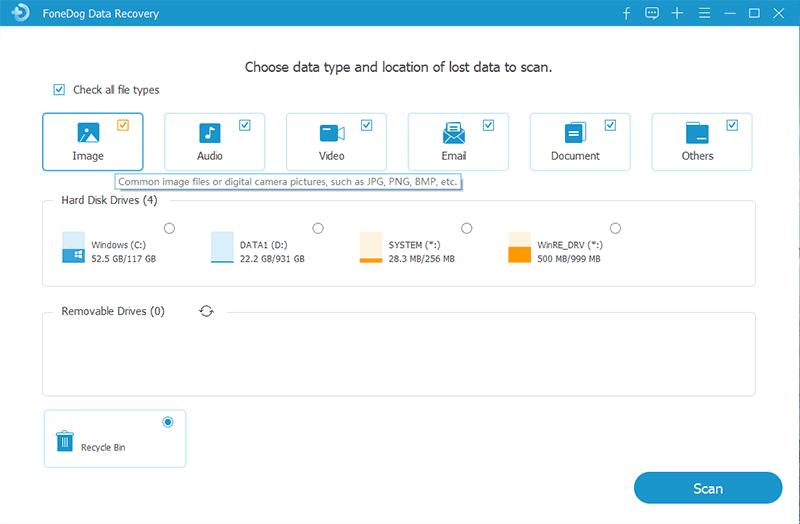
Are you in need of a comprehensive solution to recover lost or deleted photos from your Mac camera? Look no further than FoneDog Data Recovery, a reliable and efficient tool that can help you retrieve your precious memories with ease. In this section, we will provide an overview of FoneDog Data Recovery, step-by-step instructions on how to use it, and its key features that make it the best choice for free Mac camera photo recovery.
FoneDog Data Recovery is a powerful and user-friendly software designed to help Mac users recover lost or deleted photos from various storage devices, including internal and external hard drives, SD cards, USB drives, and more. Not only camera photo files, FoneDog can also do music recovery. It is known for its high success rate and versatility, making it an excellent choice for Mac camera photo recovery.
FoneDog Data Recovery is your go-to solution for free Mac camera photo recovery, offering a user-friendly experience, a high success rate, and a wide array of features to ensure that your lost photos are retrieved with ease and precision. Don't let your memories slip away; recover them with FoneDog Data Recovery.
In the digital age, our Mac cameras have become the custodians of our cherished memories. Whether it's snapshots of special occasions, scenic landscapes, or candid moments with loved ones, losing these photos can be heartbreaking. However, with the right tools and methods, you can often recover those lost or deleted photos without breaking the bank.
This article has explored several free Mac camera photo recovery methods, each offering a unique approach to help you retrieve your valuable images. We've covered checking the Trash for recently deleted photos, utilizing macOS's Time Machine for backups, using the Terminal for advanced users, and inspecting external storage devices like SD cards and external hard drives.
For those who seek a comprehensive and user-friendly solution, we introduced FoneDog Data Recovery as a standout tool. This software offers a high success rate, wide compatibility, and a secure approach to photo recovery. FoneDog Data Recovery streamlines the process, making it accessible to both beginners and advanced users.
Whether you choose a method discussed in this article or opt for specialized software like FoneDog Data Recovery, the key takeaway is that your lost photos are not necessarily lost forever. With the right knowledge and tools, you can often bring your memories back to life. So, don't despair when faced with missing photos on your Mac camera; instead, follow these methods to recover those valuable images and continue to treasure your life's moments.
Leave a Comment
Comment

iPhone/Android Devices’ Maintenance Expert
Staying home, listening to music, writing tech articles
Many people asked me to repair their mobile phones so I have a lot of experience in mobile phone repair, and I know a lot about Android or Apple phones.
Data Recovery
FoneDog Data Recovery recovers the deleted photos, videos, audios, emails, and more from your Windows, Mac, hard drive, memory card, flash drive, etc.
Free Download Free DownloadHot Articles
 /
/
INTERESTINGDULL
/
SIMPLEDIFFICULT
Thank you! Here' re your choices:
Excellent
Rating: 4.6 / 5 (based on 107 ratings)
